What to Consider Before Having Your Suspended Ceiling Repaired

A damaged ceiling is easy to ignore—until it isn’t. What starts as a small water stain or a slightly sagging tile can quietly worsen over weeks, eventually becoming a costly structural problem or even a safety hazard. Suspended ceilings, sometimes called drop ceilings, are built to be durable, but they’re not immune to wear, water, and time.

Before calling a contractor or picking up a toolkit, there are several things worth thinking through. Knowing what to look for, what questions to ask, and what repairs actually involve will help you make smarter decisions—and avoid unnecessary expenses.

Call 317-269-7319 for Suspended Ceiling Repair in Indianapolis

Recognizing the Signs Your Suspended Ceiling Needs Attention

Not all ceiling damage is obvious. Some problems reveal themselves gradually, and catching them early is always cheaper than dealing with them later.

Visible Damage: Cracks, Sags, and Stains

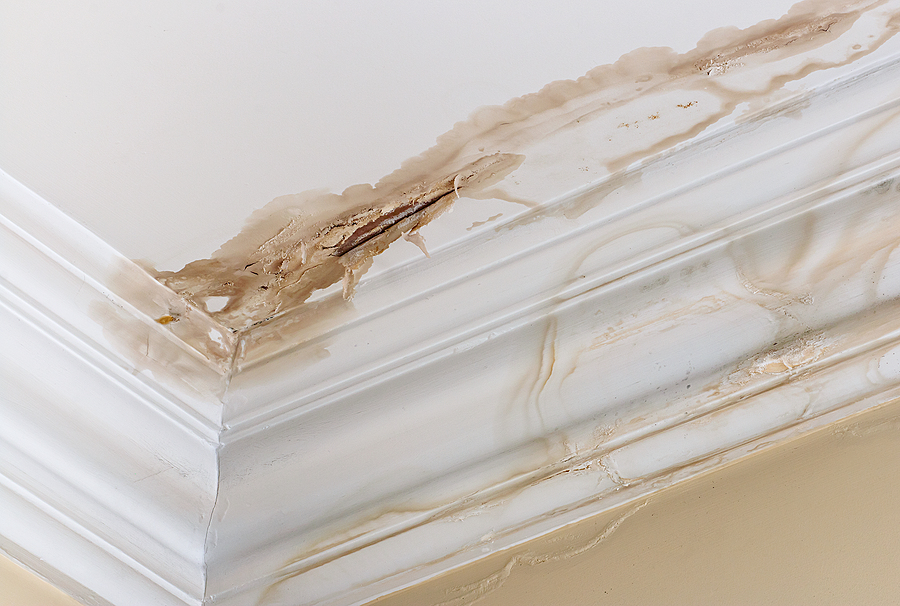
The most common signs of a troubled suspended ceiling are visible ones. Cracked or chipped tiles, water stains spreading across panels, and sagging sections of the grid are all signals that something needs attention.

Water stains are particularly important not to dismiss. Left untreated, moisture can seep into the grid system and surrounding materials, causing more extensive (and expensive) damage. A sagging grid, meanwhile, is more than an eyesore—it can indicate a structural weakness that poses real safety risks.

Functional Issues: Acoustic and Insulation Problems

Suspended ceilings do more than just look good. They play an active role in acoustics, insulation, and even airflow. If you’ve noticed your space feels noisier, drafty, or less energy-efficient than it used to be, the ceiling could be contributing to the problem.

Damaged or misaligned tiles disrupt the acoustic properties of a room. Similarly, compromised ceiling panels can reduce a building’s insulation efficiency, leading to higher energy bills over time.

Age and Wear: The Lifespan of Suspended Ceilings

Suspended ceilings generally last 25 years or more, though their exact lifespan depends on the materials used and how well they’ve been maintained. If your ceiling is approaching or past that mark, even minor damage may be a sign that the system as a whole needs a closer look—or a full replacement.

Assessing the Damage: DIY vs. Professional Evaluation

Once you’ve spotted an issue, the next question is how to assess it properly.

Basic Inspections You Can Perform

A visual inspection is a reasonable first step. Walk the room and look for stained, cracked, or displaced tiles. Check whether the grid is level and properly aligned. Gently press on tiles near any visible damage to test for softness or moisture. Experts recommend inspecting your suspended ceiling at least twice a year, even when no obvious problems are present—catching small issues early is far less disruptive than managing a larger repair.

When to Call in the Experts

DIY assessment has its limits. If you notice significant grid misalignment, widespread water damage, sagging across multiple sections, or any signs of mold growth, a professional evaluation is the right call.

Ceiling damage can be deceptive. What looks like a modest stain on the surface may indicate much more extensive damage above the ceiling plane—compromised insulation, soaked structural materials, or even rotted framing. A professional drywall contractor uses moisture meters and hands-on inspection to measure what you can’t see, giving you a far more accurate picture of what you’re actually dealing with.

Repair Options: What to Expect

Once the damage is assessed, you’ll have a clearer sense of what kind of repair is needed. Broadly speaking, suspended ceiling repairs fall into three categories.

Minor Repairs: Patching and Panel Replacement

For small cosmetic issues—a cracked tile, a minor stain, a slightly misaligned panel—the repair process is usually straightforward. Individual tiles can be lifted out of the grid and replaced without disturbing the surrounding system. According to Angi (2026), minor ceiling repairs typically cost between $150 and $370, depending on the material and the extent of the damage.

When replacing tiles, matching the size, material, color, and texture of the existing panels is important. If tiles from the original installation are no longer available, replacing multiple panels may be necessary to maintain a consistent look.

Major Repairs: Structural and Water Damage

More serious damage—sagging caused by water intrusion, grid misalignment, or compromised panels across a larger area—requires a more involved drywall repair process. This often means removing damaged materials, drying out affected areas, treating for mold if needed, and replacing sections of the grid along with the panels.

Costs rise significantly at this level. Water damage repairs run approximately $45 to $55 per square foot for labor and materials (Angi, 2026). For moderate damage covering 50 to 100 square feet, expect a total cost somewhere between $1,500 and $4,000. If structural elements like ceiling joists are involved, costs can climb higher still.

It’s also worth remembering that repairing the ceiling itself is only part of the job. The source of the damage—a leaking pipe, a roof problem, an HVAC issue—must be addressed first, or the same damage will simply return.

Full Replacement: When Repairs Aren’t Enough

Sometimes, particularly when damage is widespread or a ceiling system is significantly aged, full replacement is the more practical option. This is especially true when the cost of repeated repairs begins to approach the cost of a new installation, or when the existing grid system is no longer structurally sound.

A professional assessment is the most reliable way to determine whether repair or replacement makes better financial and structural sense for your situation.

Choosing a Repair Professional: Key Considerations

The quality of a suspended ceiling repair depends heavily on who performs it. Here’s what to look for when evaluating contractors.

Experience and Expertise

Suspended ceiling repair requires specific knowledge—not just of the tiles themselves, but of the grid system, underlying structure, and any related systems like lighting or HVAC that interact with the ceiling. Look for contractors with documented experience in ceiling work, not just general handyman services. Ask about past projects similar to yours, and don’t hesitate to request references.

Licensing and Insurance

Any contractor you hire should be properly licensed for the work they’re performing and carry both liability insurance and workers’ compensation coverage. This protects you if something goes wrong during the repair—whether that’s additional property damage or an on-site injury. Reputable contractors will provide proof of coverage without hesitation.

Quotes and Transparency

Get at least three itemized quotes before committing to a contractor. An itemized quote breaks down the cost of labor, materials, and any additional services separately, making it far easier to compare proposals and spot anything that seems inflated or vague.

Be cautious of quotes that come in significantly lower than others—this can indicate cut corners, unlicensed labor, or materials that won’t hold up over time.

Preventing Future Problems: Maintenance Tips

The best ceiling repair is the one you avoid altogether. A few simple habits can significantly extend the life of a suspended ceiling.

Regular Inspections

Inspect your ceiling every three to six months. Look for early signs of damage—water stains, cracks, looseness in the tiles or grid. Catching small problems before they develop into larger ones is the single most effective maintenance strategy available.

Addressing Issues Promptly

When you do spot damage, act quickly. Water damage, in particular, accelerates fast. Drywall begins breaking down within 24 hours of exposure, and mold can begin forming within 48 to 72 hours. A small repair left unattended for a week can become a far more expensive and disruptive project.

Environmental Control

Moisture is the most common enemy of suspended ceilings. Ensure your space has adequate ventilation, keep HVAC systems maintained, and regularly check for leaks in plumbing or roofing above the ceiling plane. Controlling humidity and airflow reduces the risk of moisture-related damage considerably.

FAQ

How much does suspended ceiling repair cost?

Costs vary based on the extent and type of damage. Minor repairs—such as replacing a few tiles or patching small cracks—typically run between $150 and $400. Moderate water damage repairs can cost $1,500 to $4,000, while severe structural damage may reach $5,000 to $15,000 or more. Labor is generally charged at $45 to $90 per square foot or $60 to $90 per hour (Angi, 2026).

How long does suspended ceiling repair take?

Small repairs can be completed in a matter of hours. Repairs involving water damage or grid replacement typically take one to several days. If structural issues are present, the timeline may extend further depending on the scope of work required.

Can I repair a suspended ceiling myself?

Replacing individual tiles or adjusting minor grid issues is generally manageable as a DIY project. However, water damage, structural problems, mold, and significant grid misalignment are best handled by a professional. Improper repairs can worsen structural problems and create safety hazards that cost more to fix in the long run.

Don’t Wait Until Small Problems Become Big Ones

Suspended ceiling repairs handled early are almost always simpler and less expensive than those left to worsen. A proactive approach—regular inspections, prompt attention to damage, and choosing the right professional—will keep your ceiling performing well and your space safe for years to come.

Looking for professional ceiling drywall repair and installation in Indianapolis? Our experienced team at Drywall By Renso is ready to assess your ceiling, explain your options clearly, and deliver quality workmanship you can count on. Request a free estimate today.

Call Now

Related Posts:

Drop Ceiling Repair: Fixing Common Suspended Ceiling Issues
Ceiling Tiles: Pros, Cons & Top Alternatives
Drop Ceilings: What You Need to Know Before You Decide

Local Building Codes: What Every Drywall Project Needs

Drywall installation looks straightforward on the surface. You hang panels, tape the seams, and finish the walls. But beneath that smooth exterior lies a web of local building codes that govern everything from the thickness of your panels to the spacing of your fasteners—and ignoring them can cost you far more than a failed inspection.

Whether you’re finishing a basement, renovating a bathroom, or adding a new room to your home, building codes exist to protect you. They ensure your walls can withstand fire, moisture, and structural stress. Getting them right from the start is the difference between a project that adds value to your home and one that causes expensive headaches down the road.

Drywall Installation Building Codes in Indianapolis

Why Local Building Codes Matter for Drywall Installation

Building codes aren’t arbitrary bureaucratic hurdles. They’re the result of decades of construction experience, safety research, and real-world lessons learned. Local codes, in particular, reflect the specific climate, soil conditions, and structural risks in your area.

The Consequences of Ignoring Building Regulations

Skipping the codes can lead to serious outcomes. Fines, mandatory tear-outs, and project delays are common penalties for non-compliant work. In some jurisdictions, unpermitted work can also complicate your home sale—buyers’ inspectors are trained to spot it. Worse, code violations involving fire-rated or moisture-resistant drywall can create genuine safety risks for your family.

Key Building Codes for Drywall Installation

Fire Safety Regulations and Drywall

Fire safety is one of the most heavily regulated areas of drywall installation, and for good reason.

Fire-Rated Drywall Requirements

Certain areas of your home—garages, utility rooms, and walls adjacent to living spaces—typically require Type X or Type C fire-rated drywall. These panels are engineered to resist the spread of flames for a specified period, giving occupants more time to evacuate in the event of a fire.

Placement and Thickness Rules

Fire-rated drywall is usually required to be at least 5/8 inch thick. Garages that share a wall with living spaces commonly require two layers of drywall on the garage side. Local codes will specify exactly where fire-rated panels are required, so it’s worth checking with your local building department before purchasing materials.

Structural Integrity and Drywall

Drywall contributes more to your home’s structural performance than most homeowners realize.

Load-Bearing Walls and Drywall Installation

On load-bearing walls, the way drywall is attached and oriented matters. Codes typically specify whether panels should run vertically or horizontally, and how they must be anchored to framing to support the wall’s structural role.

Fastener Requirements and Spacing

Screw and nail spacing requirements exist to prevent drywall from buckling, sagging, or pulling away from framing over time. Most codes require fasteners at 8-inch intervals along the edges and 12 inches in the field of the panel. Using the wrong fasteners—or spacing them too far apart—can compromise both aesthetics and structural performance.

Moisture Control and Drywall

Moisture is drywall’s greatest enemy. Codes are designed to keep it at bay.

Moisture-Resistant Drywall in High-Humidity Areas

Bathrooms, kitchens, laundry rooms, and basements typically require moisture-resistant drywall, commonly known as greenboard or cement board. Standard drywall absorbs water, which leads to mold growth, structural degradation, and costly remediation. Using the right product in the right place is not optional—it’s code.

Proper Ventilation and Drywall Longevity

Ventilation requirements go hand-in-hand with moisture control. Even moisture-resistant drywall performs better in a well-ventilated space. Codes may specify exhaust fan requirements for bathrooms and other high-humidity areas to protect your walls long-term.

Permits and Inspections: Essential Steps for Compliance

When Is a Drywall Permit Required?

Permit requirements vary by location, but as a general rule, any project that involves significant structural work, fire-rated assemblies, or changes to the building envelope will require a permit. Basic drywall repair and small patches typically don’t. When in doubt, contact your local building department—it’s always better to ask before you start.

The Drywall Inspection Process

After work is complete, an inspector will visit your property to verify that the installation meets local code requirements. Inspectors check fastener spacing, panel placement, fire-rated assemblies, and moisture-resistant applications. Failing an inspection means correcting the work before the project can be closed out.

Working with Local Authorities

Local building departments are a valuable resource, not an obstacle. They can clarify code requirements, help you understand permit timelines, and flag potential issues before they become expensive problems. A quick phone call or email before your project begins can save significant time and money.

Benefits of Code-Compliant Drywall Installation

Ensuring Safety and Durability

Code-compliant drywall performs as it was designed to. Fire-rated panels slow the spread of flames. Moisture-resistant panels resist mold. Properly fastened panels stay flat and secure for decades. Compliance isn’t just about passing an inspection—it’s about building something that lasts.

Avoiding Fines and Project Delays

Non-compliant work is expensive to correct. Inspectors may require you to remove and reinstall drywall so they can verify what’s behind it. That means additional labor, materials, and time—none of which were in your original budget.

Protecting Your Investment

A home with permitted, code-compliant work is easier to sell and appraise. Unpermitted work can reduce your home’s value, trigger buyer concerns, or even kill a sale during the due diligence process. Doing it right from the start protects the long-term value of your property.

Hiring a Professional: Expertise in Local Regulations

Why Professional Drywallers Know the Codes

Experienced contractors work within local building codes every day. They know which products are required in which areas, how to pull permits efficiently, and how to prepare for inspections. That expertise reduces your risk and speeds up your project.

Questions to Ask Your Drywall Contractor

Before hiring a contractor, ask:

  • Are you licensed and insured in this state?
  • Will you pull the necessary permits for this project?
  • Are you familiar with local fire and moisture-resistance requirements?
  • Have you completed similar projects in this area?

A reputable drywall contractor will answer these questions confidently and transparently.

Frequently Asked Questions

Do all drywall projects need a permit?

Not always. Minor repairs and small patches typically don’t require a permit. However, larger projects—especially those involving structural work, fire-rated assemblies, or new construction—usually do. Check with your local building department to confirm what applies to your project.

What happens if I install drywall without a permit?

Unpermitted work can result in fines, mandatory removal of the installed drywall, and complications when selling your home. In some cases, you may be required to expose the work for inspection before it can be approved retroactively.

How do I find my local building codes for drywall?

Start with your city or county building department’s website. Many jurisdictions publish their adopted codes online. You can also visit the department in person or call them directly—staff are generally happy to point you toward the right documentation.

Build It Right the First Time

Building codes exist to keep your home safe, your investment protected, and your project on the right side of the law. Cutting corners might save a few hours upfront, but the cost of correcting non-compliant work—financially and logistically—almost always exceeds the time saved.

If you’re planning a drywall project in Indianapolis, Indiana, let the professionals handle it. Request a free estimate today and get expert drywall installation that’s fully compliant with local building codes, backed by real experience, and built to last.

Place Your Call Now

Related Posts:

5 Reasons to Hire Pro Drywall Installers
Indiana Drywall Building Codes: Your Quick Guide for New Construction
Unexpected Costs of Drywall Installation: What You Need to Know

The Complete Guide to Green Board Drywall: Facts and Tips

Water damage is one of the most frustrating challenges a homeowner can face. A small leak or simply everyday humidity can quickly break down standard building materials, leaving you with costly repairs and potential health hazards.

Using the right materials in moisture-prone spaces is crucial for maintaining a healthy and structurally sound home. Standard white drywall works perfectly in a dry living room or bedroom, but it quickly falls apart when exposed to damp environments. That is where green board drywall comes into play.

This guide explores the facts, costs, and installation tips for green board drywall. By learning how this material works, you can make informed decisions for your next bathroom remodel, kitchen upgrade, or basement finishing project.

Call 317-269-7319 for Green Board Drywall Installation in Indianapolis

What to Know About Green Board Drywall

Green board drywall, commonly referred to simply as green board, is a specific type of drywall designed to withstand damp conditions. It shares the same solid gypsum core as conventional drywall but features a unique exterior.

What is Green Board Drywall?

Both the front and back paper facings of green board are treated with a special wax coating that repels moisture. The distinct seafoam green color on the front facing serves a very practical purpose. It tells you exactly which side should face outward into the room. It also acts as a visual identifier for building inspectors to confirm that moisture-resistant materials were used in appropriate areas.

Key Features and Benefits

The main benefit of green board is its ability to absorb water slowly without breaking down immediately. Traditional drywall paper easily soaks up moisture, causing the gypsum core to crumble and mold to flourish. The treated paper on green board slows this process down. At a cost of roughly $12 to $18 per standard sheet, it offers a highly cost-effective upgrade over standard drywall in humid spaces.

Advantages of Choosing Green Board Drywall

If you are planning a renovation, knowing exactly why and where to use green board will save you money and headaches in the long run.

Moisture Resistance Explained

A common misconception is that green board is entirely waterproof. It is moisture-resistant, meaning it can handle high humidity and occasional splashes. If it is submerged in standing water or exposed to a continuous, direct stream from a showerhead, the core will eventually break down.

Ideal Applications for Green Board

Because of its specific resistance levels, green board is perfect for certain rooms but inappropriate for others.

Bathrooms and Kitchens

Green board is highly recommended for bathroom walls outside of the immediate shower surround. It works beautifully behind toilets, around vanity sinks, and on ceilings where steam collects. In the kitchen, it serves as an excellent backing behind sinks and dishwashers where occasional water splashes occur.

Basements and Laundry Rooms

Laundry rooms generate a lot of heat and humidity from washers and dryers. Installing green board behind these appliances provides an extra layer of protection. It is also a smart choice for above-grade basement walls in homes with controlled humidity levels.

Preventing Mold and Mildew

Mold requires organic material and moisture to thrive. While the wax coating on green board deters water absorption, it also helps hinder the growth of mold and mildew. This keeps the air quality in your home safer and your walls looking pristine.

Why Professional Installation is Recommended

While it might be tempting to install green board yourself, its unique properties make professional installation the wiser choice.

The Challenges of DIY Installation

Green board is significantly heavier than standard drywall, with a typical half-inch sheet weighing up to 70 pounds. Handling and lifting these boards safely requires at least two people and can be physically demanding, increasing the risk of injury or damage to the material.

Ensuring a Secure and Lasting Fit

Proper installation in moisture-prone areas is critical to prevent future issues. Professional drywall contractors understand the specific requirements for green board, such as using closer screw spacing (every 12 inches) to prevent sagging and applying a setting-type joint compound that hardens properly in damp conditions. These technical details are often overlooked in DIY projects, which can compromise the board’s integrity and moisture-resistant capabilities over time.

The Importance of Correct Finishing

To achieve maximum moisture resistance, green board must be finished correctly. This includes using a high-quality, moisture-resistant primer designed to block water vapor from penetrating the wall. A professional drywaller will have the right materials and expertise to ensure the surface is perfectly sealed before painting, guaranteeing a long-lasting and protective finish that a standard DIY approach might not achieve. Trusting an expert ensures the job is done right the first time, saving you from costly repairs down the road.

Green Board vs. Other Drywall Types

Selecting the best wall material depends entirely on the specific environment of your room.

Comparing with Standard Drywall

Standard drywall costs about 20% less than green board. It is lighter and easier to maneuver, making it the perfect choice for living rooms, bedrooms, and hallways. However, using standard drywall in a damp bathroom guarantees premature failure. The small price increase for green board is a wise investment for high-humidity areas.

When to Use Green Board Over Other Options

Green board sits in the middle ground between standard drywall and fully waterproof materials.

  • Use standard drywall for dry, interior rooms.
  • Use green board for damp areas like laundry rooms, half-bathrooms, and kitchen backsplashes.
  • Use cement board (which contains no organic paper) for direct wet areas, such as the inside of a shower stall or bathtub surround.

Common Questions about Green Board Drywall (FAQ)

Is green board waterproof?

No, it is strictly moisture-resistant. It repels high humidity and minor splashes but will fail if exposed to constant, direct water.

Can green board be used outdoors?

No. Green board has absolutely no resistance to rain or exterior weather conditions. It is manufactured strictly for interior applications.

What is the cost difference?

Green board generally costs about 20% more than standard drywall. A typical sheet of regular drywall runs between $8 and $12, while a sheet of green board costs between $12 and $18.

Ready to Upgrade Your Walls?

Protecting your home from moisture damage starts with choosing the right building materials. By utilizing green board drywall in the appropriate spaces, you can safeguard your bathrooms, kitchens, and basements against humidity and decay.

If you need professional assistance, we are here to help. For expert drywall installation and repair in Indianapolis, Indiana, request a free quote today. Our team will ensure your walls are built to last, providing peace of mind and beautiful results for years to come.

Place Your Call Now

Related Post: The Ultimate Guide to Water-Resistant Drywall

How to Fix Common Residential Garage Drywall Problems

Your garage is often the hardest-working room in your home. It protects your vehicles, stores your heavy tools, and sometimes serves as a makeshift workshop. Because of this heavy daily use, the walls take a significant amount of abuse. Over time, that wear and tear can leave you with a painful reminder of neglected maintenance—damaged, unsightly drywall.

Garage drywall damage is more than just a cosmetic issue. It can compromise the structural integrity of your space, invite unwanted pests, and even pose a safety hazard if fire-resistant barriers are breached. Ignoring these early warning signs often leads to more expensive and extensive repairs down the road.

If you are dealing with sagging panels, strange odors, or mysterious holes, you are not alone. This guide covers the most frequent residential garage drywall problems and offers practical solutions to restore your space. By addressing these issues early, you can protect your home, maintain your property value, and create a safer environment for your family.

Garage Drywall Problems
Call 317-269-7319 for Help With Garage Drywall Problems in Indianapolis

Common Drywall Problems in Residential Garages

Garages are exposed to extreme temperature fluctuations, vehicle exhaust, and heavy physical impacts. This unique environment creates several distinct challenges for standard wall materials.

Moisture Damage and Mold Growth

Moisture is the natural enemy of traditional drywall. Unlike the interior of your home, garages often lack climate control. When warm, humid air meets cold garage walls, condensation forms. Wet cars pulling in after a rainstorm or snow melting off your tires also introduce heavy moisture into the space.

When drywall absorbs this water, it softens, swells, and eventually crumbles. Worse, damp paper backing provides the perfect food source for mold. Signs of mold on garage drywall include dark black or green spots, a persistent musty odor, and unexplained respiratory irritation when you spend time in the space.

Cracks and Holes

Physical damage is almost inevitable in a busy garage. Carelessly opened car doors, falling ladders, and heavy tools can easily puncture standard half-inch drywall.

However, not all cracks come from blunt force. Foundation settling and structural stress can cause long, jagged cracks to appear above doorways or along the seams where drywall panels meet. These structural fissures indicate that your home is shifting, placing stress on the rigid drywall boards.

Pest Infestation

Garages provide excellent shelter for rodents and insects looking to escape harsh weather. Mice and rats can chew right through drywall to build nests in the warm, insulated cavities between your wall studs.

Termites and carpenter ants also pose a severe threat, tunneling through the paper exterior and into the wooden framing behind it. Signs of a pest infestation include small entry holes near the floor, unexplained piles of sawdust, or faint scratching noises coming from inside the walls.

Poor Installation or Finishing

Sometimes, the problem begins the day the drywall is hung. In many new construction projects, builders rush the drywall finishing process. This leads to visible seams, popping screws, and uneven surfaces that only worsen over time.

More importantly, inadequate finishing can be a code violation. For example, walls shared with living spaces require fire-rated drywall (Type X) and proper fire taping to slow the spread of flames. A poorly installed fire barrier compromises the safety of your entire home.

Solutions for Garage Drywall Problems

Fortunately, most drywall issues are entirely fixable. Addressing the root cause is crucial before you attempt to patch or paint over the damage.

Addressing Moisture Issues

To stop moisture from ruining your walls, you must control the humidity in your garage. Start by checking your weatherstripping and garage door seals to keep outside water from seeping in.

Installing a heavy-duty exhaust fan or using a dehumidifier can drastically reduce airborne moisture. If your walls are already water-damaged, the affected drywall must be cut out and replaced to prevent structural rot and stop mold from spreading. Applying a waterproof primer to the new drywall will help repel future condensation.

Repairing Cracks and Holes

Small dents and nail holes can easily be filled with lightweight spackle and sanded smooth. However, impact holes larger than a few inches require a more robust repair.

For large holes, cut the damaged garage drywall back to the nearest wall studs. You will need to attach wooden backer boards to the studs to support the new patch. Once the new piece of drywall is screwed into place, apply joint tape and multiple coats of joint compound to seamlessly blend the repair into the surrounding wall.

Pest Control and Prevention

If pests have breached your walls, patching the holes will not solve the underlying infestation. Rodents will simply chew a new exit.

First, hire a professional exterminator to eliminate the active pests. Once the space is clear, carefully seal all exterior entry points. Use steel wool and heavy-duty caulk to fill gaps around pipes, vents, and the foundation line so critters cannot re-enter the wall cavities.

Professional Drywall Repair and Installation

While patching a tiny hole is a manageable weekend project, large-scale replacements and structural repairs are best left to experts.

Professional drywall contractors ensure that repairs are completely seamless and structurally sound. Furthermore, experts understand local building codes. If you are replacing the wall between your garage and your kitchen, a professional will ensure the required 5/8-inch fire-rated drywall is installed and taped correctly to keep your family safe.

Preventing Future Drywall Damage

Taking proactive steps can protect your newly repaired walls from suffering the same fate. A little preparation goes a long way in preserving your garage interior.

Regular Maintenance Tips

Make it a habit to inspect your garage walls every season. Look for early signs of water stains near the floorboards or tiny cracks around the ceiling. Address small chips and paint peeling immediately before moisture can penetrate the exposed gypsum core. Additionally, keep your garage well-ventilated during wet weather to prevent condensation buildup.

Proper Garage Organization

Clutter leaning against the walls is a primary cause of impact damage. Investing in proper storage solutions gets heavy items off the floor and away from fragile drywall.

Consider installing heavy-duty slatwall panels. These PVC panels mount directly to the wall studs, creating an impact-resistant barrier while providing versatile storage for rakes, shovels, and cords. Overhead storage racks are also excellent for holding seasonal items safely out of the way of car doors and moving vehicles.

Frequently Asked Questions (FAQ)

Can I paint over mold on my garage drywall?

No, you should never paint directly over mold. Paint does not kill mold spores; they will eventually grow right through the fresh coat. The mold must be killed with a specialized cleaner, and severely infested drywall should be completely removed and replaced.

Why do I need special drywall for my garage?

Building codes typically require special fire-rated drywall (often 5/8-inch Type X) on any garage wall that attaches to a living space. This thicker material contains glass fibers that help it withstand fire longer, giving you more time to safely evacuate if a vehicle or chemical fire starts in the garage.

How do I stop cracks from reappearing in the same spot?

Recurring cracks usually indicate movement in the wall framing or foundation. To fix it permanently, you must dig out the old drywall tape, secure the drywall panel with additional screws into the stud, and re-tape the joint using high-quality mesh tape and setting-type joint compound.

Leave your drywall repairs to the experts

Your garage walls do not have to be an eyesore. By quickly identifying moisture issues, fixing impact damage, and organizing your space, you can maintain a clean, safe, and highly functional garage. However, large repairs and code-compliant fire barriers require the precise hand of an experienced professional.

If you need professional garage drywall repair and installation in Indianapolis, Indiana, we are here to help. Our team provides expert finishing, seamless patching, and code-compliant installations tailored to your specific needs. Request a free quote today and let us restore your garage walls to perfection.

Call for a Free Quote

Related Post: How to Choose the Right Drywall for Your Garage

Drop Ceiling Repair: Fixing Common Suspended Ceiling Issues

A sagging or stained drop ceiling can completely change the feel of a room, turning a clean, professional space into one that feels neglected. Suspended ceilings are highly practical, hiding exposed pipes, electrical wires, and ductwork while offering easy access for maintenance. Over time, however, the tiles and grid components can suffer from wear and tear, environmental damage, or structural shifts.

Dealing with a damaged ceiling can feel stressful, especially if you are worried about the underlying causes. Sometimes a discolored tile is simply the result of an old, fixed leak. Other times, it signals an active plumbing problem that needs immediate attention. Knowing how to identify the root cause of these issues is crucial for maintaining the safety and appearance of your building.

This guide covers the most frequent problems you might encounter with a suspended ceiling and offers practical solutions. You will learn how to care for different tile materials, recognize when a problem goes beyond a simple fix, and keep your ceiling looking crisp and well-maintained for years to come.

Common Drop Ceiling Problems

Suspended ceilings consist of a metal grid system and individual tiles. Because these components are lightweight and easily removable, they are susceptible to a variety of specific issues.

Water Damage and Stains

Water leaks are the most frequent cause of damage to drop ceilings. Whether from a leaky roof, a faulty HVAC unit, or a broken pipe, water easily pools on top of the tiles. This leads to unsightly yellow or brown stains. If left untreated, the water will weaken the tile material entirely, causing it to crumble or collapse. Always fix the source of the leak before replacing the damaged tiles, or the problem will simply repeat itself.

Sagging or Bowing Tiles

High humidity levels can cause ceiling tiles to absorb moisture from the air. As they become heavier, they begin to bow or sag in the center. Sagging can also happen if the grid is improperly supported or if the tiles have reached the end of their natural lifespan. Upgrading to moisture-resistant tiles can prevent this issue in damp environments like basements or commercial kitchens.

Cracked or Broken Tiles

Ceiling tiles are fragile and easily damaged during routine maintenance. Plumbers, electricians, or IT technicians lifting the tiles to access the space above can accidentally crack or chip the edges. Once a tile is physically broken, it loses its structural integrity and aesthetic appeal. The simplest fix is to swap the broken tile with a fresh replacement.

Mold and Mildew Growth

When moisture gets trapped in the dark space above a drop ceiling, mold and mildew can quickly develop. You might notice dark spots on the tiles or a musty smell in the room. Mold poses a serious health risk, aggravating allergies and respiratory conditions. Any tiles contaminated with mold should be safely removed and replaced, and the area must be thoroughly ventilated and treated.

Poor Installation Issues

A ceiling grid must be perfectly level and securely anchored. If the hanger wires are spaced incorrectly or the wall moldings are uneven, the entire grid can shift. This causes tiles to fall out of place and the metal framework to bend. Correcting poor grid ceiling installation usually requires leveling the grid and securing new hanger wires to properly support the weight of the system.

Damage from Pests

The void above a suspended ceiling provides a warm, hidden environment for rodents and insects. Mice and rats can chew through tiles, leave droppings, and damage the structural grid. If you notice scratching sounds or physical damage to the tiles, lift them slowly and carefully to check for signs of pests. Eradicate the pest infestation and sanitize the grid before installing new ceiling panels.

Addressing Specific Ceiling Tile Materials

Different materials require specific approaches when it comes to repair and maintenance.

Acoustic Tile Repair

Acoustic ceiling tiles are widely used in commercial applications because they offer excellent sound absorption. They are typically made from mineral fiber or fiberglass. These tiles are highly porous, making them susceptible to water stains and crushing. You cannot simply paint over an acoustic tile to cover a stain, as heavy paint fills the pores and destroys the tile’s sound-dampening qualities. It is best to replace damaged acoustic tiles entirely to maintain the room’s sound quality.

Metal Panel Ceiling Repair

Metal ceiling panels provide a sleek, modern look and are incredibly durable. However, they can suffer from dents, scratches, or rust. For minor dents, you can often pop the metal back into place using gentle pressure. Scratches can be concealed with a specialized touch-up paint that matches the metal finish. If a panel is severely rusted due to a persistent leak, replacing the individual metal tile is the safest option.

Gypsum Board Tile Repair

Gypsum ceiling tiles offer a clean visual design and reliable fire performance. They are sturdier than mineral fiber acoustic tiles and can withstand more handling. Minor chips or scratches on a gypsum tile can sometimes be patched with a small amount of joint compound and lightly sanded. If the board is subjected to heavy water damage, it will soften and crumble, requiring a full replacement.

When to DIY vs. Call a Professional

Swapping out a single water-stained tile is an easy task for most homeowners or facility managers. All you need to do is gently push the tile up, angle it, and slide it out of the grid.

However, major issues require a professional touch. If the metal grid is sagging, hanger wires have snapped, or you suspect structural damage to the ceiling joists above, you should contact a local drywall contractor. Professionals have the tools to level a shifted grid and safely handle complex repairs involving integrated lighting or HVAC vents.

Preventative Maintenance Tips

Keeping your drop ceiling in excellent condition requires a proactive approach. Check your ceiling regularly for early signs of discoloration or slight bowing. Address roof leaks and plumbing issues immediately, as a dry environment is the best defense against ceiling tile damage.

Additionally, control the humidity in your building. Use dehumidifiers in damp areas to keep moisture levels low, preventing tiles from sagging and inhibiting mold growth. When lifting tiles for routine maintenance, use clean hands and handle the edges gently to avoid accidental chips or smudges.

FAQ About Drop Ceiling Repair

Can you paint a water-stained ceiling tile?

While you can physically paint some tiles, it is generally not recommended for acoustic panels. Paint blocks the porous surface, ruining the tile’s ability to absorb sound. Replacement is usually a better, more effective solution.

How do I clean my ceiling tiles?

For regular maintenance, use a soft duster or a vacuum cleaner with a brush attachment to remove dust and cobwebs. Avoid using harsh chemical cleaners or soaking the tiles with water, as this will degrade the material.

What should I do if my ceiling grid is rusting?

Light surface rust can sometimes be sanded off and touched up with rust-inhibiting paint. However, if the rust has eaten through the metal grid, those specific cross tees or main runners must be replaced to prevent the ceiling from collapsing.

Restore Your Ceiling to Perfect Condition

A well-maintained suspended ceiling contributes to a clean, healthy, and visually appealing environment. By addressing minor stains, cracks, and sagging tiles early on, you can prevent small inconveniences from turning into costly structural repairs. Always prioritize finding and fixing the root cause of the damage, whether it is a hidden water leak, poor ventilation, or an uneven grid.

If you are dealing with a damaged grid, persistent mold, or complex installation issues, professional help ensures the job is done safely and correctly. For expert suspended ceiling repair and installation in Indianapolis, Indiana, request a free quote today.

Call Now

Related Post: Drop Ceilings: What You Need to Know Before You Decide

Restoring Walls After Water Damage: DIY vs Expert Repair

A burst pipe or a flooded basement leaves behind a stressful mess, but the real trouble often hides inside your walls long after the floors are dry. Drywall acts like a sponge, pulling moisture upward and retaining it inside the gypsum core.

Attempting to patch up the damage yourself might seem like an easy way to save money. However, improper repair can lead to severe structural problems and hidden health hazards that threaten your family.

This guide explains why replacing water-damaged drywall requires professional expertise. You will learn how to identify hidden moisture risks, avoid common pitfalls, and protect your Indianapolis home from long-term consequences.

Call 317-269-7319 for Professional Drywall Installation in Indianapolis Indiana

Assessing Water Damage: Beyond the Surface

Water travels quickly through building materials. Even when the outside of your wall feels dry to the touch, moisture can still linger deep within the structure.

The Invisible Threat: Mold and Mildew Growth

Time is your biggest enemy when dealing with moisture. According to the EPA, mold can begin to grow on damp surfaces within 24 to 48 hours. Indianapolis experiences fluctuating humidity levels, which makes completely drying out a wall cavity incredibly difficult without specialized equipment. If your drywall has been wet for longer than two days, mold growth is highly likely. Disturbing this material without proper containment can release harmful spores into your home’s air supply.

Structural Integrity: Compromised Drywall

Drywall loses its structural strength rapidly when wet. You can often feel the damage by gently pressing on the affected area. If the wall feels soft, spongy, or leaves an indentation, the gypsum core has dissolved. The Federal Emergency Management Agency (FEMA) generally recommends removing drywall at least 12 inches above the highest water line. Wet insulation behind the wall must also be completely removed to prevent the wooden studs from rotting.

The Complexities of Drywall Replacement: Why It’s Not a Simple Fix

In an era of endless internet tutorials, tearing down a wall looks easy. The reality of water damage remediation involves complexities that go far beyond cutting a square hole.

Precision Matters: Cutting and Fitting New Drywall

Removing the exact right amount of drywall requires skill. You have to locate the studs, cut clean lines, and ensure you do not accidentally sever hidden electrical wires or plumbing pipes. Fitting the new panels requires exact measurements so that the new piece sits perfectly flush with the existing wall.

Taping, Mudding, and Sanding: A Skillful Art

Blending a new piece of drywall into an old wall takes years of practice. Taping the joints, applying the joint compound (mud), and sanding it down smoothly is a highly precise process. A lack of experience easily results in visible seams, uneven patches, and bumpy textures that draw the eye straight to the repair.

DIY Drywall Repair: Hidden Costs and Potential Pitfalls

Taking on a home improvement project can be rewarding, but repairing water damage comes with high stakes. Doing it yourself often leads to unexpected headaches.

Time and Effort: More Than You Bargained For

Applying joint compound requires multiple coats. Each layer must dry completely before you can sand it and apply the next. This process can drag on for days, leaving your living space covered in fine white dust and in a state of disarray.

Tools and Materials: Unexpected Expenses

DIY repairs require specific drywalling tools. You will need drywall knives, specialized tape, sanding blocks, mud pans, and the drywall itself. You also need heavy-duty plastic sheeting for containment and personal protective equipment to keep yourself safe from mold and old construction materials. These expenses add up quickly, cutting into the money you hoped to save.

Substandard Results: Impact on Home Value

A poor drywall repair job is impossible to hide. Uneven walls and visible seams detract from the beauty of your rooms and can negatively influence your home’s market value. Furthermore, failing to completely dry the structural wood behind the drywall will lead to ongoing rot and recurrent mold issues, costing you far more money in the long run.

The Professional Advantage: Seamless Drywall Installation and Lasting Results

Hiring a professional contractor protects your investment and your peace of mind. Skilled experts bring the right tools and years of hands-on experience to every job.

Expertise and Experience: The Mark of a Pro

Professional restoration teams know how to safely handle hazardous materials. They set up proper containment zones with negative air pressure to stop mold spores from spreading into your HVAC system. They also use advanced moisture meters to verify that the wooden studs are completely dry before putting up new walls.

Efficiency and Quality: A Flawless Finish

A seasoned Indianapolis drywall contractor works efficiently. They know exactly how to mix the mud, apply the tape, and feather the edges so the patch becomes completely invisible. The result is a high-quality finish that seamlessly integrates with your existing wall structure.

Preventing Future Issues: Long-Term Solutions

Professionals solve the root of the problem. By ensuring all moisture is eradicated and the structural integrity is sound, they prevent secondary damage like warping and persistent odors. This level of thoroughness provides lasting results that keep your home safe.

Choosing the Right Professional for Water Damage Drywall Repair in Indianapolis

Finding a reliable contractor ensures your home is restored correctly. You need a team that understands both drywall finishing and moisture remediation.

What to Look For in a Drywall Contractor

Look for a company that is fully licensed and carries liability insurance. This protects you in case of any accidental damage during the project. It is also beneficial to find professionals holding certifications for water damage restoration, as they understand the science of structural drying.

Questions to Ask Before Hiring

Always vet your contractors carefully. Ask them the following questions:

  • How do you test for hidden moisture behind the walls?
  • What is your process for containing mold and dust?
  • Will you handle any necessary local building permits?
  • Do you provide a warranty for the finished repair?

FAQS About Water-Damaged Drywall

Can water-damaged drywall just dry out and be saved?

If clean water touches drywall for a very short period, it can sometimes be dried with high-powered commercial fans. However, if the drywall swells, feels soft, or stays wet for more than 48 hours, it must be replaced.

How long does it take for mold to grow on wet drywall?

Mold spores begin to multiply rapidly on damp, porous surfaces within 24 to 48 hours.

Is it safe to remove moldy drywall myself?

No. Tearing out moldy drywall without commercial containment barriers will spread dangerous spores throughout your entire house. Always hire professionals to handle mold removal.

Invest in Professionalism for Your Home’s Health and Value

A water leak causes enough stress on its own. You do not need the added burden of a messy, complicated DIY repair that puts your home at risk for mold and structural decay. Relying on skilled experts ensures that the moisture is fully eradicated and your walls look perfectly smooth once again.

For professional drywall installation and replacement in Indianapolis, request a free quote today.

Call Now to Get Started

Related Post: Water-Damaged Drywall? Here’s When to Repair vs. Replace

How to Fix Drywall Nail Pops for Good

Smoothly painted walls feel incredible, but a sudden protrusion can leave you with an annoying reminder—a nail pop. A nail pop is a small, unsightly bump or cracked ring on your wall that breaks up an otherwise perfect surface. It is a condition that occurs when the fasteners holding your drywall to the framing shift or loosen over time.

Understanding how these blemishes form is crucial for maintaining the beauty and structural integrity of your home. While they are usually harmless, seeing them scattered across your living room or hallway can be incredibly frustrating.

In this guide, we will cover exactly what causes these frustrating blemishes, how you can permanently repair them, and the best ways to keep your home’s walls looking flawless.

Call 317-269-7319 to Repair Nail Pops in Drywall in Indianapolis Indiana

What are Nail Pops and Why Do They Appear?

Nail pops occur when the nails or screws holding your drywall to the wooden studs push outward. This outward movement breaks the thin layer of joint compound and paint covering the fastener head. The result is a visible bump, a cracked circle, or even an exposed piece of metal on your wall. While they are structurally harmless in small numbers, they can ruin the aesthetic of a freshly painted room.

Common causes of nail pops

The most frequent culprit behind nail pops is the natural shrinking and expanding of the wooden framing behind your drywall. When new lumber dries out, it shrinks slightly, pulling away from the drywall and forcing the nail head outward.

Foundation settling also plays a major role. In areas like Indianapolis, the clay-heavy soils expand during wet spring months and contract during dry summers. This constant shifting causes the home’s foundation to settle. The resulting movement transfers stress to the wall studs, creating pressure that pops drywall fasteners loose.

Identifying Nail Pops: A Homeowner’s Guide

Spotting a nail pop is usually straightforward. You will see a small, dime-sized blister or a cracked ring of paint on the wall or ceiling. Because drywall is attached directly to the framing, these bumps appear most often along the lines of your wall studs or ceiling joists. You might notice them popping up in a straight vertical or horizontal line spaced roughly 16 to 24 inches apart.

Nail pops vs. other wall imperfections

Not every bump or crack is a nail pop. If you notice long, jagged cracks traveling diagonally from the corners of your doors or windows, your home is likely experiencing more significant foundation settling. Soft spots, peeling paint, or brownish stains indicate water damage behind the wall. A true nail pop will be localized exactly where a fastener sits, without any accompanying moisture issues or massive structural cracking.

Step-by-Step Guide to Repairing Nail Pops

Gathering necessary tools and materials

Fixing these blemishes requires a few basic hand tools. You will need a utility knife, a putty knife, a hammer, a drill or Phillips-head screwdriver, drywall screws, joint compound (spackle), and a fine-grit sanding sponge.

Preparing the affected area

Start by using your utility knife to carefully scrape away the cracked paint and joint compound covering the protruding fastener. Expose the head of the nail or screw completely. This allows you to see exactly what you are working with and creates a clean surface so the new joint compound adheres properly.

Repairing the nail pop

If the fastener is a nail, use your hammer and a nail punch to drive it deep back into the wood stud. Do not try to pull it out, as this can severely damage the surrounding drywall.

Next, drive a new drywall screw about one to two inches above or below the old nail. Sink the screw just enough to create a slight dimple in the drywall paper without breaking it. This new screw secures the board tightly against the stud, ensuring the old nail will not pop out again.

Finishing and painting

Apply a thin layer of joint compound over the newly driven screw and the old nail head using your putty knife. Smooth it out as best as you can and allow it to dry completely, which usually takes a few hours.

Once dry, lightly sand the area with your fine-grit sponge until it is perfectly flush with the wall. Apply a second coat of joint compound if necessary, sand it smooth again, and wipe away the dust. Finish with a coat of primer and matching interior paint to seamlessly blend the repair into the rest of the room.

Preventing Future Nail Pops

Proper framing and drywall installation techniques

The best defense against wall imperfections starts during construction or renovation. Ensure the lumber used for framing is kiln-dried, which minimizes future shrinkage. Contractors should also apply construction adhesive to the studs before hanging drywall. The adhesive bonds the board directly to the wood, drastically reducing the reliance on metal fasteners alone.

Maintaining stable indoor humidity levels

Wood framing swells and shrinks based on the moisture in the air. Indianapolis experiences humid summers and incredibly dry winters, which can wreak havoc on your drywall. HVAC experts recommend maintaining an indoor humidity level between 30 and 50 percent year-round. Using a whole-home humidifier during the harsh Indiana winters keeps the wood from drying out and contracting, saving your walls from cyclical stress.

Using screws instead of nails

Using drywall screws instead of smooth-shank nails is a simple but highly effective prevention method. Screws have coarse threads that bite securely into the wood. This holds the drywall tightly against the stud even if the lumber shifts slightly, making them far less likely to back out over time.

When to Call a Professional Drywall Repair Service

Extensive damage or recurring issues

A single bump is a quick afternoon project, but a wall covered in popping fasteners might point to a bigger problem. If you notice clusters of nail pops across multiple rooms, your home could be experiencing severe foundation movement, high humidity fluctuations, or poor initial drywall installation.

Benefits of professional drywall services

Hiring a professional drywall contractor ensures the root cause is correctly diagnosed and addressed. An expert drywall technician will secure loose panels, repair structural shifting damages, and blend the finishing compound flawlessly. They have the experience to spot underlying issues that a typical homeowner might miss, saving you from repeated headaches and endless patching.

Frequently Asked Questions About Nail Pops

Are nail pops a sign of structural damage?

Generally, no. A few scattered bumps are a normal part of a home settling and lumber drying. However, sudden clusters of them accompanied by large wall cracks or sticking doors can indicate a larger foundation problem.

Can I just hammer the nail back in and paint over it?

Hammering the nail back in without adding a new securing screw is only a temporary fix. The natural movement of the wall will almost certainly push the nail back out within a few months.

Why do nail pops happen more often in newer homes?

New homes are built with lumber that naturally contains some moisture. As the house settles over its first year or two, the lumber dries out and shrinks, causing the fasteners to push through the drywall mud.

Keeping Your Walls Smooth and Flawless

Maintaining your home involves dealing with the occasional imperfection. Understanding how temperature changes, soil shifting, and lumber drying affect your walls empowers you to handle minor repairs with confidence. By securing loose boards with proper screws and maintaining your indoor humidity, you can keep your living spaces looking pristine.

Need professional help restoring your walls? If you are dealing with recurring drywall issues or extensive damage, we are here to help. Contact us today for professional and affordable drywall repair and installation in Indianapolis.

Call for a Free Quote

Related Post: Troublesome Nail Pops? Here’s How to Spot, Fix, and Prevent Them

The Ultimate Guide to Water-Resistant Drywall

Your home should be a safe, comfortable haven for you and your family. Hidden threats like excessive moisture can compromise that safety, leading to invisible structural decay and harmful mold growth. Water vapor from hot showers, boiling pots, and damp basements constantly interacts with your walls. If those walls are not properly equipped to handle the dampness, you could face extensive and expensive damage.

Using the right materials during construction or remodeling is a vital step in maintaining a healthy living environment. Standard building materials often fall short in rooms prone to high humidity. By upgrading to specialized products, you give your home an invisible layer of armor that repels water and keeps your indoor atmosphere clean.

Water-resistant drywall is one of the most effective tools for defending your home against humidity. This comprehensive guide will explain how this material works, where you need it most, and how it can save you from future headaches.

Call 317-269-7319 for Water Resistant Drywall Installation and Repair in Indianapolis

What is Water-Resistant Drywall?

Water-resistant drywall is a specialized building panel specifically engineered to repel moisture and prevent water from penetrating the inner core of your walls.

Composition and Properties

Unlike standard wallboard, moisture-resistant drywall features a unique, chemically treated core. Manufacturers blend traditional gypsum with water-repelling additives like wax or silicone. They wrap this enhanced core in heavy-duty, moisture-resistant paper.

You will often hear builders refer to these panels as “green board” or “purple board” due to the colored paper facing that identifies them on the job site. This construction creates a tough barrier that stops water droplets and steam from soaking into the material.

How it Differs from Regular Drywall

Regular drywall acts like a dry sponge. When exposed to high humidity or direct water contact, the untreated paper facing absorbs the moisture, pulling it deep into the unprotected gypsum core. The panel then swells, loses its structural integrity, and eventually crumbles. Water-resistant drywall actively sheds moisture. The treated facing causes water to bead up and roll off, while the enhanced core resists swelling.

Where to Use Water-Resistant Drywall in Your Home

You should install water-resistant drywall in any room that regularly experiences high humidity, potential plumbing leaks, or poor natural ventilation.

Bathrooms: A Moisture Battleground

Bathrooms endure the highest levels of daily moisture in most homes. Hot showers generate thick steam that settles on the walls and ceiling. You need water-resistant drywall on the bathroom ceiling and on all walls outside the immediate shower enclosure to prevent the steam from destroying the paint and underlying board.

Kitchens: Spills and Splashes

Boiling water, running dishwashers, and accidental sink splashes introduce constant moisture into your kitchen. Installing green or purple board behind the sink, behind the stove, and around the dishwasher provides a necessary buffer. It stops accidental splashes from seeping into the wall cavity and causing rot.

Basements: Combating Dampness

Basements naturally hold dampness because they sit below ground level. Soil moisture constantly presses against the foundation, increasing the indoor humidity. Using moisture-resistant wallboard in a finished basement prevents the walls from degrading over time and helps keep the space smelling fresh.

Laundry Rooms: Humidity Control

Washing machines and hot dryers create a warm, heavily humid environment. A small leak from a washing machine hose can quickly ruin standard walls. Upgrading the drywall in your laundry room safeguards the area against both ambient humidity and accidental flooding.

Other High-Humidity Areas

Consider using moisture-resistant panels in mudrooms, attached garages, and enclosed porches. Any area where wet coats, snowy boots, or outdoor weather routinely enter the home will benefit from this added protection.

Benefits of Choosing Water-Resistant Drywall

Upgrading to moisture-resistant drywall protects your family’s respiratory health and saves you significant money on future structural repairs.

Preventing Mold and Mildew Growth

Mold spores thrive in dark, damp environments. Because standard drywall absorbs water, it creates the perfect breeding ground for toxic black mold and mildew. Water-resistant drywall deprives these spores of the moisture they need to multiply. Many premium brands (like purple board) even include specific antimicrobial chemicals in the paper facing to actively stop mold growth.

Enhanced Durability and Longevity

Walls built with moisture-resistant panels simply last longer. They resist the warping, bubbling, and crumbling that plagues standard gypsum boards in damp environments. Your paint jobs will look smoother for years, and your walls will maintain their solid, rigid structure even after thousands of hot showers.

Maintaining Indoor Air Quality

Hidden mold inside wall cavities silently releases spores into the air you breathe. This can trigger asthma attacks, allergic reactions, and chronic coughing. By keeping moisture out of your walls, you keep mold out of your ductwork and living spaces. This proactive step helps maintain crisp, clean indoor air quality for your entire family.

Cost-Effectiveness in the Long Run

Moisture-resistant drywall costs slightly more upfront than standard panels. However, this small initial investment pays massive dividends. Repairing water-damaged walls requires tearing out the old board, treating for mold, and reinstalling new drywall. You bypass these exorbitant repair bills by installing the right material the first time.

Installation Tips for Water-Resistant Drywall

Proper installation requires leaving a small gap at the floor and using specialized moisture-resistant tape and joint compound to ensure a watertight seal.

Proper Preparation is Key

Before hanging the first panel, inspect the wood or metal framing for existing moisture issues. Fix any plumbing leaks and ensure the room has adequate ventilation, such as an exhaust fan. When cutting the panels, measure carefully to leave a one-quarter-inch gap between the bottom edge of the drywall and the floor. This gap prevents the board from wicking up spilled water from the ground.

Sealing and Finishing Techniques

Standard paper drywall tape and regular joint compound will absorb water, ruining the moisture-resistant properties of the panels. You must use fiberglass mesh tape and a setting-type joint compound designed specifically for high-moisture areas. Apply the compound smoothly, sand it lightly, and always finish the wall with a high-quality, moisture-blocking primer before painting.

Professional Installation vs. DIY

Hanging drywall is heavy, exhausting work. While an experienced homeowner can tackle a small patch, outfitting a whole bathroom or basement requires precise skills. Professional drywall contractors understand local building codes, know exactly which tapes and muds to use, and can guarantee a perfectly smooth, watertight finish.

Frequently Asked Questions

Is water-resistant drywall waterproof?

No. Water-resistant drywall repels ambient moisture and occasional splashes, but it is not entirely waterproof. You should not use it as a backing for tiles directly inside a shower stall. For areas submerged in water or receiving direct, heavy spray, you must use cement board.

Can I paint over water-resistant drywall?

Yes. You can paint it just like regular drywall. For the best results, use a moisture-resistant primer followed by a high-quality semi-gloss or satin paint that repels water and allows for easy cleaning.

How much does water-resistant drywall cost?

Prices fluctuate based on your location and the thickness of the board. Generally, a standard 4×8 sheet of moisture-resistant drywall costs between $15 and $25. This is slightly more expensive than standard drywall, which typically costs between $10 and $15 per sheet.

What are the best brands of water-resistant drywall?

Top-rated brands include USG (makers of Sheetrock® brand Mold Tough® panels), National Gypsum (creators of Gold Bond® XP® purple board), and Georgia-Pacific (producers of ToughRock® moisture-resistant boards).

Safeguard Your Home Against Moisture Damage

Protecting your home from the damaging effects of humidity requires foresight and the right materials. Water-resistant drywall serves as a crucial line of defense in your bathrooms, kitchens, and basements. By understanding how this material works and ensuring it is installed correctly, you preserve the structural integrity of your house and protect the health of your family.

If you need expert drywall installation and repair in Indianapolis, we are here to help. From new construction homes to water-damaged drywall replacement, we do it all. Contact us today to ensure your walls are built to last.

Call Now to Book Service

Related Post: Water-Damaged Drywall? Here’s When to Repair vs. Replace

5 Reasons to Hire Pro Drywall Installers

Taking on a home renovation is exciting, but realizing a project is more complex than it appears can quickly cause unnecessary stress. Watching home improvement shows might make hanging and finishing drywall look like a simple weekend task. However, achieving walls that look beautifully smooth and hold up over time is a highly skilled trade.

Poorly installed drywall often results in bulging seams, visible screw heads, and a constant dusting of fine white powder settling over your furniture. These issues can distract from your beautiful paint colors and carefully chosen decor.

Understanding the craftsmanship behind wall installation is crucial for maintaining a healthy and structurally sound home. Hiring a professional team ensures your walls are built correctly from the studs outward. Here are the top five reasons you should leave your next wall project to the experts.

Call 317-269-7319 for Professional Drywall Installation in Indianapolis

Achieve a Flawless, Professional Finish

Hiring a professional ensures your walls are perfectly smooth and completely free of visible joints, shadows, or surface imperfections. The industry standard for drywall finishing, established by the Gypsum Association, outlines specific levels of quality ranging from Level 0 to Level 5. Most residential interiors require a Level 4 finish, which means the seams and fasteners are completely concealed, and the wall is ready for flat paint or light texture.

If you plan to use glossy paint, or if your room features strong natural lighting from large windows, an expert will likely recommend a Level 5 finish. This involves applying a premium skim coat of joint compound over the entire surface. Without this expert technique, you risk a problem known as “joint photographing,” where the seams cast faint shadows through the paint. A professional has the trained eye and specialized tools needed to prevent these visual blemishes.

Ensure Long-Term Durability and Prevent Cracks

Professionals use the correct materials and fastening techniques to build strong walls that resist cracking, sagging, and popping over time. A common frustration for homeowners is the appearance of “nail pops,” which occur when the head of a drywall screw or nail protrudes and breaks the paint. Professionals prevent this by using exact fastener spacing and driving the screws perfectly flush without tearing the drywall paper.

Material selection also plays a significant role in durability. For example, research from major manufacturers like USG indicates that traditional paper joint tape is significantly stronger than fiberglass mesh tape when used with standard drying-type joint compounds.

Paper tape reinforces the joint under compression and shear forces, helping to prevent visible cracking as a home naturally settles. Experts know exactly which tapes and compounds to pair together to guarantee walls that stand the test of time.

Maximize Your Time and Cost Efficiency

Bringing in an expert crew saves you days of exhausting labor and the unexpected expenses of purchasing specialized finishing tools. Hanging heavy panels of gypsum board is physically demanding work, but the real time-drain comes during the taping and finishing process. Standard joint compounds must dry thoroughly between coats.

According to manufacturer guidelines, this drying process can take up to 24 hours per coat, depending on the temperature and humidity of the room. The environment must also be carefully maintained above 50 degrees Fahrenheit.

A seasoned drywall installation service knows how to manage these variables and work efficiently. What might take a homeowner several weekends of start-and-stop labor can be completed by a professional team in a fraction of the time. You also bypass the need to buy specialized broad knives, mud pans, sanding poles, and heavy-duty mixing drills that you will likely never use again.

Protect Your Health with Proper Dust Containment

Professional installers use advanced containment strategies and specialized vacuum systems to protect your home and your lungs from hazardous particulate matter. Sanding drywall joint compound creates incredibly fine dust that can linger in the air and travel through your home’s ventilation system.

According to the National Institute for Occupational Safety and Health (NIOSH), drywall dust contains elements like gypsum, mica, talc, and sometimes respirable silica. Breathing this dust can cause persistent throat irritation, coughing, and breathing difficulties. In fact, standard dry sanding can release dust levels up to ten times the occupational safety limits.

Professional drywall contractors mitigate these health risks. They utilize heavy-duty plastic barriers to seal off the work area and employ specialized vacuum sanding systems. These commercial-grade vacuums capture the dust directly at the sanding tool, successfully reducing airborne dust exposures by 80% to 97%. This keeps your family safe and prevents a massive cleaning headache once the project is done.

Increase Your Property Value and Curb Appeal

High-quality drywall craftsmanship enhances the overall aesthetic of your home, making it significantly more appealing to potential buyers and home appraisers. The condition of your interior walls serves as the canvas for your entire home.

When appraisers evaluate a property, they take note of the interior condition, including the quality of the paint and wall surfaces. Peeling paint, visible cracks, and poorly taped seams can signal to buyers that a home has not been well maintained, potentially lowering their perceived value of the property.

Flawless walls signal care, quality, and structural integrity. By investing in professional installation, you ensure that any future remodeling projects, fresh coats of paint, or home staging efforts look their absolute best, directly supporting a strong resale value.

Frequently Asked Questions

How long does drywall joint compound take to dry?

Standard ready-mixed joint compound requires adequate time to cure before it can be sanded or re-coated. Manufacturers typically recommend allowing up to 24 hours of drying time. However, this heavily depends on the environment. Wet or damp conditions, as well as cold temperatures, will significantly slow the drying process.

Should I use paper tape or fiberglass mesh tape?

For strong, crack-resistant joints with traditional drying-type compounds, paper tape is the best choice. While fiberglass mesh tape is easy to apply because of its sticky backing, it stretches slightly under pressure. This flexibility can allow the dried compound to crack. Fiberglass mesh should only be used with specific, fast-setting chemical compounds.

Transform Your Home With Expert Drywall Services

Your home deserves walls that provide a durable, beautiful foundation for your life. Trying to tackle heavy panels and dusty finishing compounds on your own can lead to structural flaws, messy cleanups, and a final look that falls short of your expectations. Trusting a professional protects your health, saves you valuable time, and guarantees a seamless finish that elevates your entire space.

If you are ready to upgrade your interior with flawless results, rely on experienced craftsmanship. Reach out today for professional drywall installation for repairs, renovations, or new construction in Indianapolis, Indiana.

Call for a Free Quote

Related Post: Unexpected Costs of Drywall Installation: What You Need to Know

Best Areas for Moisture-Resistant Drywall

TL;DR: Moisture-resistant drywall (green board) protects high-humidity areas from water damage and mold. Install it in bathrooms outside shower enclosures, kitchens near sinks, basements, laundry rooms, and garages. However, it’s not approved for direct water exposure like shower walls or tub surrounds—use cement backer board instead.

Key Takeaways:

  • Bathrooms: Use green board on walls and ceilings outside the shower/tub enclosure
  • Kitchens: Install behind sinks and in areas prone to splashing
  • Basements & Laundry Rooms: Protect against humidity and occasional moisture
  • Garages: Shield walls from condensation and temperature fluctuations
  • Not for Showers: Building codes prohibit green board as a tile substrate in direct water zones

Table of Contents:

  1. What is Moisture-Resistant Drywall? (Green Board Explained)
  2. Essential Installation: Bathrooms and Showers
  3. Protecting Your Kitchen: Sinks and Backsplashes
  4. Managing Humidity: Basements and Laundry Rooms
  5. Garages and Exterior-Facing Walls
  6. FAQ: Comparing Green Board vs. Standard Drywall
  7. Quick Recap
  8. Indianapolis Drywall Service Quote
Call 317-269-7319 for Moisture Resistant Drywall Installation and Repair in Indianapolis

What is Moisture-Resistant Drywall? (Green Board Explained)

Moisture-resistant drywall, commonly called green board due to its distinctive green paper facing, is specially designed to resist moisture absorption better than standard drywall.

According to ASTM C1396, the industry standard for gypsum board products, moisture-resistant drywall must absorb no more than 5% of its weight when exposed to water. This is achieved through a treated, water-repellent paper facing and a moisture-resistant gypsum core. Some manufacturers enhance these properties with mold-resistant additives in both the core and facing materials.

Understanding where to use this material is crucial. While green board offers excellent protection against humidity and occasional splashing, it’s not waterproof. The Gypsum Association’s GA-216 standard clearly states that gypsum panel products “shall not be used where there will be direct exposure to water or continuous high humidity conditions.”

This distinction matters because improper installation can lead to water damage, mold growth, and costly repairs. Knowing exactly where green board belongs—and where it doesn’t—will help you maintain a healthy, durable home.

Essential Installation: Bathrooms and Showers

Install moisture-resistant drywall on bathroom walls and ceilings outside the shower or tub enclosure.

Bathrooms are the most obvious location for green board, but there’s an important limitation: building codes prohibit using moisture-resistant drywall behind tile in shower and tub areas. According to the International Building Code Section 2509.3, water-resistant gypsum backing board cannot be installed “over a vapor retarder in shower or bathtub compartments” or “where there will be direct exposure to water.”

Here’s where you should use green board in bathrooms:

  • Walls outside the shower/tub surround
  • Ceilings in the main bathroom area
  • Powder room walls where humidity levels rise
  • Behind vanities and toilet areas

For the shower itself, use cement backer board products like Durock, Permabase, or fiber-cement panels that meet ASTM C1288 or C1325 standards. These materials are specifically designed to withstand constant water exposure and serve as proper substrates for tile installation.

Even with green board in the appropriate areas, proper ventilation remains essential. Install exhaust fans rated for your bathroom’s square footage and run them during and after showers to manage humidity levels effectively.

Protecting Your Kitchen: Sinks and Backsplashes

Use moisture-resistant drywall behind kitchen sinks, near dishwashers, and in areas prone to splashing.

Kitchens experience regular moisture exposure from cooking, dishwashing, and food preparation. While not as extreme as bathroom conditions, these areas benefit significantly from green board installation.

Focus on these kitchen zones:

  • Behind the sink: This area receives frequent splashing and high humidity from hot water use
  • Around the dishwasher: Steam and occasional leaks make this a vulnerable spot
  • Near the stove: Cooking generates significant steam and grease-laden moisture
  • Base cabinet areas with plumbing: Protects against slow leaks from supply lines

One common question: Can you install tile directly over green board in a kitchen backsplash? The Gypsum Association advises that moisture-resistant panels are “not designed to be used as a substrate for tile applications.” For areas receiving regular water contact, consider cement backer board even in kitchens, or ensure your tile installation includes a proper waterproof membrane system.

Remember that green board handles occasional splashes well but isn’t meant for continuous water exposure. Wiping down surfaces promptly and maintaining good kitchen ventilation will help your moisture-resistant drywall perform as designed.

Managing Humidity: Basements and Laundry Rooms

Install green board in basements and laundry rooms to combat persistent humidity and protect against occasional moisture. Basements face unique moisture challenges. Below-grade walls naturally experience higher humidity due to their contact with cool, damp earth. Even with proper waterproofing on the exterior, interior humidity can lead to mold growth on standard drywall.

Moisture-resistant drywall provides an extra layer of protection in these areas:

  • Finished basement walls: Especially on exterior-facing walls where condensation may occur
  • Basement ceilings: Where HVAC ducts or plumbing pipes may cause condensation
  • Storage areas: Where boxes and belongings need protection from humidity

Laundry rooms generate substantial moisture from washing machines and dryers. Even with properly vented dryers, these spaces experience humidity spikes during each laundry cycle. Green board installation here prevents moisture absorption that could compromise wall integrity over time.

Critical tip: Green board helps manage humidity, but it doesn’t replace proper basement waterproofing or ventilation. Address any active water intrusion issues before installing any drywall, and ensure your space has adequate dehumidification.

Garages and Exterior-Facing Walls

Consider moisture-resistant drywall for garage walls and interior walls facing exterior conditions. Garages experience significant temperature fluctuations and humidity changes. In winter, warm interior air meeting cold garage surfaces creates condensation. In summer, hot, humid air can penetrate through gaps and settle on cooler interior walls.

Moisture-resistant drywall makes sense for:

  • Walls between living spaces and garages: These transition zones experience the most dramatic temperature differences
  • Exterior-facing walls in rooms without climate control: Mudrooms, enclosed porches, or storage areas
  • Walls behind water heaters or HVAC units: Where condensation commonly occurs

While green board isn’t always required by code in these locations, it provides cost-effective insurance against moisture-related problems. The modest price difference compared to standard drywall can prevent expensive repairs down the line.

If you’re planning garage renovations or finishing previously unfinished spaces, discuss moisture-resistant options with your contractor. They can assess your specific conditions and recommend whether green board makes sense for your project.

Need expert drywall installation in Indianapolis? Our experienced drywall contractors understands local building codes and moisture challenges specific to Indiana homes. Contact us today for a free consultation on your drywall project.

FAQ: Comparing Green Board vs. Standard Drywall

Can I use green board everywhere in my home?

You can, but it’s not necessary or cost-effective. Green board costs 20-30% more than standard drywall. Reserve it for moisture-prone areas and use regular drywall in bedrooms, living rooms, and other dry spaces.

How do I identify moisture-resistant drywall?

Look for the distinctive green paper facing. The long edges are typically tapered and wrapped with the green facer material. Most manufacturers also print product information on the surface indicating moisture-resistant properties.

What’s the difference between moisture-resistant and mold-resistant drywall?

Moisture-resistant (green board) focuses on limiting water absorption through treated facing. Mold-resistant drywall (like purple board) includes anti-microbial additives in both the core and facing to actively resist mold growth. Some products combine both features.

Can I paint green board like regular drywall?

Yes, but apply a primer first. The moisture-resistant facing may not accept paint as readily as standard paper-faced drywall. A quality primer ensures proper paint adhesion and finish quality.

Do I need special fasteners for green board?

No. Use the same screws, nails, or adhesives you’d use for standard drywall. Follow standard installation practices for spacing and depth.

Is green board required by building code?

Local codes vary, but most don’t specifically require moisture-resistant drywall in bathrooms outside wet zones. However, they do prohibit it in direct water areas and specify acceptable materials for shower/tub tile backing. Always check your local building codes or consult a licensed contractor familiar with regional requirements.

Quick Recap:

  • Moisture-resistant drywall (green board) limits water absorption to 5% of board weight per ASTM C1396
  • Install in bathrooms on walls and ceilings outside shower/tub enclosures
  • Never use behind tile in shower or tub surrounds—codes require cement backer board instead
  • Protect kitchens near sinks, dishwashers, and areas receiving regular splashing
  • Use in basements to combat persistent humidity, especially on exterior-facing walls
  • Consider for laundry rooms where washing machines and dryers generate moisture
  • Install in garages and transition zones experiencing temperature fluctuations
  • Green board resists moisture but isn’t waterproof—avoid areas with direct water exposure

Make the Right Choice for Your Home

Moisture-resistant drywall serves as an essential line of defense against water damage and mold in your home’s vulnerable areas. By installing green board in bathrooms, kitchens, basements, and other humidity-prone spaces, you’re investing in your home’s long-term health and your family’s comfort.

Remember that proper installation makes all the difference. While green board provides superior moisture resistance, it must be paired with adequate ventilation, proper sealing, and correct application techniques to perform as designed.

Looking for professional drywall services in Indianapolis? Our certified installers know exactly where moisture-resistant drywall belongs—and where it doesn’t. We’ll ensure your project meets all local building codes while protecting your home from moisture damage. Call us today for a free estimate on your drywall installation or repair project.

Phone Us Now

Related Post: Water-Damaged Drywall? Here’s When to Repair vs. Replace