Don’t Panic! Here’s What You Need to Know About Repairing Drywall Holes

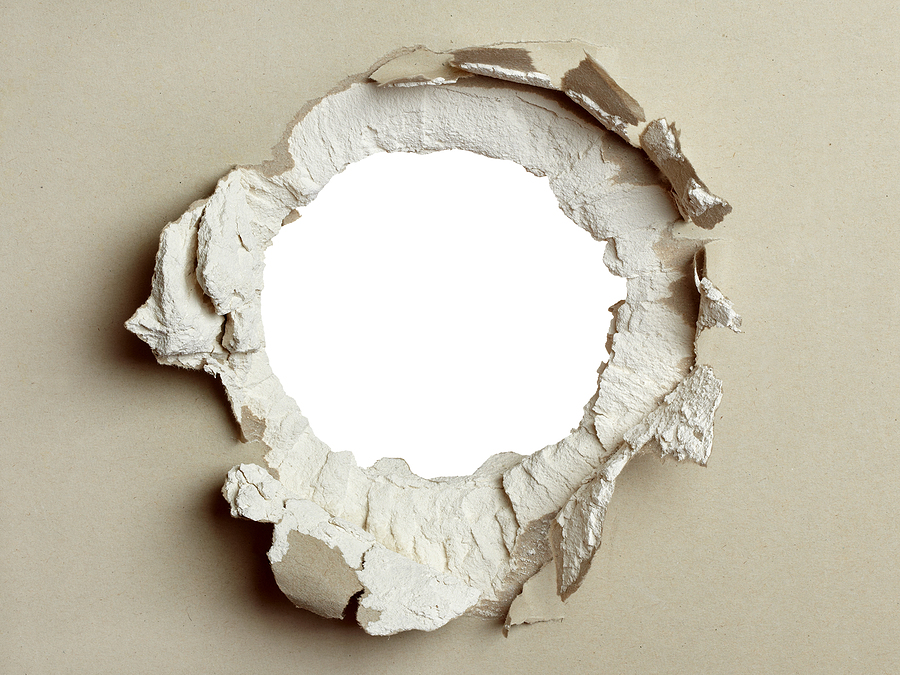
It happens to the best of us. A doorknob slams into a wall a little too hard, a picture frame is moved one too many times, or perhaps an enthusiastic furniture rearrangement goes awry. Suddenly, you’re staring at an unsightly hole in your pristine wall. While it might feel like a disaster in the moment, a hole in your drywall is actually one of the most manageable home repairs you can tackle yourself.

Leaving a hole unrepaired isn’t just an eyesore; it can allow moisture, pests, or drafts to enter the wall cavity, potentially leading to bigger issues down the line. Fortunately, with a little patience and the right guidance, you can restore your wall to its former glory. Whether you’re dealing with a tiny nail pop or a gaping hole from a moved outlet, understanding the repair process empowers you to take control of your home maintenance.

Call 317-269-7319 to Repair a Hole in Your Wall in Indianapolis

How to Repair a Hole in the Wall

Essential Tools and Materials for the Job

Before you begin, gathering the right supplies is crucial. Having everything within arm’s reach will make the process smoother and prevent frantic trips to the hardware store halfway through the repair.

Here is what you will need:

  • Spackle or Joint Compound: For tiny holes, lightweight spackle works wonders. For anything larger than a coin, you will want all-purpose joint compound.
  • Putty Knife or Taping Knife: You will need a smaller knife (about 2-4 inches) for applying the compound and a wider one (6-10 inches) for feathering it out seamlessly.
  • Sandpaper or Sanding Sponge: A fine-grit sandpaper (around 100 to 120 grit) is essential for smoothing out dried compound without damaging the surrounding wall.
  • Mesh or Paper Tape: This reinforces the repair and prevents cracks from reappearing. Self-adhesive mesh tape is often easier for beginners.
  • Wall Patch or Scrap Drywall: For medium holes (up to 4 inches), an adhesive aluminum patch is great. For larger holes, you will need a piece of scrap drywall.
  • Utility Knife: Useful for trimming ragged edges around the hole.
  • Dust Mask: Protect your lungs from fine drywall dust during sanding.

Step-by-Step: Repairing Small to Medium Holes

Small holes—typically those left by nails, screws, or wall anchors—are the perfect starting point for DIY beginners. These repairs are quick and forgiving.

1. Prep the Area

Start by cleaning the hole. Use your utility knife to gently scrape away any loose paint or paper sticking out of the hole. If the hole is from a nail pop, use a hammer and nail set to drive the nail back below the surface of the wall.

2. Fill the Void

Take a small amount of spackle or joint compound on your finger or a small putty knife. Press it firmly into the hole, slightly overfilling it. The compound shrinks as it dries, so a little extra helps prevent a dimple from forming.

3. Swipe and Dry

Swipe your putty knife across the hole once to level it off. Don’t overwork it—the more you mess with it, the messier it gets. Let it dry completely according to the manufacturer’s instructions (usually a few hours).

4. Sand and Repeat

Once dry, lightly sand the area until it is flush with the wall. If there is still a slight indentation, apply a second thin coat, let it dry, and sand again.

Request a Free Onsite Drywall Repair Estimate in Indy Now

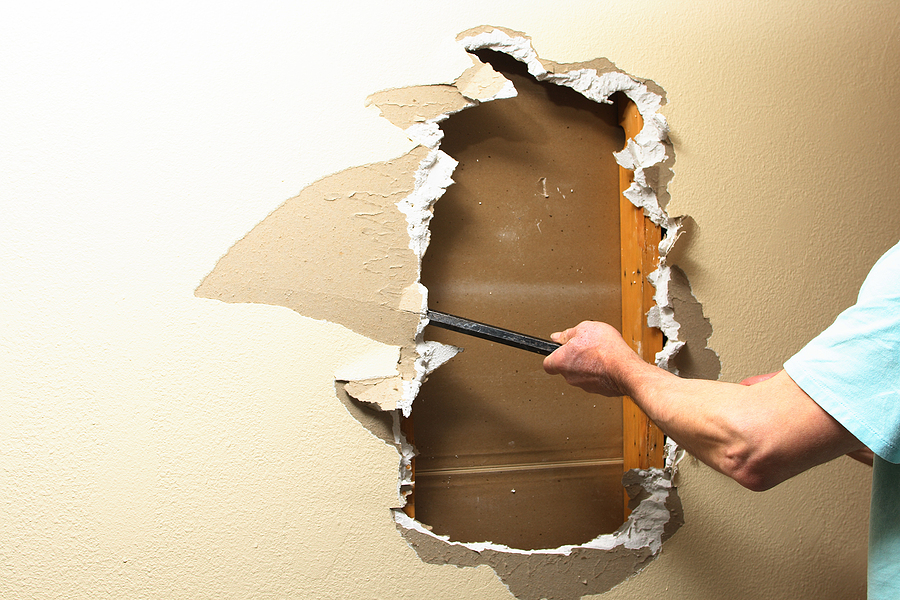
Tackling Larger Holes: The Patch Method

When the hole is larger than a few inches—perhaps from a doorknob accident, flying toy, foot, or fist—filling it with spackle won’t work. The compound will just fall through. For these, you need to create a new surface.

The “California Patch” or Adhesive Mesh

For holes up to about 4 inches, you can use a self-adhesive metal patch. simply stick the patch over the hole, then cover it with joint compound.

However, for a stronger repair, or for holes larger than 4 inches, you will need to use a backing method:

  1. Cut the Hole Square: Use a drywall saw to cut the damaged area into a neat square or rectangle.
  2. Install a Backer Board: Cut a piece of wood (like a 1×2 or piece of plywood) slightly longer than the hole. Insert it into the hole, hold it tight against the back of the drywall, and screw it in place through the existing wall on top and bottom.
  3. Insert the New Piece: Cut a piece of scrap drywall to fit your square hole. Screw this new piece into the wood backer board you just installed.
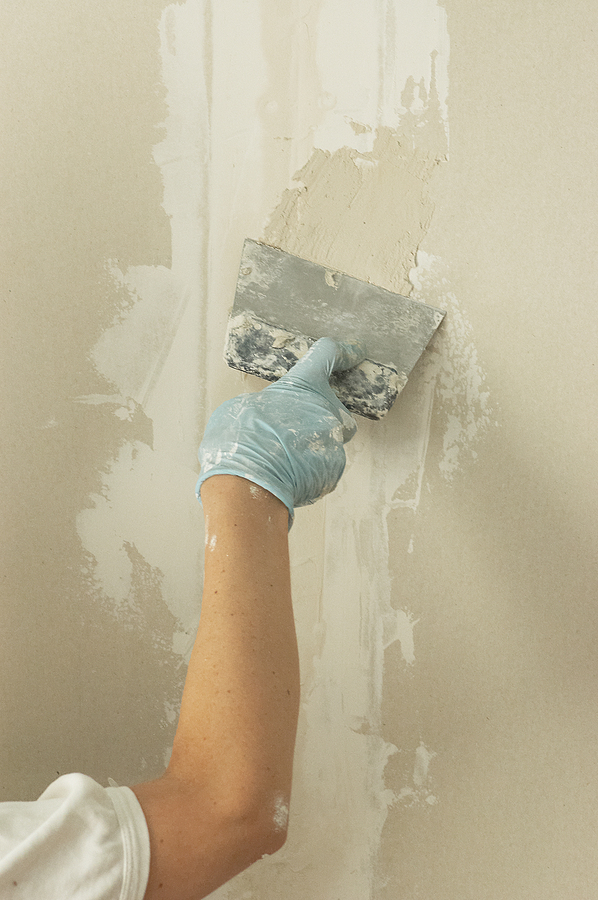
  4. Tape and Mud: Apply mesh tape over the seams where the new piece meets the old wall. Cover the tape with joint compound, feathering the edges out wide to blend the repair.

The Art of Painting and Finishing

The repair isn’t finished until it disappears. The goal is to make the wall look like nothing ever happened.

Once your final coat of compound is sanded smooth, wipe away the dust with a damp cloth. You must prime the repaired area before painting. Joint compound is porous and absorbs paint differently than the rest of the wall; if you skip primer, you will see a dull spot where the patch is.

After the primer dries, paint the area. If you can, paint the entire wall from corner to corner. If that isn’t possible, use a roller to “feather” the new paint into the old paint, rather than painting a strict square, which catches the eye.

Common Drywall Repair Mistakes to Avoid

Even seasoned DIYers can stumble on drywall repairs. Watch out for these pitfalls:

  • Skipping the Sanding: If you don’t sand enough, the patch will look like a lump. If you sand too much, you’ll expose the mesh tape or paper. Use a light hand.
  • Thick Layers: Applying one thick layer of compound takes forever to dry and often cracks. Several thin layers are always better than one thick one.
  • Ignoring Texture: If your walls have texture (like orange peel or knockdown), a smooth patch will stand out. You can buy spray cans of wall texture to match the surrounding area before painting.

When to Call a Professional Drywall Contractor

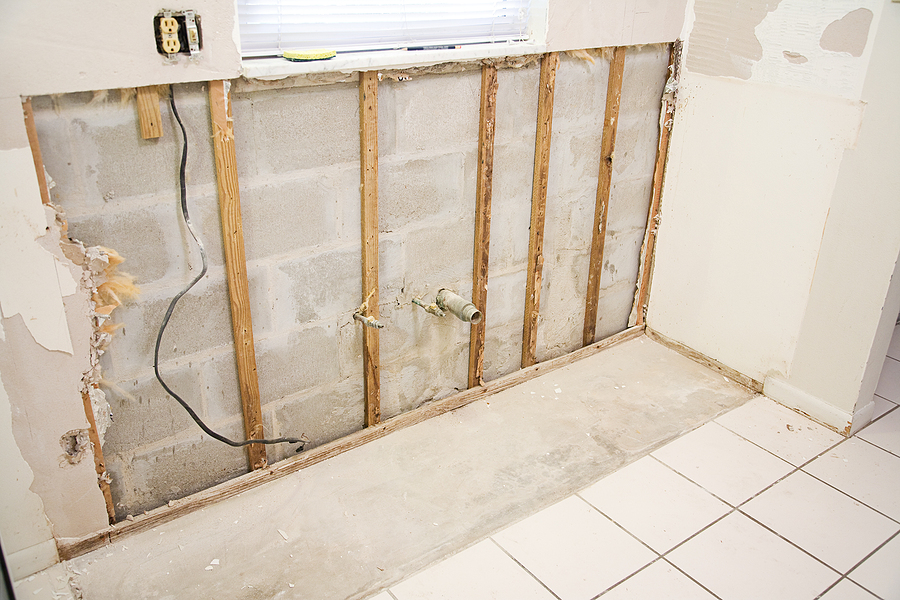
While many drywall repairs are DIY-friendly, some situations call for an expert. If you are dealing with water damaged drywall, it is crucial to address the source of the leak first, which might require a plumber or contractor.

Additionally, if the damage covers a large area of the wall, involves a ceiling (which is physically difficult to repair), or is near electrical outlets that need to be moved, calling a professional drywall repair service ensures the job is done safely and correctly. If you are simply not a handy person, a professional is the best option for you.

Conclusion

Repairing a hole in your drywall is a rite of passage for homeowners. It saves you money, improves your home’s insulation and hygiene, and restores the aesthetic appeal of your living space. With the right tools and a bit of patience, you can erase those accidental dents and dings.

However, we understand that not everyone has the time or desire to mix compound and sand walls. If you want a flawless finish without the dust and hassle, we are here to help.

If you’re looking for a seamless repair that restores your wall to its original pristine condition, we invite you to Contact Us Today. We can provide a professional drywall repair estimate and deliver top-quality service anywhere in the Indianapolis area.

Place Your Call Now

Related Post: Hole in the Wall? Here Are Your Best Options for Repair

Water-Damaged Drywall? Here’s When to Repair vs. Replace

The sound of dripping water inside a wall is enough to keep any homeowner awake at night. Whether it stems from a burst pipe, a leaky roof, or a humid summer that overwhelmed your HVAC system, water intrusion is a serious issue that requires immediate attention. It isn’t just about unsightly stains; moisture trapped in your walls can compromise the structural integrity of your home and creates the perfect breeding ground for mold.

While your instinct might be to grab a bucket and some towels, the damage often goes deeper than the surface. Drywall acts like a sponge, wicking moisture upward and retaining it long after the initial spill is cleaned up. Understanding the severity of the damage and knowing when to call in a professional is crucial for protecting your investment and your health.

Call 317-269-7319 for Water Damaged Drywall Repair in Indianapolis
Call 317-269-7319 for Water-Damaged Drywall Repair in Indianapolis

Assessing the Damage: Signs You Can’t Ignore

Before you can decide on a course of action, you need to understand the extent of the problem. Drywall is a porous material made of gypsum plaster sandwiched between two sheets of thick paper. When this material gets wet, it loses its structural strength quickly.

The 48-Hour Window

Time is your enemy when dealing with water damage. According to the EPA, mold can begin to grow on damp surfaces within 24 to 48 hours. If the drywall has been wet for longer than two days, it is generally safer to assume that mold growth has begun, even if you can’t see it yet.

Visual and Tactile Clues

To evaluate the state of your walls, look for these common indicators:

  • Discoloration: Water stains often appear as yellow or brown rings.
  • Texture Changes: Bubbling, peeling paint, or wallpaper that is lifting at the seams are clear signs of moisture behind the surface.
  • The “Press Test”: Gently press on the affected area with your finger. Drywall should be firm. If it feels soft, spongy, or leaves an indentation, the gypsum core has dissolved, and the panel needs to be replaced.
  • Visible Mold: If you see black, green, or white clusters, do not disturb the area, as this can release spores into the air.

The Hidden Danger of Insulation

It is not just the drywall you need to worry about. If your walls are insulated, the problem is likely compounded. The Department of Housing and Urban Development (HUD) warns that wet fibrous insulation holds water and impedes drying. If the insulation behind your drywall is wet, it cannot be saved and must be removed to prevent wood decay and persistent mold issues inside the wall cavity.

Why Professional Repair is Essential

In an era of DIY tutorials, it is tempting to view drywall replacement as a weekend project. However, water damage remediation involves complexities that go far beyond patching a hole. Attempting to fix this yourself can lead to long-term structural issues and serious health risks.

Avoiding Hazardous Materials

If your home was built before 1980, the joint compound used to finish your drywall may contain asbestos. Furthermore, homes built prior to 1978 often contain lead-based paint. Disturbing these materials without proper containment and personal protective equipment (PPE) can release toxic dust into your home. Professional remediation teams are trained to test for these hazards and remove materials safely, following strict safety guidelines to protect your family.

Preventing Mold Spread

One of the biggest risks of DIY removal is cross-contamination. Tearing out moldy drywall without setting up a containment zone (using plastic sheeting and negative air pressure) can send millions of mold spores flying into your HVAC system and other rooms. The EPA advises that if a moldy area covers more than 10 square feet, a professional should handle the cleanup to ensure the contamination is fully contained.

Ensuring Structural Integrity

Professionals know exactly how much drywall to remove. A general rule of thumb from FEMA is to remove drywall at least 12 inches above the water line. This ensures that any material that may have wicked moisture upward is removed. Professionals also have the moisture meters and infrared cameras necessary to verify that the wooden studs behind the wall are completely dry before new drywall is installed—a step often skipped by DIYers, leading to rot behind brand-new walls.

Book a Free Drywall Repair Estimate Right Now

Scheduling Service: What to Look For

When you are ready to hire a professional, diligence is key. You need a contractor who understands both the construction aspect of drywall and the science of water damage restoration.

Check for Certification

Look for professionals who hold certifications from the Institute of Inspection, Cleaning and Restoration Certification (IICRC). This non-profit organization sets the standards for the inspection, cleaning, and restoration industries. A technician with IICRC certification has been trained in the latest methods for safe mold remediation and structural drying.

Verify Insurance and Licensing

Ensure the company carries liability insurance and workers’ compensation. This protects you in case of accidental damage to your property or injury to a worker during the project. Additionally, check regarding local building codes. While some minor repairs might be exempt, structural work often requires specific permits.

In Indiana, for example, even if a project is exempt from state filing, local permits are often still required. A reputable contractor will handle the permitting process for you.

Prevention Tips: Protecting Your Home

Once your walls are restored, the goal is to prevent history from repeating itself. While you cannot control the weather, you can fortify your home against moisture intrusion.

  • Manage Exterior Drainage: Ensure your gutters and downspouts are clear and direct water at least five feet away from your foundation.
  • Control Humidity: The EPA recommends keeping indoor humidity between 30 and 50 percent. Using a dehumidifier during humid months can prevent condensation from forming on cold walls.
  • Maintain Plumbing: Regularly check under sinks and around appliances for slow leaks. Catching a drip early can save you thousands of dollars in drywall work later.
  • Sump Pump Maintenance: If you have a basement, test your sump pump regularly, especially before the rainy season, to ensure it is functioning correctly.

Conclusion

Water damage is a time-sensitive issue that demands a professional response. The risks associated with improper drying—ranging from structural rot to hazardous mold growth—are simply too high to leave to chance. By understanding the signs of damage and prioritizing professional remediation, you ensure that your home remains a safe, healthy environment for your family.

If you suspect water damage in your walls, do not wait for the problem to worsen. Acting fast is the best way to minimize damage and costs.

If you are located in the Indianapolis area and are concerned about soft walls, stains, or potential water damage, we are here to help. Contact Us Today to schedule a free drywall repair assessment. Our team will evaluate the extent of the damage and provide a clear plan to restore your home to its original condition.

Schedule Your Free Assessment

Related Post: Detecting Water Damage in the Home: Signs, Solutions, and Prevention

Why Professional Drywall Repair Beats DIY Every Time

That hole in your living room wall might seem like a simple weekend fix, but drywall repair involves more complexity than most homeowners realize. While the appeal of saving money through DIY projects is understandable, drywall repair requires specific skills, tools, and techniques that professionals have mastered through years of experience.

Whether you’re dealing with water damage from a leaky pipe, impact damage from moving furniture, or nail pops from house settling, the quality of your repair will determine whether the problem stays fixed or becomes a recurring headache. Professional drywall repair offers homeowners a reliable solution that stands the test of time, while DIY attempts often lead to frustration, wasted materials, and the need for costly do-overs.

Understanding the differences between professional and DIY drywall repair can save you both time and money in the long run. Let’s explore why hiring a drywall repair company is often the smarter choice for achieving seamless, lasting results.

Call 317-269-7319 for Professional Drywall Repair in Indianapolis Indiana

Common DIY Drywall Mistakes That Cost Homeowners

Most homeowners underestimate the complexity of drywall repair, leading to mistakes that create bigger problems than the original damage. These errors often result in visible patches, recurring issues, and the need for complete re-work by professionals.

Improper Texture Matching

Achieving a seamless finish requires matching the existing wall texture perfectly. DIY repairs frequently result in obvious patches because homeowners struggle to replicate the original texture pattern. Whether your walls have orange peel, knockdown, or popcorn texture, each requires specific techniques and tools that most homeowners don’t possess.

Water damage from leaky pipes often creates bubbling and crumbling drywall that extends beyond the visible damage. DIY repairs typically address only the surface problem, missing underlying moisture issues that can lead to mold growth and structural damage.

Inadequate Surface Preparation

Professional drywall work begins with thorough surface preparation, including proper cleaning, priming, and ensuring the area is completely dry. DIY attempts often skip these crucial steps, resulting in poor adhesion and patches that fail over time.

Impact damage from furniture or accidental collisions might appear straightforward, but properly repairing holes requires understanding wall construction, stud location, and load-bearing considerations that DIY repairs often overlook.

Incorrect Material Selection

Different types of drywall damage require specific materials and compounds. Using the wrong joint compound, mesh tape, or patching material can result in repairs that crack, shrink, or fail to bond properly with the surrounding wall.

Nail pops and cracks due to house settling require more than simple spackling. These issues often indicate structural movement that needs professional assessment to prevent recurring problems.

Tools and Expertise: What Professionals Bring to Drywall Repair

Expert drywall work involves specialized tools and techniques that most homeowners don’t have access to or experience using. This expertise makes the difference between a repair that blends seamlessly with your existing wall and one that remains visible for years.

Specialized Equipment

Licensed drywall contractors use industrial-grade tools including pneumatic sanders, texture sprayers, and precision cutting equipment. These tools enable precise work that hand tools simply cannot match. For new construction drywall or extensive repairs, professionals have access to lifts, scaffolding, and dust collection systems that ensure both safety and quality.

Technical Knowledge

Years of experience teach professionals how to identify underlying issues that cause drywall damage. They understand building codes, moisture control, and structural considerations that impact repair longevity. This knowledge prevents small problems from becoming major issues.

High-level drywall finishing requires understanding how different compounds interact, proper drying times, and layering techniques that create smooth, durable surfaces. DIY repairs often rush these processes, resulting in visible seams and uneven surfaces.

Quality Materials and Techniques

Pros have access to commercial-grade materials and know which products work best for specific applications. They understand primer selection, compound compatibility, and finishing techniques that ensure repairs last for decades rather than months.

Contact Us Now For a Free Drywall Quote

Cost Analysis: DIY vs Professional Drywall Repair

While DIY drywall repair might seem cost-effective initially, the true cost includes materials, tools, time, and potential mistakes that require professional correction. Understanding these hidden expenses helps homeowners make informed decisions.

Upfront DIY Costs

A typical hole in the wall repair requires drywall patches, joint compound, tape, primer, paint, and various tools. First-time DIY repairs often require multiple trips to the hardware store as homeowners discover additional needed materials. Tool rental or purchase adds significant expense for repairs that might only happen once.

Hidden DIY Expenses

Failed DIY repairs frequently require complete re-work, doubling or tripling material costs. Poor surface preparation can damage surrounding wall areas, expanding the repair scope. Additionally, the time investment for DIY projects often exceeds expectations, particularly when accounting for learning curves and multiple attempts.

Dust and mess from DIY drywall repair can damage furnishings and require extensive cleanup. Professional drywalling services include proper dust containment and cleanup as part of their service.

Professional Repair Value

Professional drywall repair includes materials, labor, cleanup, and warranty protection. While the upfront cost might be higher, professionals complete repairs efficiently without the trial-and-error process that characterizes DIY attempts. Their work typically includes color-matched paint and primer, ensuring seamless blending with existing walls.

Most professional drywall installation and repair services offer warranties that protect homeowners against defects or recurring issues, providing peace of mind that DIY repairs cannot match.

Long-Term Benefits of Professional Drywall Repair

The advantages of professional drywall repair extend far beyond the immediate fix. Quality workmanship provides lasting value that DIY repairs rarely achieve.

Durability and Longevity

Professional repairs use proven techniques and quality materials that withstand normal wear and tear. Proper surface preparation, appropriate compound selection, and expert finishing create repairs that last for decades without cracking, shrinking, or becoming visible over time.

Poorly patched holes or seams from DIY attempts often result in visible lines and uneven surfaces that worsen over time. Professional repairs eliminate these issues through proper technique and quality control.

Property Value Protection

Visible drywall repairs can negatively impact property value and appeal to potential buyers. Expert repairs maintain the integrity and appearance of your walls, protecting your investment. Quality drywall finishing is particularly important in high-visibility areas where imperfections are easily noticed.

Time and Stress Savings

Licensed drywall repair eliminates the frustration, mess, and time investment required for DIY attempts. Contractors complete repairs efficiently while homeowners focus on other priorities. This time savings often justifies the cost difference, particularly for busy homeowners or complex repairs.

Health and Safety Considerations

Drywall repair involves dust, chemicals, and potential exposure to mold or asbestos in older homes. Professionals have proper safety equipment and training to handle these hazards safely. They also understand ventilation requirements and containment procedures that protect your family’s health.

Making the Right Choice for Your Home

Trained drywall repair offers homeowners reliable, lasting solutions that DIY attempts rarely achieve. While the initial investment might be higher, the combination of quality workmanship, proper materials, time savings, and warranty protection makes professional repair the smarter long-term choice.

Whether you’re dealing with water damage, impact holes, settling cracks, or failed previous repairs, professional contractors have the expertise and tools to restore your walls to like-new condition. Their work blends seamlessly with existing surfaces and stands up to years of normal use.

Don’t let drywall damage compromise your home’s appearance or value. Contact our experienced team today for a free estimate on your drywall repair needs. We’ll assess your situation and provide a comprehensive solution that restores your walls professionally and permanently.

Call Now to Request an Estimate

Related Post: DIY Drywalling vs. Professional Contractors: Making the Right Choice

A Complete Guide to Suspended Ceiling Repair

Suspended ceilings, often found in offices, commercial spaces, and homes, are popular for their sleek appearance, soundproofing capabilities, and easy access to overhead systems like plumbing and HVAC. However, they’re not immune to wear and tear. From sagging tiles to water damage, suspended ceilings can develop issues over time, compromising their functionality and aesthetics.

If you’re a building manager, business owner, or homeowner dealing with ceiling issues, this guide is here to help. We’ll walk you through everything from identifying common problems to performing repairs and preventing future damage. Whether you’re planning a DIY fix or considering hiring a professional, this comprehensive guide will lead you in the right direction.

Call 317-269-7319 for Professional Suspended Ceiling Repair in Indianapolis Indiana

What is a Suspended Ceiling?

A suspended ceiling, also known as a dropped ceiling or false ceiling, is a secondary ceiling that hangs below the main structural ceiling. This space, known as the plenum, is often used to conceal electrical wiring, plumbing, and HVAC systems. Suspended ceilings consist of a metal grid framework that holds lightweight tiles, often made of materials like gypsum, fiberglass, or mineral fiber.

Suspended ceilings are favored for their versatility, ease of installation, and acoustic benefits. However, like any structural feature, they require periodic maintenance and repairs to remain functional and safe.

Common Issues with Suspended Ceilings

Before jumping into repairs, it’s crucial to identify the problem. Here are some common issues you might encounter:

1. Water Damage

Caused by leaks from pipes or roofs, water damage usually presents as stained, swollen, or discolored tiles. Left unchecked, it can lead to mold growth and compromise the structural integrity of the ceiling.

2. Sagging

Sagging occurs when the grid or tiles droop due to excessive weight, moisture, or aging materials. This not only looks unsightly but can also pose safety risks.

3. Cracked or Broken Tiles

Tiles can crack or break due to impact or wear. Damaged tiles can affect the aesthetics and reduce the ceiling’s functional efficiency, such as dampening sound.

4. Loose Tiles

Tiles that don’t fit snugly into the grid can shift or fall, often as a result of poor installation or vibrations from HVAC systems.

5. Structural Issues

Over time, the metal grid holding the tiles can corrode, bend, or loosen, compromising the entire ceiling framework.

Learn More About Drywall Ceiling Repairs

Why Professional Repairs Are Important

While DIY repairs can address some minor issues, hiring a professional drywall and ceiling repair company like Drywall by Renso offers several advantages:

  • Safety: Professionals have the expertise and equipment to address ceiling damages safely, preventing potential injuries.
  • Expertise: Complex issues, such as recurring leaks or sagging, often require an expert diagnosis and repair.
  • Long-Term Results: A properly repaired ceiling lasts longer and reduces the likelihood of future issues.
  • Compliance: For commercial spaces, professional contractors ensure repairs meet local codes and regulations.

Tools and Materials Needed to Repair a Suspended Ceiling

If you’re wondering how your professional drywall team will tackle suspended ceiling repairs, here’s a list of the expected tools and materials used for the job:

  • Safety gear (gloves, goggles, mask)
  • Step ladder or scaffolding
  • Replacement tiles
  • Metal grid parts (if needed)
  • Utility knife
  • Measuring tape
  • Screwdriver or drill
  • Sandpaper
  • Paint (for touching up)

Step-by-Step Suspended Ceiling Repair Guide

Here’s a brief explanation of what you can expect from the suspended ceiling repair process:

Step 1. Damage Assessment

They will inspect your suspended ceiling for visible issues like stains, sagging, or cracks. They will also check the plenum for underlying causes, such as leaks or broken grid components.

Step 2. Preparing the Workspace

They will then clear the area beneath the damaged section to avoid accidents. They will also lay down a drop cloth to catch debris and work safely with safety gear.

Step 3. Damaged Tile Removal

Next, they will carefully remove damaged tiles by lifting them out of the grid. For stains, they might consider cleaning the tile with a mild solution before deciding to replace it.

Step 4. Grid and Framework Repairs

At this point, they will inspect the metal grid for damage. Then they might tighten any loose connectors and replace bent or corroded sections with new ones.

Step 5. Replacement Tile Installation

Now, they will cut replacement tiles to size (if necessary) using a utility knife. From there, they will insert them into the grid, ensuring they are secured and aligned.

Step 6. Final Checks

Drywallers will finish by ensuring the ceiling is level and all tiles fit snugly. They will also clean up the workspace and dispose of debris responsibly.

Prevention and Maintenance Tips for Suspended Ceilings

To avoid frequent repairs, adopt these simple practices:

  • Conduct regular inspections for water leaks, tile displacement, or visible damage.
  • Ensure proper ventilation to reduce moisture buildup, especially in humid environments.
  • Use water-resistant tiles to minimize damage from accidental leaks.
  • Promptly address roof and plumbing issues to prevent water damage.
  • Avoid overloading ceilings with decorative items or excess weight.
  • Schedule professional maintenance checks at least once a year.

Frequently Asked Questions About Ceiling Repair

How do I identify water damage on my suspended ceiling?

Look for signs like brown stains, warping, or mold growth on the tiles.

Can I replace ceiling tiles myself, or do I need a professional?

Minor tile replacements can be done as a DIY project. However, for extensive damages or structural issues, hiring a professional is recommended.

How often should I inspect my suspended ceiling for damage?

Inspect your ceiling at least twice a year or immediately after events like storms or leaks.

What are the costs associated with professional suspended ceiling repair?

Costs vary based on the extent of damage, materials, and labor. Request a free quote from Drywall by Renso to get an accurate estimate.

What causes sagging in suspended ceilings and how can it be prevented?

Sagging is usually caused by excessive weight or moisture. Prevent it by using lightweight tiles and addressing leaks or high humidity promptly.

RECAP

Suspended ceilings are a practical and stylish solution for modern spaces, but they require timely maintenance to stay in top condition. Whether you’re dealing with tile damage or structural issues, acting promptly can save you from costly repairs down the line.

For business owners, building managers, or homeowners in the Greater Indianapolis area, Drywall By Renso  is here to help. Our licensed technicians specialize in professional drywall ceiling repairs to keep your spaces safe and stylish. Get started today by requesting a free quote.

Get Your Free Estimate Now

Related Post: What You Need to Know About Having Grid Ceilings Installed

How to Fix Moisture Issues in Walls and Prevent Long-Term Damage 

Moisture in walls is more than just an annoying inconvenience. Left untreated, it can lead to damaging mold growth, unpleasant odors, and even compromise the structural integrity of your home. Whether you’ve spotted peeling paint or detected a musty odor, identifying and fixing the problem early is essential to maintaining the health of your property. 

This guide will walk you through diagnosing moisture problems, tackling DIY fixes, knowing when to hire a professional, and taking steps to prevent future issues. By the end, you’ll not only have a better understanding of “moist walls” and their causes but also a clear action plan to fix and safeguard your home. 

Call 317-269-7319 for Professional Wet Drywall Replacement in Indianapolis

How to Spot Moisture Problems in Your Walls 

Unsure if your walls have a moisture issue? Here are the telltale signs to watch for in both visible and subtle forms: 

  • Water Stains: Brown or yellow stains on walls or ceilings are classic indicators of water seepage. 
  • Peeling Paint or Bubbling Wallpaper: Moisture causes paint and adhesives to lose their grip. 
  • Musty Odors: A persistent stale smell in specific spaces can suggest trapped moisture or hidden mold. 
  • Visible Mold or Mildew: Black, green, or white patches spreading on walls are red flags. 
  • Soft or Damp Spots: If certain parts of your wall feel softer to the touch or damp, water may have seeped into the structure. 
  • Condensation:Sweating walls,” especially on poorly insulated surfaces during colder months, indicate high humidity levels inside. 

If you’re seeing any of these signs, there’s likely more going on beneath the surface. 

Common Causes of Wet Walls and Moisture Problems 

Fixing moisture starts with understanding the root cause. Here are the most frequent culprits behind water-damaged walls: 

  • Leaks: Plumbing leaks or roof damage can allow water to seep into wall cavities. 
  • Condensation: High indoor humidity can lead to water droplets forming on cold surfaces, especially around windows or uninsulated spaces. 
  • Poor Ventilation: Bathrooms and kitchens without proper ventilation trap moisture, fostering dampness and mold growth
  • Cracks and Gaps: Small openings around windows, doors, or walls allow water to enter, especially during heavy rainfall. 
  • Flooding or Burst Pipes: Severe incidents like floods or burst pipes can saturate walls, causing substantial water damage. 

Recognizing the source of moisture is vital for choosing the correct method to address it. 

DIY Solutions for Moisture Control 

For minor issues, there are several homeowner-friendly fixes that can resolve or manage the problem. Give these remedies a try:

  • Improve Ventilation – Open windows and use exhaust fans, especially in kitchens and bathrooms, to reduce indoor humidity levels. 
  • Seal Cracks and Gaps – Apply waterproof caulk or sealant around window frames, door edges, and visible cracks in walls to block water intrusion. 
  • Clean Moldy Surfaces – Use a diluted bleach solution (1 cup bleach to 1 gallon of water) to scrub moldy walls. Wear gloves and a mask to protect yourself during cleaning. 
  • Use a Dehumidifier – Place a dehumidifier in damp areas to remove excess moisture from the air, reducing conditions for dampness and mold. 
  • Redirect Water – Ensure gutters and downspouts are clear and directing water at least 3 feet away from your foundation to prevent seepage into walls. 

Small steps can make a big difference, but be sure to evaluate the problem’s scale before proceeding with DIY fixes. 

Contact Us for a Drywall Inspection

When to Call in a Professional 

Not every moisture issue can be handled alone. Here’s when it’s time to bring in the pros:

  • Extensive Mold Growth – When mold covers more than 10 square feet or keeps reappearing after cleaning, professional mold remediation is crucial. 
  • Persistent Leaks – If a water leak isn’t easily identifiable or fixable, you’ll need experts to locate the source and repair it. 
  • Structural Damage – If walls are crumbling, soft, or visibly warped, the damage is structural and requires immediate professional attention, likely including drywall repair or replacement. 
  • Health Concerns – If anyone in the household suffers from allergies or respiratory issues linked to mold exposure, hire specialists to ensure a safe environment. 

Expect professionals to provide a detailed inspection using moisture detection equipment, recommend solutions like sealing leaks or replacing drywall, and offer prevention tips to keep moisture from returning. 

Tips to Prevent Future Moisture Problems 

Prevention is the best cure, especially when it comes to moisture. Follow these tips to keep your walls dry and damage-free:

  • Maintain Good Ventilation – Use exhaust fans and open windows to promote airflow and reduce indoor moisture buildup. 
  • Inspect and Maintain Plumbing – Regularly check pipes, faucets, and water heaters for leaks, addressing them promptly. 
  • Control Indoor Humidity – Keep humidity levels below 50% using dehumidifiers and ensure proper insulation to prevent condensation issues. 
  • Clean Gutters and Downspouts – Regular maintenance of gutters ensures water is directed away from your foundation, protecting your walls. 
  • Ensure Proper Sealing – Inspect and repair cracks, gaps, or worn-out seals around your home’s foundation, windows, and doors. 
  • Monitor Condensation – Pay attention to condensation forming around windows or walls and address it with insulation or moisture-control measures. 

By adopting these habits, you can create a dry, safe, and comfortable living space for years to come. 

Protect Your Home from Moisture Today 

Fixing and preventing moisture issues is essential to maintaining your home’s structural integrity and indoor air quality. Whether it’s tackling minor problems with DIY solutions or calling a professional for larger-scale repairs, addressing moisture issues promptly will save you money and stress in the long run. 

If you’re dealing with moldy walls, wet drywall, or water damage, don’t wait for the problem to grow worse. Get a free quote for drywall repair at Drywall By Renso and take the first step toward a healthier, drier home. 

Call Now For A Free Quote

Related Post: Detecting Water Damage in the Home: Signs, Solutions, and Prevention

Hole in the Wall? Here Are Your Best Options for Repair

Have you ever noticed a small (or not-so-small) hole in your wall and thought, “Where do I even start?” Whether it’s a nail hole from picture frames, a pesky dent from a door handle, or even damage caused by movers, wall imperfections can disrupt the aesthetic of your living space. The good news? Fixing holes in your walls is easier than you think and doesn’t have to cost a fortune.

This guide breaks down everything you need to know about drywall repair, so whether you’re a seasoned DIY weekend warrior or new to repairing walls, you’ll have all the tools and tips you need to get your walls back to flawless condition.

Call 317-269-7319 for Expert Wall Hole Repair in Indianapolis Indiana

Understanding Different Types of Wall Damage

Not all wall damage is created equal. The type and severity of the damage will determine the method and tools required for repair. Here are a few common scenarios:

  • Nail holes – Quick fixes for holes left behind by picture frames or decorations.
  • Door handle dents – These can range in size and may need a bit more filling and sanding to blend in.
  • Furniture scuffs – Often surface-level damage that requires just a touch-up of paint.
  • Mouse holes – Urgent repairs are needed here to seal off entry points for pests.

By identifying what type of damage you’re dealing with, you can tailor your approach and select the right materials for the job.

Gathering Your Repair Supplies

Before you roll up your sleeves, gather the proper tools. Having the right drywall supplies on hand makes the process smooth and reduces frustration. For most wall repairs, you’ll need:

  • Trowel – For applying joint compound evenly over larger damaged areas.
  • Spackle – Perfect for filling small nail holes or thin cracks.
  • Drywall Patch Kit – Ideal for covering larger holes, often with a mesh backing for support.
  • Joint Compound – Provides a smooth, blendable surface for covering damage and seams.
  • Putty Knife – Used to apply spackle or joint compound with precision.
  • Sandpaper or Sanding Sponge – To smooth the surface before painting.
  • Paint and Primer – To match your wall and ensure a seamless finish.

Contact Us for Expert Drywall Repair

Step-by-Step Guide to Patching Small Holes

For minor damage like nail or screw holes, repairs can be quick and painless. Here’s how to get it done:

  1. Clean the Area – Remove any dirt, dust, or loose paint around the hole.
  2. Apply Spackle with a Putty Knife – Scoop a small amount onto your putty knife and press it into the hole, smoothing it out flush with the wall.
  3. Allow It to Dry – Check the product instructions for drying time, but most spackle dries within a few hours.
  4. Sand the Surface – Use fine-grit sandpaper to create a smooth finish that blends seamlessly with the wall.
  5. Prime and Paint – Touch up the repaired area with primer, then apply matching paint for a flawless look.

Small nail holes may not even require sanding if your spackle application is smooth!

Tackling Larger Holes

Larger damage, like fist-sized holes from accidents or significant dents, requires a more involved approach but is still manageable:

  1. Prepare the Hole – Use a utility knife to create clean, smooth edges around the damaged area.
  2. Attach a Support Patch – For holes larger than a few inches, use a drywall patch (often included in drywall patch kits). Center it over the damage for stability.
  3. Apply Joint Compound – Use a trowel to spread joint compound evenly over the patch. Feather the edges to blend it with the surrounding wall.
  4. Sand and Repeat – Once the joint compound is dry, sand it down to achieve a smooth finish. You may need to apply another thin coat to perfect the blend.
  5. Prime and Paint – Just like with small holes, finish with primer and a matching paint color.

For textured walls, consider using texture spray or special tools to mimic the existing finish.

Preventing Future Wall Damage

Once you’ve restored your walls to their former glory, take these steps to avoid dealing with cracks, holes, and dents in the future:

  • Install doorstops to prevent doorknobs from damaging walls.
  • Use felt pads on furniture to minimize scratches and scuffs.
  • Mount decorations with appropriate hardware, like anchors, to prevent them from falling.
  • Be cautious when moving furniture to avoid bumping into walls.
  • Monitor humidity levels in your home to reduce the risk of drywall cracks.

Simple, proactive measures can save you plenty of time and effort in repairs down the road.

Professional vs DIY

If you’re not confident in your wall repair skills or the damage seems overwhelming, hiring a professional drywall repair company may be the way to go. Here’s what you gain by working with an expert:

  • Guaranteed Results – Professionals deliver seamless, high-quality repairs with no visible patches.
  • Color Matching – They’ll ensure the repaired area blends perfectly with your existing paint.
  • Time Savings – Professional repairs mean less disruption to your daily routine.
  • Peace of Mind – They’ll handle complex or hazardous issues, like walls potentially containing asbestos.

However, if the damage is minor, following the steps in this guide can save you money while still achieving great results.

Wrapping Up

Repairing wall damage doesn’t have to be a stressful or costly endeavor. Whether you’re patching a tiny nail hole or tackling a larger repair, the right tools and techniques make all the difference. By following the steps outlined here, you’ll be well on your way to smooth, flawless walls.

Need help with tougher repairs or don’t have the time to DIY? We’re here to assist. Drywall By Renso specializes in seamless drywall repair for any size or type of damage. From assessment to color matching, we’ll ensure your walls look as good as new in no time.

Get a quote today!

Related Post: How to Repair a Hole in the Wall From a Door Handle

Look Up With Delight: Finding Expert Ceiling Repair in Indianapolis

Your ceiling is more than just a part of your home—it protects your space, provides insulation, and contributes to your property’s overall aesthetic. When problems like cracks, sagging, or water damage arise, acting quickly can save you from costly repairs down the line. But choosing the right ceiling repair service is critical. This guide will help homeowners and property managers understand how to identify problems, find expert drywall ceiling repair professionals, and ensure quality craftsmanship.

Call 317-269-7319 for Expert Ceiling Repair and Replacement in Indianapolis Indiana

Why Timely Ceiling Repairs Matter

Ceiling damage often starts off small—cracks, stains, or slight sagging. At first, these issues may seem like minor inconveniences. However, neglecting them can worsen the problem, leading to structural instability, increased repair costs, or even safety risks.

While you may be tempted to fix it yourself, ceiling repair often requires specialized skills. DIY fixes can fail to address the root of the issue, leading to recurring problems. That’s why working with professional drywall and ceiling repair experts is essential to getting the job done right.

Signs Your Ceiling Needs Repair

Not sure if your ceiling requires immediate attention? Here are the most common signs that indicate it’s time to call a ceiling repair service:

Visible Cracks

Small hairline cracks may seem harmless but can indicate foundation shifts or structural issues. Wider ceiling cracks might result from more severe problems, like excessive weight or improper installation.

Water Stains and Damage

Water damage often appears as yellow or brown stains on your ceiling. These unsightly spots are usually caused by roof leaks or plumbing issues above the ceiling. Left unaddressed, a ceiling leak can lead to mold growth, which poses health risks.

Sagging Ceiling

A sagging ceiling is an urgent repair issue. It may result from water damage, improper installation, or even structural failure. If your ceiling seems to sag or dip lower than usual, it could potentially collapse without warning.

Peeling Paint or Plaster

Peeling paint or plaster is often a sign of excessive moisture or poor ventilation. It’s more than just an aesthetic issue—it could signal water damage or a developing ceiling leak.

Unusual Noises

Does your ceiling creak or groan? This could signal structural stresses, poorly installed drywall, or even pests hiding in your ceiling space.

Key Qualities to Look for in an Expert Ceiling Repair Service

When it comes to ceiling repairs, not all service providers are created equal. To ensure the best results, look for these key qualities in a ceiling repair professional:

Experience and Expertise

Choose a company with years of experience solving issues like sagging ceilings, water damage, and drywall repair. Knowledgeable contractors will quickly diagnose problems and recommend effective solutions.

Certifications and Insurance

Verify that the ceiling repair service is licensed and insured. This guarantees that the professionals working on your property have the necessary qualifications and that you’re protected if something goes wrong.

Positive Reviews and Reputation

Do some research by checking customer reviews on platforms like Google, Yelp, or Angi. Look for testimonials from people in your area who had similar ceiling damage.

Detailed Estimates

Top-notch companies provide clear, written estimates before starting any work. Transparency ensures there are no unexpected costs and that you understand exactly what you’re paying for.

Specialized Equipment

For issues like ceiling leaks or sagging, the right tools matter. Ensure the team you’re hiring has access to modern techniques and equipment to handle complex ceiling repairs efficiently.

How to Research and Shortlist Local Services

Finding the right ceiling repair service near you can seem overwhelming, but these steps make the process manageable:

1. Search for Local Services

Use search terms like “ceiling repair services in Indianapolis” or “local drywall repair in [your township]” to find companies nearby. Many professionals focus on serving local homeowners and property managers, giving them an edge in understanding common problems in your community.

2. Ask for Recommendations

Word-of-mouth referrals are invaluable. Ask friends, family, or neighbors about trusted ceiling repair professionals they’ve worked with.

3. Check Credentials

Visit the company’s website or social media profiles to confirm certifications, licenses, and positive reviews. The better the track record, the more likely you’ll receive quality results.

4. Compare Estimates

Once you’ve shortlisted a few options, request quotes from each service provider. Compare pricing but don’t choose based solely on the lowest bid—consider other factors like experience and customer reviews.

Questions to Ask Before Hiring a Ceiling Repair Professional

Before committing to a ceiling repair service, schedule a consultation and ask these critical questions:

What’s causing the ceiling damage?

Their ability to explain the issue in detail will reflect their expertise.

What is your experience with similar repairs?

This ensures they have successfully handled similar projects in the past.

How long will the repair take?

Understand the timeline upfront to minimize disruption.

Do you offer any warranties?

Reputable companies typically guarantee their workmanship for added peace of mind.

Can you provide references?

Speaking with past clients lets you gauge the quality of their service.

Why Hire Experts Instead of DIY?

While it might be tempting to tackle ceiling repairs yourself, hiring an expert ceiling repair service is almost always the better choice. Here’s why:

  • Safety First: Without proper tools or training, you risk injury while attempting ceiling repairs. Professionals follow safety protocols to eliminate hazards.
  • Long-Lasting Results: Experts address both the symptoms and the root cause of the damage, preventing recurring issues.
  • Saves Time and Money: DIY attempts can lead to further damage or failed fixes, costing more in the long run. Hiring professionals from the start ensures efficiency.
  • Aesthetic Appeal: Skilled professionals ensure your ceiling looks as good as new, preserving your property’s value.

Wrapping Up

Your ceiling is too important to leave to chance. Whether it’s water damage, a sagging ceiling, or unsightly cracks, addressing these issues with the help of qualified professionals will save you time, money, and stress.

If you’re located in Indianapolis or surrounding areas, consider connecting with trusted local drywall repair experts for a consultation. They can assess your ceiling damage and provide a tailored plan to restore your space. Schedule a free estimate today and enjoy worry-free living under a beautifully restored ceiling.

Are your ceilings suffering from some structural damage? Perhaps they’re a little outdated? We can help. Contact Drywall by Renso at 317-269-7319 for expert ceiling repair in Indianapolis, Indiana. We serve both residential and commercial clients all throughout Central Indiana.

Related Posts:

Tips for Replacing Damaged Drywall After Plumbing Leaks
Replacing Drywall After a Pest Infestation: What You Need to Know
How to Find Reliable Drywall Contractors: A Comprehensive Guide

Safeguard Your Walls in Style: Top Wall Protection Products for Interior Spaces

Over time, even the most well-maintained homes and properties face inevitable wear and tear. Walls, in particular, are especially vulnerable to scratches, dents, scuffs, and abrasions caused by everyday activities. From chair marks and foot traffic to accidental bumps and scrapes, the lifespan of your walls can take a hit if not properly protected. 

This is where wall protection products come into play. Whether you’re a homeowner looking to preserve the beauty of your walls or a property manager searching for durable solutions for tenants, wall protection can reduce damage, maintain aesthetics, and save money in costly repairs down the line. 

In this guide, we’ll explore the various types of wall protection products and how to choose the best ones for your needs. You’ll also find helpful installation tips and considerations for professional repair or replacement. 

Call 317-269-7319 for Professional Drywall Repair Service in Indianapolis

Types of Wall Protection Products 

Wall protection products are versatile and can be tailored to fit your specific needs. Below are some of the most effective options for keeping your walls in pristine condition. 

1. Corner Guards

Corner guards are durable strips made to protect the vulnerable edges of your walls from damage. Typically made from materials like stainless steel, PVC, or rubber, they’re designed to deflect impact and safeguard corners that suffer the most wear. 

  • Where to use: Ideal for high-traffic areas like hallways, stairwells, or kitchens, especially in properties with children, pets, or frequent foot traffic. 
  • Best practices: Install corner guards using adhesive for a smooth and damage-free application or use screws for heavy-duty installations in commercial spaces. 

Benefits: 

  • Prevent chips and dents on wall corners. 
  • Available in various materials and finishes to blend seamlessly with décor. 
  • Easy to clean and maintain. 

2. Wall Bumpers

Wall bumpers act as buffers, absorbing impact from furniture, door handles, and other objects that may hit your walls. 

  • Where to use: Commonly installed behind doors, near furniture, or in garages where walls are prone to dents and scratches. 
  • Best practices: Match the bumper style to your walls for a clean aesthetic, and use bumpers with adhesive backs to simplify installation. 

Benefits: 

  • Protects your walls from accidental impact. 
  • Prevents repetitive damage in high-risk areas. 
  • Comes in a range of sizes and designs. 

3. Kick Plates

Kick plates are durable panels installed at the base of doors or walls to protect surfaces from kicks, scuffs, and abrasions. 

  • Where to use: Perfect for entryways, corridors, and areas in busy properties where doors see heavy use. 
  • Best practices: Choose materials like aluminum or stainless steel for maximum durability, or opt for acrylic plates for a more subtle appearance. 

Benefits: 

  • Protects lower walls and doors from damage. 
  • Offers a sleek, professional appearance. 
  • Long-lasting, even under heavy wear. 

4. Chair Rails

Chair rails are decorative molding strips installed horizontally across walls. Originally designed to protect walls from damage caused by chairs, they now also enhance wall aesthetics. 

  • Where to use: Dining rooms, offices, or spaces where furniture frequently comes into contact with walls. 
  • Best practices: Install at about one-third the height of the wall for optimal protection and visual appeal. 

Benefits: 

  • Dual-purpose functionality—protection and design. 
  • Available in various styles to suit traditional or modern interiors. 
  • Can be painted for a custom look. 

5. Wainscoting

Wainscoting refers to decorative wood or paneling installed on the lower portion of walls. This option is particularly popular for its elegance and practicality. 

  • Where to use: Living rooms, dining areas, and hallways for a touch of class while fortifying your walls.
  • Best practices: Opt for moisture-resistant materials like PVC wainscoting for areas exposed to humidity, such as bathrooms or kitchens. 

Benefits: 

  • Adds a layer of insulation and soundproofing to walls
  • Combines functionality with sophisticated décor. 
  • Easy to clean and maintain. 

6. Clear Protective Films

Clear protective films are thin, transparent coverings that shield walls or surfaces while maintaining their original look. 

  • Where to use: Ideal for glass walls, painted surfaces, and areas requiring a discreet layer of protection. 
  • Best practices: Invest in high-quality UV-resistant films to avoid yellowing over time, and ensure surfaces are clean and dry before application. 

Benefits: 

  • Invisibly preserves the integrity of any surface. 
  • Easy to apply and remove when needed. 
  • Great for areas showcasing artwork or polished finishes. 

How to Choose the Right Wall Protection Product 

Selecting the right wall protection product depends on your unique requirements. Here are some factors to consider: 

  • Durability: Match the material with the level of traffic or use in your space. Heavy-duty aluminum or stainless steel options work for active areas, while softer PVC fits residential needs. 
  • Aesthetics: Choose designs and finishes that match or complement your existing décor. 
  • Installation: Consider whether you can install the product yourself or if professional help is needed. Adhesive-backed options are faster for DIY projects. 
  • Cost: Balance quality with your budget—investing in durable products saves money on repairs in the long run. 

Installation Tips and Maintenance 

Proper installation ensures your wall protection products are effective and long-lasting. 

  • Preparation: Clean and dry surfaces thoroughly before installing adhesive products. 
  • Measurements: Measure and mark areas beforehand for precise placement. 
  • Adhesives: Use high-strength adhesive tape or liquid adhesives designed for your chosen material. 
  • Maintenance: Periodically clean products with gentle cleaners and inspect for wear or damage to maintain effectiveness. 

When to Call in the Pros 

For significant wall damage or specialized installations—like wainscoting or extensive corner guard setups—it’s wise to consult a professional. Repairs on damaged drywall may require expert tools, and a skilled craftsman can ensure a flawless finish. 

In Summary

Investing in wall protection products is a simple, cost-effective way to enhance both the functionality and aesthetics of your space. Whether you’re safeguarding high-traffic areas with corner guards or elevating your décor with wainscoting, protecting your walls will add long-term value to your property. 

Are your walls too far past the point of protection? Let’s get them repaired. Contact Drywall by Renso at 317-269-7319 for professional drywall services in Indianapolis, Indiana. Whether you’re tackling a small repair or a large-scale renovation, we’re here to help you achieve the perfect finish.

Related Posts:

Safeguard Your Space: Simple Tips to Prevent Wall Damage
Smooth Walls Ahead: Mastering the Drywall Repair Process
Drywall Problems Decoded: A Guide to Drywall Repair and Maintenance

Why You Should Schedule a Drywall Inspection If You Suspect Structural Issues 

When it comes to the structural integrity of your home or property, drywall often plays a more crucial role than you might realize. While it may seem like just a layer of material covering the walls, drywall is a key component in maintaining your home’s safety and stability. However, visible issues in drywall are often symptoms of larger structural concerns lurking below the surface. 

If you’re noticing unusual cracks, water stains, or other irregularities, it might be time to schedule a drywall inspection. This blog will walk you through the signs to watch for, why these inspections are important, and what you can do to protect your property and your peace of mind. 

Call 317-269-7319 for Drywall Repair in Indianapolis
Call 317-269-7319 for Trusted Drywall Repair in Indianapolis

Signs of Structural Issues in Drywall 

Spotting potential structural issues early is essential. Your drywall can reveal a lot about the health of your home. Here are the most common signs to look for, along with what they could mean:

Cracks 

Cracks in your drywall, especially around windows and doors, often indicate settling of the foundation or even larger structural shifts. Small hairline cracks are common in aging houses, but wider or stair-step cracks signal something more serious. 

Bulges and Warping 

If sections of your drywall appear uneven, bulging, or warped, it may mean your home is dealing with moisture problems or even deeper foundational issues. Bulges often go hand-in-hand with water damage and can eventually lead to mold growth. 

Water Stains or Discoloration 

Nothing catches your eye faster than a brown water stain on a white wall. Water damage is often the first visible hint of leaking pipes, roof problems, or improper drainage. If left unaddressed, this can weaken structural materials and foster mold growth over time. 

Visible Mold 

Mold on drywall is a serious health risk and a glaring symptom of hidden moisture problems. This could mean anything from a small leak to widespread water damage compromising building materials and weakening its structure. 

Sagging Ceilings or Walls 

Drywall that appears to sag or pull away from its frame could indicate damage to the support structures, such as weakened studs or joists. Sagging typically suggests severe damage or long-term neglect. 

Why Early Detection Matters 

Structural issues, if not addressed promptly, can evolve into major safety hazards for you, your family, or your tenants. Beyond safety risks, the costs of ignoring drywall problems can skyrocket. Here’s why early detection is crucial:

Cost Savings 

A drywall inspection could save you thousands of dollars in repair costs. Small issues like minor cracks or leaks are much easier (and cheaper) to address than large-scale replacements once problems escalate. 

Preserves Home Value 

Homes with unresolved structural problems often lose value and become hard to sell. By addressing problems early, you protect your investment and maintain the property’s market value. 

Safety First 

Neglected structural issues can go on to compromise the safety of your home. Sagging walls and ceilings or unchecked water damage can lead to collapse, posing serious risks to occupants. 

What Happens During a Drywall Inspection? 

Curious about what to expect in a drywall inspection? Here’s how professionals examine and assess your walls and ceilings for structural issues:

Step 1. Initial Assessment 

A professional starts by asking you about signs you’ve noticed. They’ll look at problem areas, such as cracks or discoloration, and evaluate their severity. 

Step 2. Advanced Tools 

Modern drywall inspections often involve advanced tools like moisture meters, infrared cameras, and thermal imaging to detect hidden problems like water damage or airflow leaks. 

Step 3. Structural Analysis 

Inspectors often check beyond the drywall to evaluate the underlying structural components, such as beams, studs, or insulation. This ensures a thorough evaluation. 

Step 4. Detailed Report 

After the inspection, you’ll receive a detailed report with findings, along with recommendations for repairs, if needed. 

Choosing the Right Drywall Inspection Service 

When it comes to something as important as your home, choosing the right professional is key. Here’s how to select a reputable drywall service:

Experience Matters 

Look for inspectors with years of experience and certifications in structural analysis or home inspections. Their expertise ensures accurate assessments. 

Reviews and References 

Always check online reviews or ask for references to gauge their reputation. The more satisfied customers, the better. 

Specialized Tools 

Ensure the service uses advanced inspection technology like infrared cameras and moisture meters for precise results. 

Ask the Right Questions 

Before hiring, ask questions like:

  • What’s your experience with structural drywall inspections?
  • Do you provide a detailed report with findings and recommendations?
  • Can you walk me through the inspection process? 

What Happens After an Inspection? 

The results of a drywall inspection determine your next steps. Here’s how to approach common scenarios. 

If Issues Are Found 

  • Prioritize Repairs: Address safety concerns first, like compromised supports or extensive mold. 
  • Create a Budget: Consult multiple contractors to get cost estimates for needed repairs or replacements. 
  • Follow Up: Schedule a follow-up inspection after repairs are complete to ensure the issue is resolved. 

If No Issues Are Found 

  • Stay Vigilant: Just because everything looks good now doesn’t mean you shouldn’t remain attentive to future signs of damage. 
  • Routine Maintenance: Keep up with regular home maintenance and inspections to prevent future problems. 

Proactiveness is always the way forward when it comes to home safety. 

Conclusion

The structural integrity of your home or property begins with the strongest foundation—and drywall plays a vital role. By recognizing the signs of structural damage, taking advantage of early detection, and hiring a qualified inspector, you can ensure your home remains safe, strong, and valuable for years to come. 

Don’t wait for small cracks to turn into big problems. Schedule a drywall inspection today and safeguard your home’s future.  At Drywall By Renso, we specialize in professional drywall repair services in Indianapolis, ensuring your walls and ceilings are as good as new. Contact us today at 317-269-7319  for a consultation and let our experts handle all your drywall repair needs.

Related Posts:

Tips for Replacing Damaged Drywall After Plumbing Leaks
Replacing Drywall After a Pest Infestation: What You Need to Know
Detecting Water Damage in the Home: Signs, Solutions, and Prevention

Tips for Replacing Damaged Drywall After Plumbing Leaks

When plumbing leaks invade your home, they often leave behind more than just a puddle—the damage can seep into your walls, turning sturdy drywall into a soggy, unsightly mess. Replacing damaged drywall quickly and effectively is key to preserving your home’s structure and aesthetics. Whether you’re facing a minor patch-up or a full-scale repair, understanding how to tackle drywall repair can save you both time and money while ensuring that your walls stay in top shape.

This guide covers everything homeowners, property managers, or DIY enthusiasts need to know—from spotting signs of water damage to achieving a professional-looking finish. Let’s break it down step by step.

Call 317-269-7319 for Professional Drywall Replacement Services in Indianapolis

Signs and Risks of Water Damage to Drywall

Drywall is especially vulnerable to water damage, and the longer water issues go untreated, the more severe the consequences can become. Here are the key signs to look for when assessing damage to your drywall:

Common Signs of Water Damage:

  • Discoloration: Brown, yellow, or gray stains are clear indicators of water infiltration.
  • Swelling or Warping: Drywall may start to bulge, bubble, or sag if it has absorbed too much water.
  • Peeling Paint or Wallpaper: Water damage can cause paint or wallpaper to lose adhesion and peel away.
  • Soft or Crumbly Material: Touch the wall. Damaged drywall will feel soft or crumble easily.
  • Mold or Mildew Growth: A musty smell often accompanies visible black or green spots on the drywall surface.

Risks of Ignoring Water Damage:

  • Mold Growth and Health Hazards: Untreated drywall can become a breeding ground for mold, leading to allergic reactions and respiratory issues.
  • Structural Weakness: Water-damaged drywall can weaken your home’s walls, compromising the overall structure.
  • Decreased Property Value: Unsightly water stains or warped drywall can lower the market value of your home.

Recognizing and addressing these signs promptly minimizes long-term damage and helps maintain the integrity of your home.

Steps to Assess and Prepare for Repair

Before jumping into drywall replacement, a proper assessment and preparation phase ensures you tackle the root problem and avoid further complications.

  1. Identify the Source of the Leak: Before repairing drywall, confirm the plumbing issue is fixed. Whether it’s a leaky pipe, roof, or HVAC system, addressing the source is crucial for long-term success.
  2. Inspect the Extent of the Damage: Use a flashlight and moisture meter to assess how far the water damage has spread. Mark damaged areas for removal.
  3. Dry the Area Completely: Ensure the drywall is completely dry to prevent mold growth. Use fans, dehumidifiers, or professional drying equipment to speed up the process.
  4. Remove Furniture or Decorations: Clear the affected area of furniture, wall hangings, or items that might interfere with repair work.
  5. Protect Surrounding Surfaces: Lay down tarps or drop cloths to catch drywall dust and debris. Tape around unaffected areas to minimize mess.

Tools and Materials Needed

To replace damaged drywall, you’ll need the right set of tools and materials. Here’s what to gather before you begin:

Tools:

  • Utility knife
  • Drywall saw
  • Measuring tape
  • Straightedge ruler
  • T-square or level
  • Drywall screws or nails
  • Cordless drill or screwdriver
  • Joint knife

Materials:

  • Replacement drywall panels (match the thickness to your existing walls, typically ½ inch)
  • Joint compound
  • Drywall tape
  • Sandpaper (120–150 grit)
  • Primer and paint (or matching finish)
  • Safety gear (gloves, goggles, dust mask)

Having these essentials on hand will streamline the repair process and help you achieve professional results.

Step-by-Step Guide to Replacing Damaged Drywall

Replacing drywall may seem daunting, but following these steps makes the process manageable—even for first-timers:

Step 1: Cut Out the Damaged Area

Use a utility knife or drywall saw to cut out the damaged section. Always cut slightly larger than the damaged area to ensure clean edges for the replacement panel.

Step 2: Measure and Cut Replacement Drywall

Measure the opening and use those dimensions to cut a new drywall piece. Precision is key—your replacement piece should fit snugly.

Step 3: Secure the Replacement Panel

Place the new drywall into position and secure it with drywall screws or nails spaced every 6–8 inches.

Step 4: Apply Drywall Tape

Cover the seams between the old and new drywall with self-adhesive drywall tape. This step ensures a smooth, seamless transition.

Step 5: Apply Joint Compound

Spread a thin layer of joint compound over the taped area using a joint knife. Feather the edges to create a smooth, blended surface. Allow it to dry completely, then sand until smooth.

Step 6: Prime and Paint

Apply a coat of primer to prepare the surface, then paint to match the rest of the wall. Your repair should now blend seamlessly with its surroundings.

Tips for a Professional Finish

For results that rival those of professional drywall services, follow these tips:

  • Feather Your Edges: Gradually thin out joint compound near the edges for a flawless blend.
  • Sanding Between Coats: Sand lightly after each coat of joint compound to eliminate rough spots.
  • Paint in Natural Light: Check your work in natural daylight to ensure even coverage and color matching.

If achieving a perfect finish feels overwhelming, hiring a professional drywall installation service may be worth considering to handle the job with precision.

Preventing Future Water Damage

Minimizing the likelihood of future water damage saves you from repeating the drywall repair process. Here’s how you can protect your home:

  • Inspect Plumbing Regularly: Schedule routine checks for pipes, faucets, and fixtures to catch leaks early.
  • Install Waterproof Drywall: Known as green or cement board, this type of drywall is ideal for areas prone to moisture, such as bathrooms or basements.
  • Use Water Leak Detectors: Devices that alert you to leaks can stop water damage in its tracks.
  • Ensure Proper Ventilation: Maintain good airflow in high-humidity spaces to prevent condensation buildup.
  • Keep Gutters and Downspouts Clean: Diverting rainwater away from your home’s foundation reduces leaks from exterior walls.

Why It’s Okay to Leave It to the Professionals

Replacing damaged drywall after plumbing leaks is a project that requires precision, time, and patience. While DIY is an option, hiring a professional drywall service comes with its benefits—guaranteed quality, faster completion times, and peace of mind.

Is this drywalling project proving to be more than you can handle on your own? Contact Drywall by Renso at 317-269-7319 for professional drywall services in Indianapolis, Indiana. We serve residential and commercial clients.

Related Posts:

Replacing Drywall After a Pest Infestation: What You Need to Know
Detecting Water Damage in the Home: Signs, Solutions, and Prevention
Tips for Drywall Water Damage Clean Up