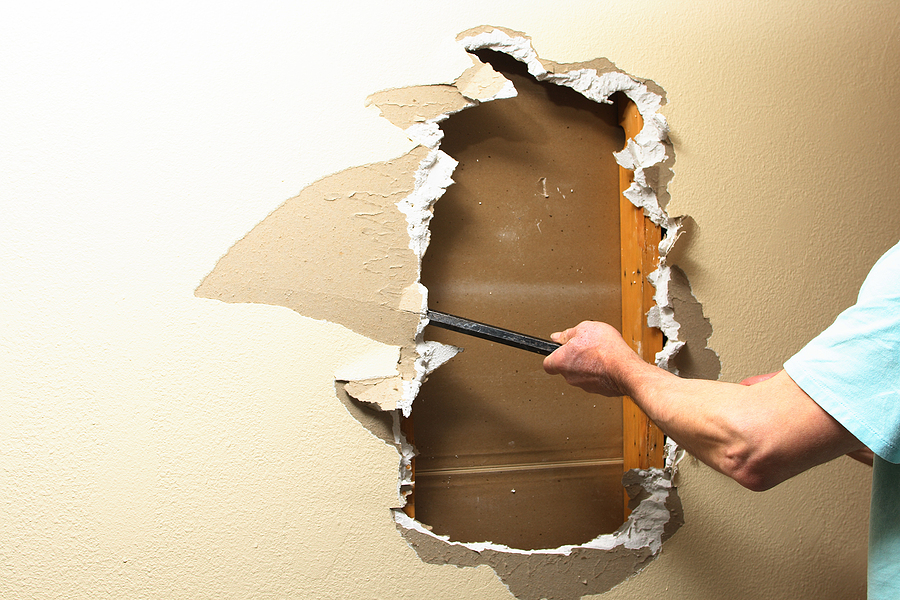
Have you ever noticed a small (or not-so-small) hole in your wall and thought, “Where do I even start?” Whether it’s a nail hole from picture frames, a pesky dent from a door handle, or even damage caused by movers, wall imperfections can disrupt the aesthetic of your living space. The good news? Fixing holes in your walls is easier than you think and doesn’t have to cost a fortune.
This guide breaks down everything you need to know about drywall repair, so whether you’re a seasoned DIY weekend warrior or new to repairing walls, you’ll have all the tools and tips you need to get your walls back to flawless condition.
Call 317-269-7319 for Expert Wall Hole Repair in Indianapolis Indiana
Understanding Different Types of Wall Damage
Not all wall damage is created equal. The type and severity of the damage will determine the method and tools required for repair. Here are a few common scenarios:
Nail holes – Quick fixes for holes left behind by picture frames or decorations.
Door handle dents – These can range in size and may need a bit more filling and sanding to blend in.
Furniture scuffs – Often surface-level damage that requires just a touch-up of paint.
Mouse holes – Urgent repairs are needed here to seal off entry points for pests.
By identifying what type of damage you’re dealing with, you can tailor your approach and select the right materials for the job.
Gathering Your Repair Supplies
Before you roll up your sleeves, gather the proper tools. Having the right drywall supplies on hand makes the process smooth and reduces frustration. For most wall repairs, you’ll need:
Trowel – For applying joint compound evenly over larger damaged areas.
Spackle – Perfect for filling small nail holes or thin cracks.
Drywall Patch Kit – Ideal for covering larger holes, often with a mesh backing for support.
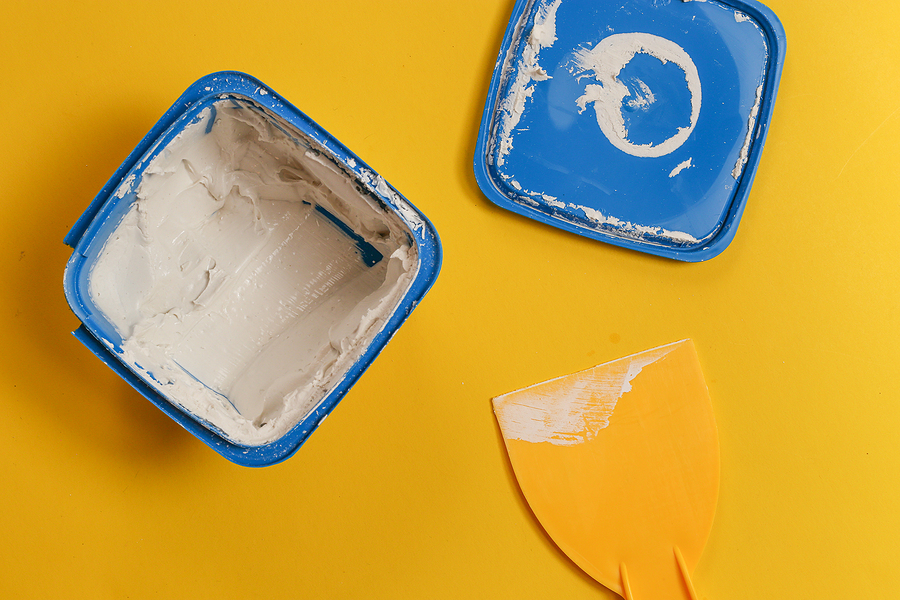
Joint Compound – Provides a smooth, blendable surface for covering damage and seams.
Putty Knife – Used to apply spackle or joint compound with precision.
Sandpaper or Sanding Sponge – To smooth the surface before painting.
Paint and Primer – To match your wall and ensure a seamless finish.
💡 Pro tip: For safety, always wear safety glasses and a dust mask when sanding to protect against debris and drywall dust.
For minor damage like nail or screw holes, repairs can be quick and painless. Here’s how to get it done:
Clean the Area – Remove any dirt, dust, or loose paint around the hole.
Apply Spackle with a Putty Knife – Scoop a small amount onto your putty knife and press it into the hole, smoothing it out flush with the wall.
Allow It to Dry – Check the product instructions for drying time, but most spackle dries within a few hours.
Sand the Surface – Use fine-grit sandpaper to create a smooth finish that blends seamlessly with the wall.
Prime and Paint – Touch up the repaired area with primer, then apply matching paint for a flawless look.
Small nail holes may not even require sanding if your spackle application is smooth!
Tackling Larger Holes
Larger damage, like fist-sized holes from accidents or significant dents, requires a more involved approach but is still manageable:
Prepare the Hole – Use a utility knife to create clean, smooth edges around the damaged area.
Attach a Support Patch – For holes larger than a few inches, use a drywall patch (often included in drywall patch kits). Center it over the damage for stability.
Apply Joint Compound – Use a trowel to spread joint compound evenly over the patch. Feather the edges to blend it with the surrounding wall.
Sand and Repeat – Once the joint compound is dry, sand it down to achieve a smooth finish. You may need to apply another thin coat to perfect the blend.
Prime and Paint – Just like with small holes, finish with primer and a matching paint color.
For textured walls, consider using texture spray or special tools to mimic the existing finish.
Preventing Future Wall Damage
Once you’ve restored your walls to their former glory, take these steps to avoid dealing with cracks, holes, and dents in the future:
Install doorstops to prevent doorknobs from damaging walls.
Use felt pads on furniture to minimize scratches and scuffs.
Mount decorations with appropriate hardware, like anchors, to prevent them from falling.
Be cautious when moving furniture to avoid bumping into walls.
Monitor humidity levels in your home to reduce the risk of drywall cracks.
Simple, proactive measures can save you plenty of time and effort in repairs down the road.
Professional vs DIY
If you’re not confident in your wall repair skills or the damage seems overwhelming, hiring a professional drywall repair company may be the way to go. Here’s what you gain by working with an expert:
Guaranteed Results – Professionals deliver seamless, high-quality repairs with no visible patches.
Color Matching – They’ll ensure the repaired area blends perfectly with your existing paint.
Time Savings – Professional repairs mean less disruption to your daily routine.
Peace of Mind – They’ll handle complex or hazardous issues, like walls potentially containing asbestos.
However, if the damage is minor, following the steps in this guide can save you money while still achieving great results.
Wrapping Up
Repairing wall damage doesn’t have to be a stressful or costly endeavor. Whether you’re patching a tiny nail hole or tackling a larger repair, the right tools and techniques make all the difference. By following the steps outlined here, you’ll be well on your way to smooth, flawless walls.
Need help with tougher repairs or don’t have the time to DIY?We’re here to assist.Drywall By Renso specializes in seamless drywall repair for any size or type of damage. From assessment to color matching, we’ll ensure your walls look as good as new in no time.
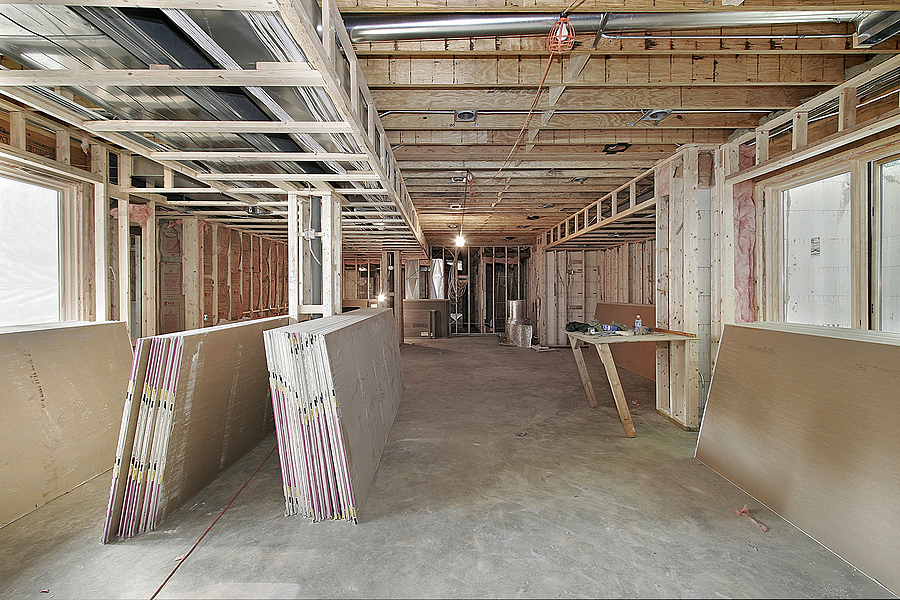
If you’re thinking about transforming your basement into a functional living space, basement drywall installation is one of the most critical steps to achieving a polished and professional look. Whether you’re adding a cozy family entertainment area, a guest suite, or a home office, the right drywall can enhance the space’s appearance, comfort, insulation, and safety.
This guide will walk you through the benefits of basement drywall, essential prep work, the installation process, associated costs, and common problems to avoid. By the end, you’ll have the insights you need to decide whether to tackle this project yourself or hire a professional contractor.
Call 317-269-7319 for Professional Basement Drywall Installation in Indianapolis
The Benefits of Installing Basement Drywall
Drywall isn’t just a surface to decorate; it offers multiple advantages in the context of finishing a basement. Here’s why it’s an excellent choice:
✅ Enhanced Insulation
Drywall with proper backing, such as insulation-backed panels or moisture-resistant boards, helps retain heat in the colder months and keeps the space cool in summer. This improves energy efficiency and reduces utility bills.
✅ Aesthetic Appeal
Drywall provides a clean and smooth surface that can easily be painted or finished to match the interior design of your home. Whether you prefer a minimalist vibe or textured walls, drywall adapts effortlessly to your desired style.
✅ Fire and Moisture Resistance
Modern drywall options include fire-resistant panels that slow the spread of flames, offering enhanced safety. Moisture-resistant drywall is specifically designed to prevent issues like mold growth, which is vital for basements that are prone to dampness.
✅ Soundproofing
Soundproof drywall reduces noise transfer from floors above or neighboring rooms, creating a more tranquil environment in your basement.
✅ Cost-Effective
Compared to alternatives like plaster, drywall is far more affordable. Its ease of installation also reduces labor costs.
How to Prepare Your Basement for Drywall Installation
Proper preparation ensures a smooth installation process and longevity for your drywall project. Here are the key steps:
1. Check for Moisture
Identify and address any existing moisture problems in the basement or sub-level. This might involve waterproofing the walls, adding vapor barriers, or improving ventilation to keep the area dry.
2. Inspect the Foundation
Look for cracks or instability in your foundation, as these issues can lead to drywall cracking or water infiltration later. Repair any damage before proceeding.
3. Plan Utilities
Ensure plumbing, electrical wiring, and insulation are in place before drywall installation begins. Check local building codes to ensure you’re compliant.
4. Get Necessary Permits
Some areas require permits for basement renovation projects, especially those involving major changes like drywall installation. Confirm the regulations in your location to avoid fines or problems down the road.
3. Cut and Fit Panels – Cut drywall panels to fit the measured spaces, ensuring precise alignment for a seamless finish.
4. Secure Panels – Attach drywall sheets to the studs using screws, spacing them evenly for firm support. Be sure to use the recommended screws and spacing to prevent future issues like loosening or uneven panels.
5. Tape and Mud – Apply drywall tape along the seams. Use joint compound (mud) to cover the tape, screws, and joints. Smooth the compound for a clean look.
6. Sand and Finish – Once the compound dries, sand the surface to remove imperfections. Afterward, the drywall is ready to be primed and painted.
Factors Affecting Drywall Installation Costs
The cost of your project will depend on several factors, such as:
Type of Drywall: Specialty drywall, like soundproof or fire-resistant varieties, costs more than standard gypsum boards.
Square Footage: Larger basements naturally require more materials and labor.
Prep Work: Fixing moisture issues, foundation problems, or utility installation will increase initial costs.
Labor: Hiring professional drywall contractors will have a higher upfront cost compared to DIY installation.
Unexpected Costs: For example, replacing outdated insulation or purchasing new tools for a DIY project can increase expenses unexpectedly.
On average, homeowners can expect to spend $1.50–$3.00 per square foot for standard drywall installation.
DIY vs. Hiring Professional Drywall Contractors
Wondering whether this is a project you can take on yourself? Here’s a guide to help you decide:
Pros of DIY
Cost savings on labor
A sense of personal accomplishment
Flexible timelines
Cons of DIY
Time-consuming
Risk of mistakes like incorrect fastening or uneven surfaces
Requires specialized tools and skills
Pros of Hiring a Pro
Expertise ensures high-quality results
Professionals handle challenges like moisture issues or irregular wall shapes
If you choose to hire a professional, look for drywall contractors in Indianapolis with licenses, certifications, and strong reviews. Always ask for a detailed estimate and warranty.
Maintenance Tips for Basement Drywall
To keep your drywall in great condition, follow these maintenance tips:
Control Humidity: Use a dehumidifier to regulate moisture levels and prevent mold growth.
Inspect Regularly: Check for cracks, water stains, or drywall bubbling. Address issues promptly.
Clean Gently: Use a damp cloth to remove dust or smudges. Avoid overly wet cleaning agents.
Seal Gaps: Ensure all edges and gaps are sealed to maintain insulation and air quality.
Final Thoughts
Installing basement drywall is a worthwhile investment that adds style, comfort, and functionality to your home. From choosing moisture-resistant panels to ensuring you meet local building codes, attention to detail is key to a successful project.
Whether you’re planning a DIY project or looking to hire professional drywall contractors, you’re now equipped with the knowledge to move forward confidently.
When you’re ready to take the next step, contact Drywall By Renso for a seamless drywall installation experience. We’re here to help you bring your basement renovation vision to life!
New construction drywalling is a critical step in creating solid, beautiful walls and ceilings for your new home or commercial space. While it often goes unnoticed when completed properly, drywall provides both structural stability and a blank canvas ready for interior painting or design. Getting it right the first time can save time, money, and frustration down the line.
Whether you’re taking a DIY approach or hiring professional drywall contractors, our guide will walk you through the key considerations, from planning and material selection to installation and finishing.
Call 317-269-7319 for Professional New Construction Drywall in Indianapolis
Planning and Preparation for New Construction Drywall
Before you begin your new construction drywall project, proper planning and preparation can set you up for success. Here’s what you need to consider:
Assess Project Scope
Define your project requirements clearly. Are you working on a single room, an entire home, or a commercial space? Larger projects will require more materials and careful coordination.
Set a Budget
Understanding your budget constraints is essential. Key factors to account for include:
Material Costs: Different types of drywall come with varying price tags. Opt for the type that suits your needs.
Labor Costs: If you’re hiring professional drywall contractors, obtain quotes for the job.
Tools and Equipment Rental: For those going the DIY route, factor in the cost of renting or purchasing tools like drywall lifts or sanders.
Disposal Fees: If old drywall or debris needs removal, include disposal costs.
Contingency Funds: Unexpected issues happen. Allocate at least 10% of your budget for surprises like incorrect measurements or damaged materials.
Create a Realistic Timeline
Create a project timeline with clear milestones. Keep in mind that certain steps, like mudding and sanding, require specific drying times to avoid compromising the finish.
Selecting the right type of drywall is key to ensuring durability and meeting specific needs for each space. Here’s an overview of popular drywall options and their common uses:
Standard Drywall – Best for general interior walls and ceilings. It’s cost-effective and suitable for spaces with low moisture exposure.
Moisture-Resistant Drywall – This green or purple board is perfect for bathrooms, laundry rooms, and basements. It resists mold and mildew better than standard drywall.
Fire-Resistant Drywall – Ideal for garages, utility rooms, or areas near furnaces, this type prioritizes safety by slowing fire spread.
Soundproof Drywall – If privacy is important, this denser drywall minimizes noise between rooms and is a favorite for home offices, theaters, and bedrooms.
Cement Board – While not technically drywall, this material is used as a base for tiling projects in wet areas like showers.
The Step-by-Step Installation Process
Once you’ve chosen your materials and planned the project, it’s time to begin installation. Here’s how to install drywall like a pro:
Step 1: Measure and Cut
Accurate measurements are the foundation of proper installation. Measure each wall and ceiling area, then cut drywall sheets to fit snugly. Always leave a small gap at the bottom of walls to prevent moisture absorption from floors.
Step 2: Attach Drywall Sheets
Use screws instead of nails for greater stability and to minimize the risk of popping. Start by affixing sheets to the ceiling before moving to walls, ensuring each piece aligns properly with studs.
Step 3: Mudding and Taping
Apply joint compound (mud) to the seams and use drywall tape to cover them. Smooth out excess compound for a seamless finish. Try the All Purpose Ready-Mixed Joint Compound by USG Sheetrock Brand.
Step 4: Sanding
After the mud has dried, sand the joints to create a smooth surface. This step is essential for achieving a flawless finish before applying primer or paint.
Step 5: Priming
Before beginning any interior painting, apply a drywall primer to prepare the surface for even color absorption and a polished look.
Finishing Touches for a Professional Look
Drywall finishing isn’t just about covering imperfections; it’s about creating a polished foundation for the final design. Follow these tips for flawless results:
Use fine-grit sandpaper for a smooth finish without over-sanding.
Ensure all screws are flush with the drywall surface.
Inspect every seam and corner to identify areas needing extra attention.
Always vacuum or clean up dust before priming.
Common Drywall Installation Mistakes to Avoid
Mistakes during drywalling can lead to costly fixes or unsightly results. Here are some common pitfalls to watch out for and how to prevent them:
Improper Measuring – Accurate measurements prevent material waste and misalignment. Double-check all dimensions before cutting.
Incorrect Fastening – Over-driving screws can weaken the drywall, while under-driving can leave bumps that ruin the smooth finish. Always ensure screws are flush.
Sloppy Joint Treatment – Poor mudding, taping, or sanding can result in visible seams and cracks over time. Take your time with these steps for a professional look.
Using the Wrong Drywall Type – Installing standard drywall in moisture-prone areas can lead to long-term damage and mold issues.
Rushing the Process – Skipping drying times between steps can compromise the strength and appearance of the finish. Patience is key to a durable result.
DIY or Hire a Professional?
Deciding between DIY drywall installation and hiring professionals depends on your budget, skill level, and timeline.
▶ DIY Drywall Installation
Pros:
Cost savings on labor expenses.
Flexibility to work at your own pace.
Cons:
Requires skill and tools for professional results.
Time-consuming and prone to mistakes without experience.
▶ Professional Drywall Installation
Pros:
Faster completion with high-quality results.
Reduced risk of errors or rework.
Cons:
Higher upfront costs due to labor fees.
Less control over the timeline.
Key Takeaways
New construction drywalling doesn’t have to be daunting. By planning effectively, choosing the right materials, and avoiding common mistakes, you can create a stunning interior that’s ready for finishing touches like interior painting or design.
Looking for expert assistance? Schedule your drywall installation today and partner with Drywall By Renso who prioritize precision and quality.
Over time, even the most well-maintained homes and properties face inevitable wear and tear. Walls, in particular, are especially vulnerable to scratches, dents, scuffs, and abrasions caused by everyday activities. From chair marks and foot traffic to accidental bumps and scrapes, the lifespan of your walls can take a hit if not properly protected.
This is where wall protection products come into play. Whether you’re a homeowner looking to preserve the beauty of your walls or a property manager searching for durable solutions for tenants, wall protection can reduce damage, maintain aesthetics, and save money in costly repairs down the line.
In this guide, we’ll explore the various types of wall protection products and how to choose the best ones for your needs. You’ll also find helpful installation tips and considerations for professional repair or replacement.
Call 317-269-7319 for Professional Drywall Repair Service in Indianapolis
Types of Wall Protection Products
Wall protection products are versatile and can be tailored to fit your specific needs. Below are some of the most effective options for keeping your walls in pristine condition.
1. Corner Guards
Corner guards are durable strips made to protect the vulnerable edges of your walls from damage. Typically made from materials like stainless steel, PVC, or rubber, they’re designed to deflect impact and safeguard corners that suffer the most wear.
Where to use: Ideal for high-traffic areas like hallways, stairwells, or kitchens, especially in properties with children, pets, or frequent foot traffic.
Best practices: Install corner guards using adhesive for a smooth and damage-free application or use screws for heavy-duty installations in commercial spaces.
Benefits:
Prevent chips and dents on wall corners.
Available in various materials and finishes to blend seamlessly with décor.
Easy to clean and maintain.
2. Wall Bumpers
Wall bumpers act as buffers, absorbing impact from furniture, door handles, and other objects that may hit your walls.
Where to use: Commonly installed behind doors, near furniture, or in garages where walls are prone to dents and scratches.
Best practices: Match the bumper style to your walls for a clean aesthetic, and use bumpers with adhesive backs to simplify installation.
Benefits:
Protects your walls from accidental impact.
Prevents repetitive damage in high-risk areas.
Comes in a range of sizes and designs.
3. Kick Plates
Kick plates are durable panels installed at the base of doors or walls to protect surfaces from kicks, scuffs, and abrasions.
Where to use: Perfect for entryways, corridors, and areas in busy properties where doors see heavy use.
Best practices: Choose materials like aluminum or stainless steel for maximum durability, or opt for acrylic plates for a more subtle appearance.
Benefits:
Protects lower walls and doors from damage.
Offers a sleek, professional appearance.
Long-lasting, even under heavy wear.
4. Chair Rails
Chair rails are decorative molding strips installed horizontally across walls. Originally designed to protect walls from damage caused by chairs, they now also enhance wall aesthetics.
Where to use: Dining rooms, offices, or spaces where furniture frequently comes into contact with walls.
Best practices: Install at about one-third the height of the wall for optimal protection and visual appeal.
Benefits:
Dual-purpose functionality—protection and design.
Available in various styles to suit traditional or modern interiors.
Can be painted for a custom look.
5. Wainscoting
Wainscoting refers to decorative wood or paneling installed on the lower portion of walls. This option is particularly popular for its elegance and practicality.
Where to use: Living rooms, dining areas, and hallways for a touch of class while fortifying your walls.
Best practices: Opt for moisture-resistant materials like PVC wainscoting for areas exposed to humidity, such as bathrooms or kitchens.
Clear protective films are thin, transparent coverings that shield walls or surfaces while maintaining their original look.
Where to use: Ideal for glass walls, painted surfaces, and areas requiring a discreet layer of protection.
Best practices: Invest in high-quality UV-resistant films to avoid yellowing over time, and ensure surfaces are clean and dry before application.
Benefits:
Invisibly preserves the integrity of any surface.
Easy to apply and remove when needed.
Great for areas showcasing artwork or polished finishes.
How to Choose the Right Wall Protection Product
Selecting the right wall protection product depends on your unique requirements. Here are some factors to consider:
Durability: Match the material with the level of traffic or use in your space. Heavy-duty aluminum or stainless steel options work for active areas, while softer PVC fits residential needs.
Aesthetics: Choose designs and finishes that match or complement your existing décor.
Installation: Consider whether you can install the product yourself or if professional help is needed. Adhesive-backed options are faster for DIY projects.
Cost: Balance quality with your budget—investing in durable products saves money on repairs in the long run.
Installation Tips and Maintenance
Proper installation ensures your wall protection products are effective and long-lasting.
Preparation: Clean and dry surfaces thoroughly before installing adhesive products.
Measurements: Measure and mark areas beforehand for precise placement.
Adhesives: Use high-strength adhesive tape or liquid adhesives designed for your chosen material.
Maintenance: Periodically clean products with gentle cleaners and inspect for wear or damage to maintain effectiveness.
When to Call in the Pros
For significant wall damage or specialized installations—like wainscoting or extensive corner guard setups—it’s wise to consult a professional. Repairs on damaged drywall may require expert tools, and a skilled craftsman can ensure a flawless finish.
In Summary
Investing in wall protection products is a simple, cost-effective way to enhance both the functionality and aesthetics of your space. Whether you’re safeguarding high-traffic areas with corner guards or elevating your décor with wainscoting, protecting your walls will add long-term value to your property.
Are your walls too far past the point of protection? Let’s get them repaired.Contact Drywall by Renso at 317-269-7319 for professional drywall services in Indianapolis, Indiana. Whether you’re tackling a small repair or a large-scale renovation, we’re here to help you achieve the perfect finish.
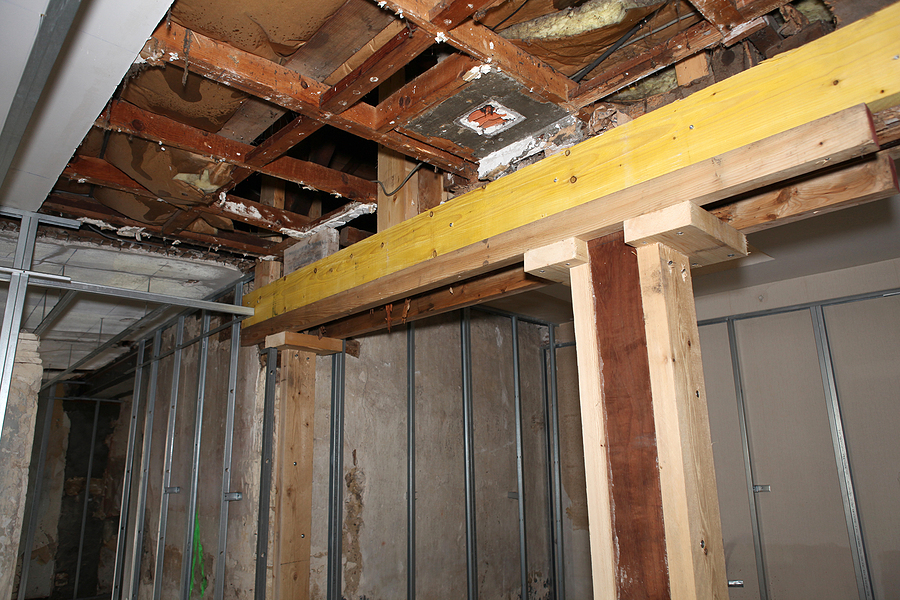
When it comes to the structural integrity of your home or property, drywall often plays a more crucial role than you might realize. While it may seem like just a layer of material covering the walls, drywall is a key component in maintaining your home’s safety and stability. However, visible issues in drywall are often symptoms of larger structural concerns lurking below the surface.
If you’re noticing unusual cracks, water stains, or other irregularities, it might be time to schedule a drywall inspection. This blog will walk you through the signs to watch for, why these inspections are important, and what you can do to protect your property and your peace of mind.
Call 317-269-7319 for Trusted Drywall Repair in Indianapolis
Signs of Structural Issues in Drywall
Spotting potential structural issues early is essential. Your drywall can reveal a lot about the health of your home. Here are the most common signs to look for, along with what they could mean:
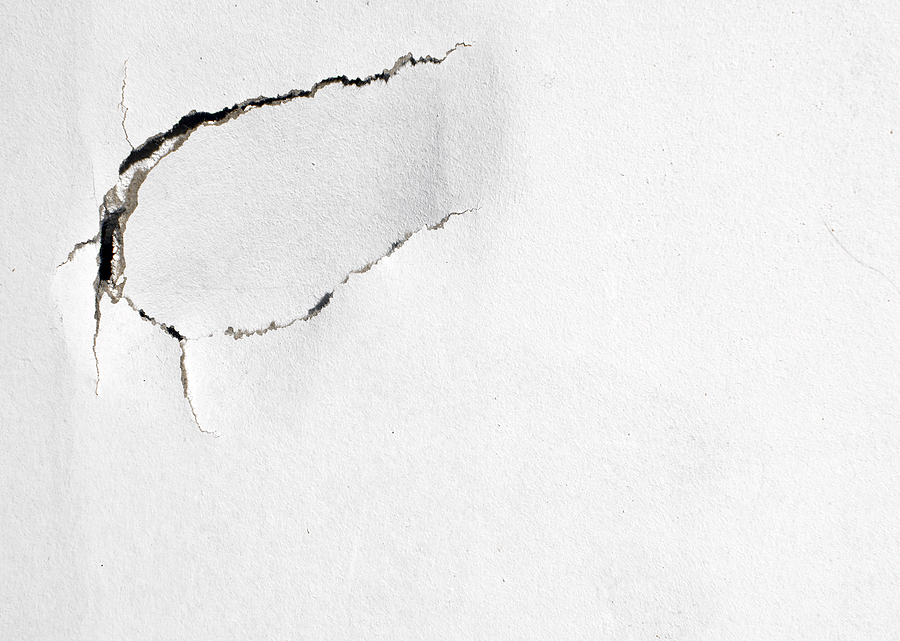
Cracks
Cracks in your drywall, especially around windows and doors, often indicate settling of the foundation or even larger structural shifts. Small hairline cracks are common in aging houses, but wider or stair-step cracks signal something more serious.
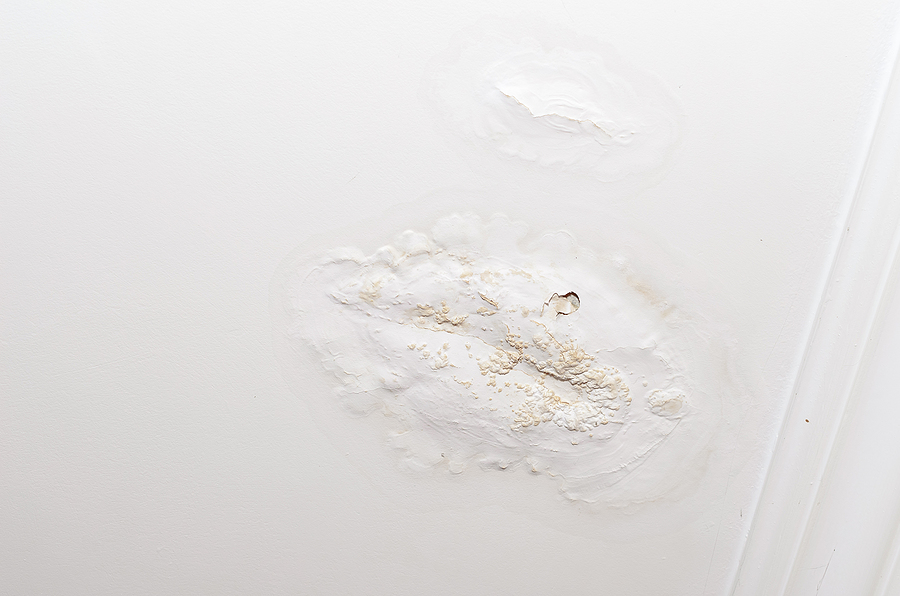
Bulges and Warping
If sections of your drywall appear uneven, bulging, or warped, it may mean your home is dealing with moisture problems or even deeper foundational issues. Bulges often go hand-in-hand with water damage and can eventually lead to mold growth.
Water Stains or Discoloration
Nothing catches your eye faster than a brown water stain on a white wall. Water damage is often the first visible hint of leaking pipes, roof problems, or improper drainage. If left unaddressed, this can weaken structural materials and foster mold growth over time.
Visible Mold
Mold on drywall is a serious health risk and a glaring symptom of hidden moisture problems. This could mean anything from a small leak to widespread water damage compromising building materials and weakening its structure.
Sagging Ceilings or Walls
Drywall that appears to sag or pull away from its frame could indicate damage to the support structures, such as weakened studs or joists. Sagging typically suggests severe damage or long-term neglect.
If you’re seeing any of these warning signs, there’s a good chance structural issues may lie beneath the surface.
Why Early Detection Matters
Structural issues, if not addressed promptly, can evolve into major safety hazards for you, your family, or your tenants. Beyond safety risks, the costs of ignoring drywall problems can skyrocket. Here’s why early detection is crucial:
Cost Savings
A drywall inspection could save you thousands of dollars in repair costs. Small issues like minor cracks or leaks are much easier (and cheaper) to address than large-scale replacements once problems escalate.
Preserves Home Value
Homes with unresolved structural problems often lose value and become hard to sell. By addressing problems early, you protect your investment and maintain the property’s market value.
Safety First
Neglected structural issues can go on to compromise the safety of your home. Sagging walls and ceilings or unchecked water damage can lead to collapse, posing serious risks to occupants.
Early drywall inspections turn a potential hazard into a solvable situation.
What Happens During a Drywall Inspection?
Curious about what to expect in a drywall inspection? Here’s how professionals examine and assess your walls and ceilings for structural issues:
Step 1. Initial Assessment
A professional starts by asking you about signs you’ve noticed. They’ll look at problem areas, such as cracks or discoloration, and evaluate their severity.
Step 2. Advanced Tools
Modern drywall inspections often involve advanced tools like moisture meters, infrared cameras, and thermal imaging to detect hidden problems like water damage or airflow leaks.
Step 3. Structural Analysis
Inspectors often check beyond the drywall to evaluate the underlying structural components, such as beams, studs, or insulation. This ensures a thorough evaluation.
Step 4. Detailed Report
After the inspection, you’ll receive a detailed report with findings, along with recommendations for repairs, if needed.
Understanding this process ensures you know exactly what you’re paying for when you hire a professional.
Choosing the Right Drywall Inspection Service
When it comes to something as important as your home, choosing the right professional is key. Here’s how to select a reputable drywall service:
Experience Matters
Look for inspectors with years of experience and certifications in structural analysis or home inspections. Their expertise ensures accurate assessments.
Reviews and References
Always check online reviews or ask for references to gauge their reputation. The more satisfied customers, the better.
Specialized Tools
Ensure the service uses advanced inspection technology like infrared cameras and moisture meters for precise results.
Ask the Right Questions
Before hiring, ask questions like:
What’s your experience with structural drywall inspections?
Do you provide a detailed report with findings and recommendations?
Can you walk me through the inspection process?
The right professional will give you peace of mind and a clear plan of action if issues are detected.
What Happens After an Inspection?
The results of a drywall inspection determine your next steps. Here’s how to approach common scenarios.
If Issues Are Found
Prioritize Repairs: Address safety concerns first, like compromised supports or extensive mold.
Create a Budget: Consult multiple contractors to get cost estimates for needed repairs or replacements.
Follow Up: Schedule a follow-up inspection after repairs are complete to ensure the issue is resolved.
If No Issues Are Found
Stay Vigilant: Just because everything looks good now doesn’t mean you shouldn’t remain attentive to future signs of damage.
Routine Maintenance: Keep up with regular home maintenance and inspections to prevent future problems.
Proactiveness is always the way forward when it comes to home safety.
Conclusion
The structural integrity of your home or property begins with the strongest foundation—and drywall plays a vital role. By recognizing the signs of structural damage, taking advantage of early detection, and hiring a qualified inspector, you can ensure your home remains safe, strong, and valuable for years to come.
Don’t wait for small cracks to turn into big problems. Schedule a drywall inspection today and safeguard your home’s future. At Drywall By Renso, we specialize in professional drywall repair services in Indianapolis, ensuring your walls and ceilings are as good as new. Contact us today at 317-269-7319 for a consultation and let our experts handle all your drywall repair needs.
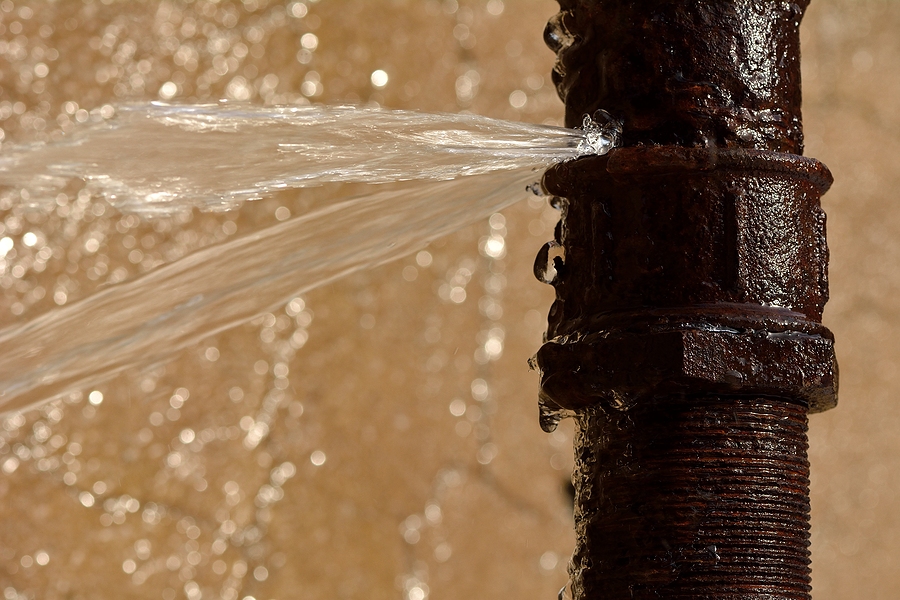
When plumbing leaks invade your home, they often leave behind more than just a puddle—the damage can seep into your walls, turning sturdy drywall into a soggy, unsightly mess. Replacing damaged drywall quickly and effectively is key to preserving your home’s structure and aesthetics. Whether you’re facing a minor patch-up or a full-scale repair, understanding how to tackle drywall repair can save you both time and money while ensuring that your walls stay in top shape.
This guide covers everything homeowners, property managers, or DIY enthusiasts need to know—from spotting signs of water damage to achieving a professional-looking finish. Let’s break it down step by step.
Call 317-269-7319 for Professional Drywall Replacement Services in Indianapolis
Signs and Risks of Water Damage to Drywall
Drywall is especially vulnerable to water damage, and the longer water issues go untreated, the more severe the consequences can become. Here are the key signs to look for when assessing damage to your drywall:
Common Signs of Water Damage:
Discoloration: Brown, yellow, or gray stains are clear indicators of water infiltration.
Swelling or Warping: Drywall may start to bulge, bubble, or sag if it has absorbed too much water.
Peeling Paint or Wallpaper: Water damage can cause paint or wallpaper to lose adhesion and peel away.
Soft or Crumbly Material: Touch the wall. Damaged drywall will feel soft or crumble easily.
Mold or Mildew Growth: A musty smell often accompanies visible black or green spots on the drywall surface.
Risks of Ignoring Water Damage:
Mold Growth and Health Hazards: Untreated drywall can become a breeding ground for mold, leading to allergic reactions and respiratory issues.
Structural Weakness: Water-damaged drywall can weaken your home’s walls, compromising the overall structure.
Decreased Property Value: Unsightly water stains or warped drywall can lower the market value of your home.
Recognizing and addressing these signs promptly minimizes long-term damage and helps maintain the integrity of your home.
Steps to Assess and Prepare for Repair
Before jumping into drywall replacement, a proper assessment and preparation phase ensures you tackle the root problem and avoid further complications.
Identify the Source of the Leak: Before repairing drywall, confirm the plumbing issue is fixed. Whether it’s a leaky pipe, roof, or HVAC system, addressing the source is crucial for long-term success.
Inspect the Extent of the Damage: Use a flashlight and moisture meter to assess how far the water damage has spread. Mark damaged areas for removal.
Dry the Area Completely: Ensure the drywall is completely dry to prevent mold growth. Use fans, dehumidifiers, or professional drying equipment to speed up the process.
Remove Furniture or Decorations: Clear the affected area of furniture, wall hangings, or items that might interfere with repair work.
Protect Surrounding Surfaces: Lay down tarps or drop cloths to catch drywall dust and debris. Tape around unaffected areas to minimize mess.
Tools and Materials Needed
To replace damaged drywall, you’ll need the right set of tools and materials. Here’s what to gather before you begin:
Tools:
Utility knife
Drywall saw
Measuring tape
Straightedge ruler
T-square or level
Drywall screws or nails
Cordless drill or screwdriver
Joint knife
Materials:
Replacement drywall panels (match the thickness to your existing walls, typically ½ inch)
Joint compound
Drywall tape
Sandpaper (120–150 grit)
Primer and paint (or matching finish)
Safety gear (gloves, goggles, dust mask)
Having these essentials on hand will streamline the repair process and help you achieve professional results.
Step-by-Step Guide to Replacing Damaged Drywall
Replacing drywall may seem daunting, but following these steps makes the process manageable—even for first-timers:
Step 1: Cut Out the Damaged Area
Use a utility knife or drywall saw to cut out the damaged section. Always cut slightly larger than the damaged area to ensure clean edges for the replacement panel.
Step 2: Measure and Cut Replacement Drywall
Measure the opening and use those dimensions to cut a new drywall piece. Precision is key—your replacement piece should fit snugly.
Step 3: Secure the Replacement Panel
Place the new drywall into position and secure it with drywall screws or nails spaced every 6–8 inches.
Step 4: Apply Drywall Tape
Cover the seams between the old and new drywall with self-adhesive drywall tape. This step ensures a smooth, seamless transition.
Step 5: Apply Joint Compound
Spread a thin layer of joint compound over the taped area using a joint knife. Feather the edges to create a smooth, blended surface. Allow it to dry completely, then sand until smooth.
Step 6: Prime and Paint
Apply a coat of primer to prepare the surface, then paint to match the rest of the wall. Your repair should now blend seamlessly with its surroundings.
Tips for a Professional Finish
For results that rival those of professional drywall services, follow these tips:
Feather Your Edges: Gradually thin out joint compound near the edges for a flawless blend.
Sanding Between Coats: Sand lightly after each coat of joint compound to eliminate rough spots.
Paint in Natural Light: Check your work in natural daylight to ensure even coverage and color matching.
If achieving a perfect finish feels overwhelming, hiring a professional drywall installation service may be worth considering to handle the job with precision.
Preventing Future Water Damage
Minimizing the likelihood of future water damage saves you from repeating the drywall repair process. Here’s how you can protect your home:
Inspect Plumbing Regularly: Schedule routine checks for pipes, faucets, and fixtures to catch leaks early.
Install Waterproof Drywall: Known as green or cement board, this type of drywall is ideal for areas prone to moisture, such as bathrooms or basements.
Use Water Leak Detectors: Devices that alert you to leaks can stop water damage in its tracks.
Ensure Proper Ventilation: Maintain good airflow in high-humidity spaces to prevent condensation buildup.
Keep Gutters and Downspouts Clean: Diverting rainwater away from your home’s foundation reduces leaks from exterior walls.
Why It’s Okay to Leave It to the Professionals
Replacing damaged drywall after plumbing leaks is a project that requires precision, time, and patience. While DIY is an option, hiring a professional drywall service comes with its benefits—guaranteed quality, faster completion times, and peace of mind.
Pest infestations can wreak havoc in your home, and one of the most affected areas is often your drywall. From termites to rodents, many pests dig, chew, or burrow into walls, leaving your home structurally compromised and your family exposed to health hazards.
If you’re dealing with pest-damaged walls, it’s essential to act quickly. Prompt and professional drywall replacement restores your home’s safety, functionality, and appearance while preventing further issues. But how do you know when it’s time to replace your drywall, and what should you expect from the process? This guide dives into everything you need to know, from identifying the signs of a pest problem to choosing the right drywall repair service.
Call 317-269-7319 for Professional Drywall Replacement Service in Indianapolis
How to Identify a Pest Infestation Inside Your Walls
Drywall damage isn’t always immediately obvious, especially if pests are hidden inside your walls. Knowing the signs of common pests and their impact on drywall is crucial to catching the problem early.
Common Culprits That Damage Drywall
Termites – These notorious pests eat through wood and drywall paper, leaving behind small, pencil-thin holes or sagging drywall.
Rodents – Mice and rats chew drywall to create passages, often leaving gnaw marks and shredded materials around entry points.
Carpenter Ants – Similar to termites, they excavate wood and drywall, leaving behind piles of fine, sawdust-like material.
Cockroaches – Their presence is often noticeable due to grease trails, droppings, or odors in hidden areas, including walls.
Bees and Wasps – Occasionally, these insects create nests or hives inside walls, leaving visible damage around the entrances.
Squirrels and Bats – Even these critters can enter walls through small openings and create nests, often leaving behind feces and urine that damage drywall.
How to Confirm Hidden Infestations
While the physical signs of wall damage might be subtle, there are ways to confirm an infestation:
Sounds: Scratching, rustling, or chewing noises could indicate pests behind walls.
Stains: Discolored patches on drywall could be from pest excretions or secretions.
Smells: Musty or foul smells can signal a pest problem, especially with rodents.
Professional Inspection: When in doubt, hiring a pest control expert can help pinpoint the issue.
The Risks of Delaying Drywall Replacement
Ignoring pest-damaged drywall isn’t just an aesthetic issue—it can have serious consequences for your home and health.
Health Hazards of Compromised Drywall
Mold Growth: Damaged drywall is prone to moisture absorption, creating a breeding ground for mold that can harm respiratory health.
Allergens: Pest droppings, fur, and remains trapped in the walls introduce allergens, aggravating conditions like asthma.
Structural and Financial Impact
Weakened Walls: Severe pest infestations can erode the integrity of your walls, posing risks of collapse or further damage.
Decreased Property Value: Visible wall damage reduces your home’s market value, meaning lost money down the line.
Expensive Repairs: The longer you wait, the worse the damage becomes—leading to costlier and more complex repairs.
The Drywall Replacement Process
Replacing drywall after a pest infestation involves more than patching up cracks. Here’s a step-by-step guide to what you can expect.
Step 1: Eliminate the Source of the Infestation
Before starting drywall repairs, enlist pest control professionals to completely eliminate the pests. This prevents re-infestation after the replacement.
Step 2: Assess the Damage
A skilled drywall service will inspect the area to determine how extensive the damage is and whether only certain sections or the entire wall requires replacing.
Step 3: Remove Damaged Drywall
Damaged panels are carefully removed, along with any affected insulation or surrounding materials.
Step 4: Install New Drywall
Professionals will cut and place new drywall panels that seamlessly fit into the damaged area.
Step 5: Finishing Touches
Once installed, the new drywall is taped, mudded, and sanded to achieve a smooth finish before priming and painting.
Step 6: Use Eco-Friendly and Pest-Resistant Materials
Some professionals offer pest-resistant drywall and Eco-friendly materials to minimize future risks. Ask your contractor about these options for added peace of mind.
Finding the Best Drywall Replacement Service
Not all drywall services are created equal, and finding the right one ensures the job is done safely and efficiently.
What to Look For in a Professional Service
Experience: Choose companies with extensive experience in drywall replacement, particularly after pest damage.
Reputation: Research reviews and testimonials to evaluate their reliability and quality of work.
Warranties: Look for services that offer guaranteed satisfaction or warranties on their work.
Material Options: Ask if they offer pest-resistant drywall and quality paints that last.
Questions to Ask Before Hiring
Can you provide a detailed estimate?
How long will the replacement process take?
Do you have experience with pest-damaged walls?
What precautions do you take to prevent future infestations?
Preventive Steps to Avoid Future Wall Damage
Once your drywall is replaced, keeping pests at bay is vital to maintaining structural integrity and preserving your home.
Tips for Preventing Infestations
Seal Entry Points: Examine your walls, floors, and ceilings for cracks or gaps where pests can enter and seal them with caulk or other durable materials.
Maintain Cleanliness: Regularly clean basements, attics, and other areas prone to pests to eliminate food sources.
Trim Surrounding Vegetation: Overhanging branches or shrubs can create a bridge for pests to access your home.
Regular Inspections and Maintenance: Schedule annual pest inspections and check your walls for signs of new damage. Address small issues early to avoid more significant problems down the line.
Conclusion
Pest infestations can feel overwhelming, but the solution doesn’t have to be. Promptly replacing damaged drywall restores your home’s structural health and ensures it remains a safe place for your family to live.
If your walls have suffered pest damage, trust the experts to handle the job. Don’t wait—start your drywall replacement with a professional service today to avoid further risks and regain peace of mind. Know someone dealing with pest-damaged walls? Share this drywall blog to help them take action!
For your drywall needs, consider reaching out to a trusted drywall contractor. Your home deserves the expertise and attention to detail that only a professional can provide. Contact Drywall By Renso at 317-269-7319 to learn more about our expert drywall services in Indianapolis, Indiana. We serve residential and commercial clients throughout the Greater Indy areas. Request an estimate, today!
Walls are more than just structural elements; they define the space, create a sense of security, and contribute to the aesthetic appeal of homes and offices. But what happens when these essential structures suffer damage? This is a concern every homeowner and office manager should address proactively. From minor scratches to significant water damage, walls can suffer from various types of wear and tear if not properly maintained. This blog provides practical insights into preventing wall damage in residential and commercial settings, offering valuable tips and solutions for maintaining the integrity of your walls.
Call 317-269-7319 for Professional Finished Wall Repair in Indianapolis Indiana
The Silent Wear and Tear on Finished Walls
Daily activities, no matter how mundane, can cause gradual wear and tear on walls. Foot traffic, moving furniture, and even opening doors can lead to scrapes and dents. For homeowners, children playing indoors can be particularly tough on walls. In an office environment, frequent rearrangement of office equipment or furniture can lead to similar issues. Regularly assessing high-traffic areas can help identify potential problem spots before they escalate into significant damage.
While wear and tear might seem unavoidable, preventive measures can minimize the impact. Using corner guards and door stoppers is a simple yet effective way to protect high-risk areas from damage. Additionally, rearranging furniture thoughtfully to avoid direct contact with walls can significantly reduce the likelihood of scratches and dents.
Consistent maintenance routines are crucial in managing wear and tear. Regularly clean walls with appropriate cleaning solutions to remove dust and dirt buildup. This not only preserves the appearance but also prevents long-term deterioration. Maintenance efforts should focus on areas prone to daily contact and ensure they remain in good condition.
Preventing Moisture Damage in Drywall
Moisture is a formidable enemy to walls, leading to water damaged walls that can compromise structural integrity. This is often caused by leaks in plumbing, improper ventilation, or exposure to humid conditions. Mold growth and paint peeling are common indicators of moisture damage, requiring immediate attention.
To prevent moisture-related issues, ensure your home or office has adequate ventilation, especially in areas like kitchens and bathrooms. Regularly check for leaks in plumbing fixtures and address them promptly. Installing exhaust fans in high-moisture areas can also help maintain a dry environment.
Water-resistant paint and sealants are effective preventive measures against moisture damage. These products provide an additional layer of protection, keeping your walls safe from excessive moisture. Regular inspections and timely interventions are vital to preserving wall health and avoiding costly repairs.
Protection from Furniture and Equipment
Furniture and equipment can inadvertently cause impact damage to walls, resulting in unsightly wall dents or holes. This is especially common in offices where bulky furniture is moved frequently. Homeowners may also experience similar issues during renovations or when rearranging living spaces.
Preventing impact damage involves careful planning and strategic placement of furniture. Use felt pads under furniture legs to minimize friction and prevent scratches. In offices, encourage employees to use caution when moving office equipment to avoid accidental collisions with walls.
For added protection, consider installing wall guards or bumpers in high-risk areas. These products absorb impact and prevent direct contact between furniture and the wall surface. By taking preventive steps, you can maintain the pristine condition of your walls and avoid unnecessary repairs.
Identifying and Addressing Underlying Problems
Structural issues can manifest as wall cracks or bulges, often indicating deeper problems with the building’s foundation. These issues require immediate attention to prevent further damage and ensure the safety of occupants. Ignoring structural problems can lead to costly repairs and compromise the stability of the entire structure.
Conduct regular inspections of your property to identify any signs of structural damage. If you notice cracks in the walls or floors, consult a general contractor or structural engineer to assess the severity of the issue. Promptly addressing structural problems can prevent them from escalating into larger, more expensive repairs.
Reinforcing structural integrity may involve foundation repairs or other professional interventions. It’s important to rely on qualified professionals to address these issues adequately. Regular maintenance and early detection play a crucial role in preserving the long-term health of your property.
Wall Care Tips for Homeowners and Office Managers
Regular maintenance is essential to prevent wall damage and preserve the longevity of your walls. For homeowners, incorporate wall cleaning tips into your routine to keep surfaces free from dust and grime. Use gentle cleaning solutions to avoid damaging paint or wallpaper.
Office managers should implement a maintenance schedule that includes regular wall inspections and cleaning. Encourage employees to report any signs of damage immediately, allowing for prompt repairs. Establishing guidelines for wall care can promote a sense of responsibility among staff members.
Educate both homeowners and office occupants on the importance of maintaining wall integrity. Simple actions, such as using protective materials and handling furniture carefully, can go a long way in preserving the condition of walls. Consistent maintenance efforts can save time, money, and frustration in the long run.
Choosing the Right Wall Protection Products
Investing in wall protection products is a proactive step in preventing damage. Consider using corner guards, wall bumpers, and chair rails in high-traffic areas to protect vulnerable spots. These products are available in various materials and styles to suit different aesthetic preferences.
In an office environment, consider installing kick plates on doors to prevent scuff marks. These small additions can significantly extend the lifespan of walls and maintain a professional appearance. By choosing the right wall protection products, you can enhance both functionality and aesthetics.
Explore different options for wall protection to find the best fit for your needs. Whether it’s adding a decorative wainscoting or using clear protective films, there’s a solution for every space. Investing in these products can prevent costly repairs and maintain the pristine condition of your walls.
Implementing Wall Care Policies in the Workplace
Creating a culture of wall care in the workplace involves establishing clear policies and guidelines. Encourage employees to handle office equipment with care and be mindful of their surroundings. Regular training sessions can reinforce the importance of maintaining wall integrity.
Designate specific individuals or teams responsible for monitoring wall conditions and reporting any issues. This ensures that any damage is addressed promptly and doesn’t go unnoticed. By involving employees in wall care efforts, you can foster a sense of ownership and accountability.
Regularly communicate the importance of wall maintenance to all staff members. Remind them that preserving the appearance of the office contributes to a positive work environment. Implementing wall care policies can prevent damage and create a more pleasant workplace for everyone.
Financial Implications of Neglecting Wall Maintenance
Neglecting wall maintenance can lead to significant financial implications. Small issues, such as minor wall dents or cracks, can quickly escalate into costly repairs if left unattended. The cost of repairing extensive damage far outweighs the investment in regular maintenance.
In addition to repair costs, neglecting wall maintenance can impact the overall value of a property. Aesthetically unappealing walls can deter potential buyers or tenants, reducing the property’s marketability. Maintaining well-kept walls is essential for preserving property value.
Consider the long-term financial benefits of proactive wall maintenance. By investing in regular inspections and preventive measures, you can avoid expensive repairs and protect your property’s overall value. Prioritizing wall care is a wise investment in the longevity of your space.
Health and Safety Concerns with Damaged Walls
Damaged walls pose health and safety risks to occupants. Crumbling walls or structural issues can compromise the integrity of a building, potentially leading to accidents or injuries. Ensuring the safety of occupants should always be a top priority.
Addressing health and safety concerns involves promptly repairing any visible damage and addressing underlying structural issues. Regular inspections can help identify potential hazards and allow for timely interventions. Prioritizing safety ensures a secure environment for residents and employees.
Consider the impact of neglected walls on indoor air quality. Damaged walls may harbor mold or mildew, which can negatively affect the health of occupants. Maintaining walls in good condition contributes to a healthier living and working environment.
Step-by-Step Guide to Repairing a Hole in the Wall
Repairing a hole in the wall is a manageable task for homeowners and office managers. Gather the necessary tools and supplies, such as a patch kit, sandpaper, joint compound, putty knife, and paint. Having these items on hand ensures a smooth repair process.
Begin by cleaning the area around the hole and removing any loose debris. Apply the patch over the hole, ensuring it adheres securely. Use a putty knife to apply joint compound over the patch, feathering the edges for a seamless finish.
Once the compound is dry, sand the surface until smooth and paint over it to match the surrounding wall. This step-by-step process ensures a professional-looking repair and helps restore the appearance of your walls.
When to Call a Professional for Drywall Repair
While minor repairs can be tackled independently, certain situations require professional expertise. Extensive damage, such as large holes or structural issues, may necessitate the skills of a qualified drywall repair service. Professionals can assess the damage and recommend appropriate solutions.
Consulting a professional is advisable when dealing with moisture damage or complex repairs. These issues often require specialized equipment and techniques to address effectively. By relying on experts, you can ensure the longevity of your walls and avoid further complications.
Consider the value of professional assistance in maintaining wall integrity. A skilled technician can provide valuable insights and recommendations for preventing future damage. Partnering with professionals enhances the overall quality of your wall care efforts.
Conclusion
Protecting and maintaining your walls is essential for preserving the beauty and functionality of your home or office. By implementing preventive measures, conducting regular maintenance, and addressing repairs promptly, you can avoid costly damages and create a safe, inviting environment for all.
Take the time to assess your current wall care practices and make necessary changes to enhance their longevity. Whether you’re a homeowner or office manager, prioritizing wall maintenance is an investment in the value and safety of your space.
For further resources and expert advice on wall care, consider consulting professionals who specialize in wall maintenance and repair. Their expertise can help you take proactive steps to protect your walls and enhance the overall quality of your living or working environment.
Are you looking for some professional help with drywall work? Contact Drywall by Renso at 317-269-7319 for professional drywall repair in Indianapolis, Indiana. Your satisfaction is our top priority, and we’re here to help you maintain a beautiful and functional space. Request a free estimate, today!
In the world of home maintenance, a key aspect that often gets overlooked is something quite literally right under our noses — our walls. For homeowners, sagging or bulging drywall can be an unsettling sight. Not only can it mar the beauty of your home, but it can also indicate underlying issues that may need immediate attention. This blog post will guide you through understanding the causes of drywall imperfections and what you can do about them.
Call 317-269-7319 for Professional Drywall Water Damage Repair in Indianapolis Indiana
The Problem With Sagging or Bulging Walls
Sagging or bulging drywall is more common than you might think. For many homeowners, the first sign is a slight dip or protrusion in the wall. Left unchecked, these issues can lead to significant problems down the line. Drywall issues are not just cosmetic; they can be a sign of moisture intrusion, structural inadequacies, or even poor installation practices. Knowing how to spot these signs early can save you time, effort, and money.
Sagging vs. Bulging
At first glance, sagging and bulging might seem identical, but they arise from different sources. Sagging drywall typically hangs downwards, indicating a loss of support or integrity in the ceiling or wall. Bulging, on the other hand, pushes outward, suggesting pressure from behind the drywall. Identifying which issue you’re dealing with is crucial for determining the right fix. Recognizing these differences can help you address the root cause more effectively.
Top Causes of Sagging Drywall
Water Damage
One of the most common culprits behind sagging drywall is water damage. Whether from a leaky roof, plumbing issues, or poor ventilation, water that seeps into drywall causes it to weaken and sag. Homeowners should watch for water stains, soft spots, or a musty odor—all indicators of moisture issues. Addressing water damage swiftly is essential to prevent further deterioration.
Structural Issues
Structural inadequacies, such as insufficient support beams or shifting foundations, can lead to sagging drywall. If your home is settling unevenly, it can create stress points that cause walls to sag. In such cases, the drywall is merely a symptom of a larger problem. It’s important to consult a structural engineer to assess and resolve these foundational issues before they worsen.
Poor Installation
Drywall installation might seem straightforward, but improper techniques can lead to sagging over time. Using incorrect fasteners, failing to secure joints properly, or inadequate spacing can all result in sagging. Homeowners planning DIY projects should pay close attention to installation guidelines or hire a professional to ensure a proper job.
Top Causes of Bulging Walls
Pressure Buildup Behind the Wall
Bulging walls often occur when there is pressure building up behind the drywall. This can be due to plumbing leaks, pest infestations, or even insulation issues. These pressures push the drywall outward, creating a bulge. Investigating the source of pressure is key to preventing further damage and ensuring your home’s structural integrity.
Humidity and Temperature Changes
Fluctuations in humidity and temperature can cause drywall to expand and contract, leading to bulging. This is particularly common in regions with extreme weather changes. Installing a dehumidifier or maintaining a consistent temperature in your home can mitigate these effects. Keeping an eye on climate control can protect your walls and preserve their smooth appearance.
Anchoring and Fastening Mistakes
Sometimes, bulging can result from improper anchoring during the drywall installation process. If nails or screws are driven too deeply or spaced incorrectly, the drywall may not hold up under pressure. Ensuring correct fastening techniques can prevent these issues. Checking installation work or consulting a professional can safeguard against future bulging problems.
How to Prevent These Wall Damages
Regular Maintenance Goes a Long Way
Regular inspections can help catch potential issues before they become major problems. Look for signs like cracks, discoloration, or soft spots. Developing a maintenance routine can keep your walls in tip-top shape. Regular check-ins with a professional can provide an expert eye to catch things you might have missed.
Prompt Attention to Current Problems
If you notice sagging or bulging, prompt action is crucial. Ignoring these signs can lead to more extensive damage. Address issues like water leaks or structural inadequacies immediately to avoid the problem from escalating. Quick responses can save money and stress in the long run.
Hiring Professionals for an Expert Touch
While some fixes can be DIY, others require professional expertise. When in doubt, consult a drywall repair expert. Professionals can provide thorough inspections, identify underlying causes, and offer long-term solutions. Investing in professional services ensures quality and peace of mind.
DIY vs. Professional Wall Repair
Simple DIY Fixes You Can Try
For minor issues, such as small cracks or localized sags, DIY repairs can be effective. Patch kits and spackle are handy tools for small jobs. However, it’s important to follow instructions carefully and ensure all materials are secure. Practicing caution and patience can yield rewarding results.
When to Call the Pros
If the damage is extensive or linked to structural issues, it’s best to call in professionals. Attempting major repairs without the right skills can exacerbate the problem. Professionals have the tools and experience necessary to handle complex situations. Relying on expert intervention can prevent costly mistakes and ensure lasting repairs.
Balancing Cost and Quality
Consider the balance between cost and quality when deciding on DIY vs. professional repair. While DIY might save money initially, professional services offer expertise that ensures a longer-lasting fix. Evaluating the severity of the issue and your own capabilities can guide your decision. A thoughtful approach can protect your home and your budget.
Conclusion
Sagging or bulging drywall is more than just an eyesore—it’s a warning sign of potential underlying issues. Addressing these problems promptly can maintain your home’s beauty and safety. Regular maintenance, early detection, and professional guidance are key to preventing drywall issues. For homeowners seeking peace of mind, taking proactive steps today can safeguard their future.
If you’re dealing with drywall issues or want to ensure your home stays in great shape, reach out to a local and trusted drywall repair service. They offer comprehensive solutions to help you maintain a safe and beautiful home environment. Request a consultation and take the first step towards protecting your investment.
Are your walls showing signs of water damage or structural issues like sagging and bulging? Let us check it out for you. Contact Drywall By Renso at 317-269-7319 to learn more about our expert drywall services in Indianapolis, Indiana. We serve residential and commercial clients throughout the Greater Indy areas. Request an estimate, today!
In the world of home improvement, few tasks offer as much satisfaction as a perfectly smooth and freshly painted wall. Drywall, the unsung hero of modern interiors, provides the canvas upon which our homes and commercial spaces are built. However, like any other element of construction, drywall is not immune to wear and tear.
Whether you’re dealing with minor dents or major holes, understanding the drywall repair process can save you both time and money. This blog post is your ultimate guide to navigating the world of drywall repair, offering insights and practical steps for homeowners, property managers, and DIY enthusiasts alike.
Call 317-269-7319 for Professional Indianapolis Drywall Repair Service
Why Drywall is the Backbone of Modern Interiors
Drywall, also known as gypsum board or plasterboard, is a staple in modern construction due to its affordability, ease of installation, and versatility. It forms the walls and ceilings of our homes, providing a smooth surface for painting and decorating. Its importance cannot be overstated, as it contributes significantly to the aesthetic and functional aspects of any interior space.
Homes and commercial properties rely heavily on drywall to create partitions, cover structural elements, and improve acoustics. Without it, our living and working spaces would lack the polish and refinement we’ve come to expect. Yet, despite its strengths, drywall is susceptible to damage. Everyday activities, moisture exposure, and structural settling can all lead to dents, cracks, and holes. Understanding the causes of such damage is crucial for effective drywall maintenance and repair.
Common Culprits Behind Drywall Damage
Before embarking on the drywall repair process, it’s essential to identify the common causes of damage. Understanding these factors can help you prevent future issues and protect your walls from unnecessary wear and tear. One prevalent cause of drywall damage is accidental impact. Moving furniture, opening doors too forcefully, or even an energetic pet can result in dents and holes. These seemingly minor incidents can accumulate over time, leaving your walls less than pristine.
Moisture is another major enemy of drywall. Leaks, high humidity, and poor ventilation can lead to mold growth, warping, and deterioration of the material. Addressing the root cause of moisture issues is crucial to preventing further damage. Additionally, settling and structural shifts can cause cracks in drywall. This is especially common in new constructions as the building shifts and settles over time. Understanding these common culprits can guide your repair efforts and prevent future occurrences.
Your Step-by-Step Guide to Drywall Repair
Repairing drywall might seem daunting, but with the right approach and a bit of patience, it can become a manageable task. Here’s a comprehensive step-by-step guide to help you through the drywall repair process.
Assessing the Damage
Begin by thoroughly assessing the extent of the damage. Identify whether you’re dealing with a small dent, a medium-sized hole, or a large section that requires replacement. This assessment will determine the tools and materials you’ll need for the job. Small dents and wall holes can often be fixed with patching, while larger damages might require cutting out and replacing sections of drywall. Take note of any underlying issues, such as moisture or structural problems, that need addressing before proceeding.
Gathering the Necessary Tools and Materials
Once you’ve assessed the damage, gather the necessary tools and materials. For minor repairs, you’ll need patching compound, sandpaper, a putty knife, and paint that matches your wall color. For larger repairs, you’ll need a drywall saw, replacement drywall panels, joint tape, and screws. Having everything ready before you start will make the process smoother and more efficient.
Preparing the Area
Before you begin repairing, prepare the area by clearing the surrounding space and laying down protective coverings. Dust and debris can spread easily during the repair, so safeguarding your furniture and flooring is essential. If you’re repairing a wall near electrical outlets or switches, ensure that the power is turned off for safety.
Repairing Small and Large Holes
For small dents and holes, start by applying a thin layer of patching compound using a putty knife. Smooth it out and allow it to dry before sanding it down to create a seamless finish. For larger holes, cut out the damaged section and replace it with a new piece of drywall. Secure it with screws, apply joint tape, and use compound to blend the edges. Sand the area once the compound is dry for a uniform surface.
Sanding and Finishing
Sanding is a critical step in achieving a polished look. Use fine-grit sandpaper to gently smooth the patched area, ensuring that it’s flush with the surrounding wall. Be cautious not to over-sand, as this can damage the drywall surface further.
Painting and Final Touches
Once the repair is complete and the surface is smooth, it’s time to paint. Use a primer to ensure even paint application, then apply a coat of paint that matches your existing wall color. Feather the edges to blend the new paint seamlessly into the old. Stand back and admire your handiwork—a wall restored to its former glory.
Tips for DIY Drywall Repairs
While the drywall repair process can be tackled by anyone, a few tips can enhance your success. First, take your time. Rushing through the repair can lead to mistakes and a less-than-perfect finish. Patience is key to achieving a professional-looking result. Practice makes perfect. If you’re new to drywall repair, consider practicing on a scrap piece of drywall before tackling visible sections. This will help you refine your technique and build confidence.
Don’t hesitate to seek guidance. Online tutorials and home improvement resources can provide valuable insights and tips from experienced DIYers. Learning from others’ experiences can save you time and frustration.
Knowing When to Call a Professional
While many drywall repairs can be handled independently, there are situations where calling a professional is the best choice. Extensive damage, underlying issues like mold, or lack of experience can lead to more significant problems if not addressed correctly. Professionals bring expertise and specialized tools to the table, ensuring a smooth and long-lasting repair. If you’re unsure about tackling a particular repair, reaching out to a professional can save you time and headaches.
Wrapping Up
In conclusion, understanding and mastering the drywall repair process is a valuable skill for homeowners, property managers, and DIY enthusiasts. Regular maintenance and timely repairs not only enhance the aesthetic appeal of your spaces but also contribute to the overall integrity of your property. By addressing common causes of damage and following a systematic repair process, you can keep your walls looking pristine and well-maintained.
Maintaining your drywall is a proactive step in preserving the beauty and value of your home. Don’t hesitate to take action when damage occurs, and remember that seeking professional help is always an option.
If you’re ready to tackle your next drywall repair project or need assistance with more extensive repairs, our team of experts is here to help. Contact Drywall by Renso at 317-269-7319 for professional drywall repair service in Indianapolis Indiana. We serve residential and commercial clients all throughout the central part of the state.