Why Choose Metal Stud Framing for Your Drywall Construction Project

Metal stud framing is rapidly becoming the popular choice for construction projects, both residential and commercial. Whether you’re a homeowner planning a remodel, a business owner expanding your premises, or a real estate developer working on a new construction build, understanding the basics of metal stud framing can help you make informed decisions. With durability, versatility, and cost-efficiency on its side, this modern building method brings a wealth of benefits—but only if done right.

This guide will walk you through what metal stud framing is, its key advantages, how to select the right metal stud framers, and tips for seamless metal frame installation. By the end of this post, you’ll be prepared to start your next drywall project with confidence. Let’s get started.

Call 317-269-7319 for Professional Metal Stud Framing and Drywall Finishing in Indianapolis Indiana

What Is Metal Stud Framing?

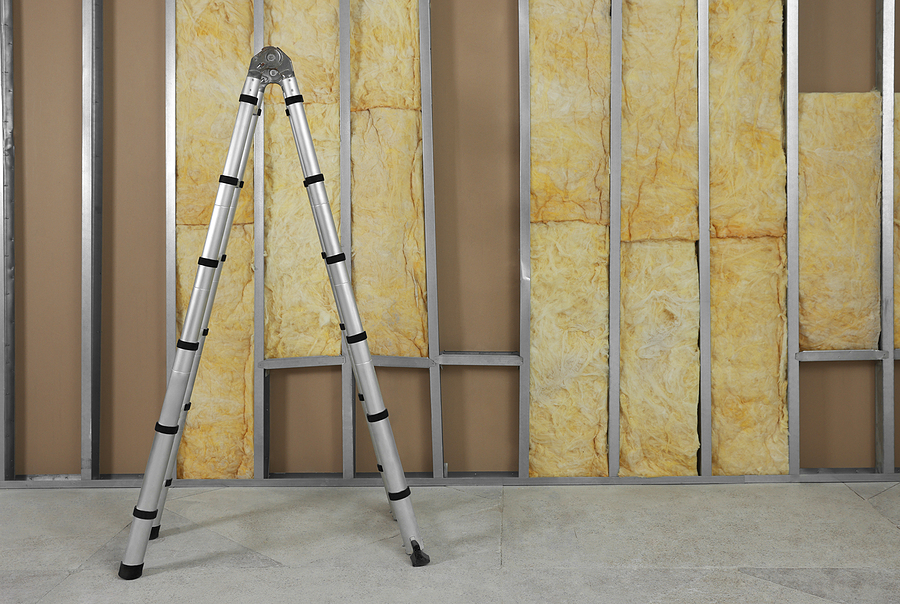
Metal stud framing involves the use of steel or aluminum studs instead of traditional wooden studs to create the structural framework for walls, ceilings, and partitions. It’s commonly used in commercial settings but is quickly making its way into residential projects due to its superior durability and design flexibility.

Metal studs come in a variety of sizes and textures, depending on specific project requirements. They serve as a reliable base for drywall installation and can be laser-aligned to ensure perfectly straight walls—making them ideal for projects where precision and durability are non-negotiable.

Benefits of Metal Stud Framing

Switching to metal stud framing offers a host of benefits that make it an attractive choice for all types of construction builds. Here are four reasons why metal stud framing might be perfect for your next project:

1. Durability Matters

Metal studs are far more resistant to wear-and-tear than their wooden counterparts. They’re impervious to termites, won’t warp or shrink over time, and can withstand the effects of moisture and fire better than wood. This means a more durable framework that lasts longer, requiring less future maintenance.

2. Lightweight and Easy to Handle

Despite their sturdy construction, metal studs are surprisingly lightweight. This makes them easier and faster for professional installers to work with—ultimately saving time during a new construction build or remodeling project.

3. Design Flexibility

Metal stud framing offers flexibility in design. Curved walls and unique architectural features are far easier to achieve with metal studs, allowing for creativity without compromising structural integrity.

4. Eco-Friendly Choice

Since metal studs are often made of recyclable materials, they’re a more sustainable choice for Eco-conscious builders. For homeowners or business owners looking to reduce their environmental footprint, this option proves ideal.

How to Choose the Right Metal Stud Framers

Selecting the right team of metal stud framers can make or break your drywall project. Whether you’re a homeowner or a developer, hiring experienced professionals should be high on your priority list. Here’s what to consider:

Experience in Metal Frame Installation

Look for contractors or framers who specialize in metal stud framing and have a proven track record in handling similar projects. Ask for references or look for reviews from past customers.

Knowledge of Laser-Aligning Walls

Precision is key in metal stud framing. Ensure your chosen framers have the tools and expertise required for laser-aligning walls, which decreases errors and ensures a flawless framework.

Licensing and Insurance

Always choose licensed and insured metal stud framers. This not only protects you from liability in case of accidents but also guarantees that the team adheres to proper construction standards.

Timelines and Budget Transparency

When interviewing potential framers, look for professionals who can provide you with a clear project timeline and a detailed cost breakdown. Transparency from the start helps to avoid issues later.

Compatibility

Lastly, consider how well you work with the team. Construction projects require ongoing communication and collaboration, so choosing someone whose communication style aligns with yours is essential.

Installation Tips for Metal Stud Framing

Even if you have the best contractors at hand, understanding installation basics can be helpful. Here are some practical tips for optimizing your metal frame installation:

Tip #1. Pre-Plan Layouts

Before installation begins, ensure the layout of your new construction build is aligned with project specifications. Clearly mark areas where studs need to align, especially around doors and windows.

Tip #2. Precision is Key

Always use laser-aligning tools to ensure the frames are positioned correctly. Even minor errors in alignment can cause issues down the line, especially when adding drywall.

Tip #3. Secure Proper Fastenings

Metal stud framing requires special screws and fasteners designed for steel or aluminum. Ensure framers are equipped with the right hardware to avoid unnecessary delays.

Tip #4. Consider Electrical and Plumbing Access

Don’t forget to pre-plan wiring and plumbing routes. Most metal studs come with pre-punched holes to accommodate electrical conduits and plumbing pipes, making it easy to install these utilities alongside the framework.

Tip #5. Use the Right Tools

Metal studs may be lightweight, but cutting and fastening them properly requires specific tools. Your installers should use aviation snips (for cutting studs cleanly) and specialized screw guns built for heavy-duty materials.

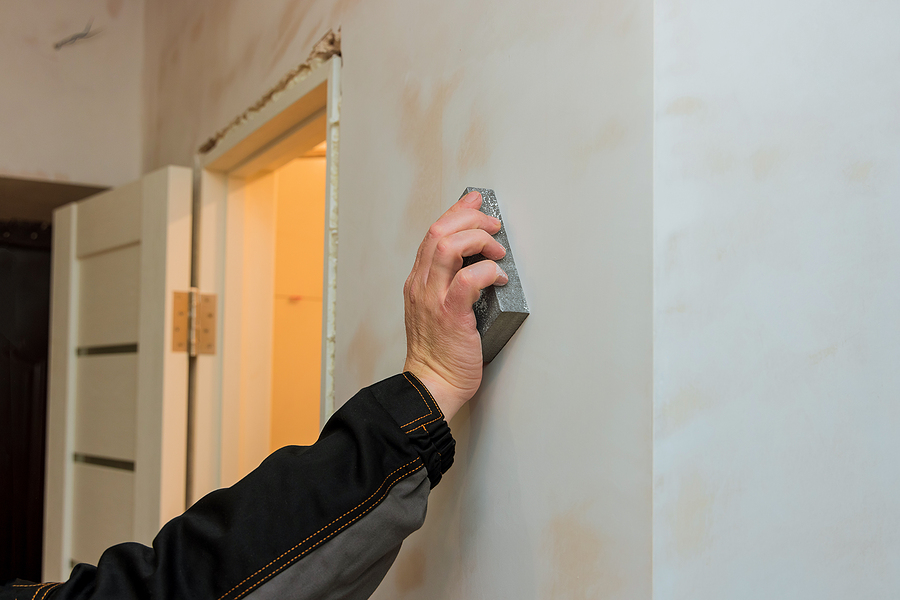
Post-Installation Drywall Finishing

Once your metal framing is complete, the next step is adding drywall. This process requires as much attention to detail as the framing itself. Follow these steps for an impeccable finish:

  • Attach Drywall to the Frames – Carefully secure sheets of drywall to your metal frames using self-tapping drywall screws. Always leave minimal gaps between panels for a seamless finish.
  • Seal Seams with Tape and Compound – Cover seams with mesh tape and apply joint compound to create a seamless appearance. Smooth everything down until the wall is perfectly flat.
  • Sand and Paint – Sand the dried joint compound lightly for a smooth finish, then apply a primer coat before painting to make your walls look polished and professional.

If precision isn’t your forte, it’s best to leave drywalling to professionals to avoid uneven seams or cracking later on.

Conclusion

Metal stud framing proves how innovative technology and durable materials can transform construction projects. Whether you’re working on a modest home remodel or a large-scale commercial project, metal stud framing ensures you build a solid foundation that stands the test of time.

If you’re looking for experienced metal stud framers and seamless metal frame installation, we’re here to help. Contact Drywall by AMFA at 317-269-7319 for professional metal stud framing services in Indianapolis, Indiana. We serve residential and commercial clients.

Related Posts:

Where to Find Trusted Commercial Drywall Service in Indy
Avoid DIY Disasters: The Importance of Professional Drywall Installation
How to Spot Improper Drywall Installation

The Perfect Finish: Mastering Drywall Sanding for DIY Enthusiasts

Are you a DIY enthusiast, home renovator, or Dad trying to fix a hole in the wall? Achieving a flawless drywall finish can be the key to transforming any space. Proper drywall preparation is crucial in the renovation process, ensuring that your walls look smooth and professional. In this comprehensive guide, we’ll explore the ins and outs of sanding drywall, offering valuable tips, techniques, and step-by-step instructions to help you achieve the perfect finish.

Call 317-269-7319 for Professional Drywall Repair and Installation in Indianapolis Indiana

A Preview to the Drywall Sanding Process

Before we jump into the how-to, let’s familiarize ourselves with the basics of sanding drywall. The sanding process involves using various types of sandpaper and sanding tools to smooth out the surface of drywall joints, corners, and imperfections. The goal is to create a seamless and even surface that blends perfectly with the surrounding wall.

Types of Sandpapers

The key to a successful sanding job lies in choosing the right type of sandpaper. Generally, sandpapers com e in different grits, ranging from coarse to fine. Coarse grits (40-80) are ideal for initial sanding to remove excess joint compound quickly. Medium grits (100-150) are used for smoothing out the surface, while fine grits (180-220) provide that final polished finish.

Essential Sanding Tools

To achieve professional results, it’s essential to have the right tools on hand. Here are some must-have sanding tools for drywall:

  • Sanding Block: A simple yet effective tool for manual sanding, providing better control over pressure.
  • Pole Sander: Ideal for reaching high or extended areas, ensuring even sanding across large surfaces.
  • Orbital Sander: A power tool that makes quick work of extensive sanding tasks, delivering consistent results.
  • Sanding Sponge: Perfect for detailed work and corners, offering flexibility and precision.

Step-by-Step Guide to Sanding Drywall

Mastering drywall sanding requires a systematic approach. Follow these steps to achieve a smooth and professional finish:

Initial Preparation

Preparation is the key to success in any renovation project. Start by ensuring the drywall surface is clean and free of any debris. Cover the floors and furniture with drop cloths to protect them from dust. Wear protective gear, including a mask, goggles, and gloves, to safeguard yourself from dust particles.

Applying Joint Compound

Before sanding, apply a thin layer of joint compound to the seams and screw holes. Use a taping knife to feather the edges, creating a smooth transition between the drywall and compound. Allow the joint compound to dry completely before proceeding to the next step.

Sanding the Surface

Begin sanding the dried joint compound using coarse grit sandpaper. Hold the sanding block or pole sander at a slight angle and use light pressure. Move in circular motions to avoid creating grooves or uneven surfaces. Once the majority of the compound is smoothed out, switch to medium grit sandpaper for further refinement.

Blending and Feathering

To achieve a seamless finish, focus on blending and feathering the edges of the joint compound. Use fine grit sandpaper to gently sand the edges, ensuring they blend smoothly with the surrounding drywall. This step is crucial to creating an even surface that hides the seams and imperfections.

Tips and Techniques for a Professional Finish

Achieving a flawless drywall finish takes practice and attention to detail. Here are some tips and techniques to help you along the way:

Avoiding Common Mistakes

One common mistake is applying too much pressure while sanding, leading to uneven surfaces. Instead, use light, consistent pressure to avoid creating indentations. Additionally, be cautious not to over-sand the joint compound, which can result in exposed seams.

Checking for Smoothness

Periodically check the smoothness of the surface by running your hand over it. If you feel any rough spots or ridges, continue sanding until the surface feels even and polished. Using a bright light source can also help highlight any imperfections that need further attention.

Sanding the Corners

Sanding corners can be challenging, but using a sanding sponge can make the task easier. Fold the sponge to create a sharp edge and gently sand the corners in a back-and-forth motion. This will help achieve a clean and sharp corner finish.

Importance of Dust Control and Safety Measures

Sanding drywall generates a significant amount of dust, which can be harmful if not properly managed. Implementing dust control measures is essential to ensure a safe and clean working environment.

Using a Dust Extractor

Investing in a dust extractor or vacuum with a HEPA filter can significantly reduce dust levels. Attach the extractor to your sanding tools to capture dust particles at the source, preventing them from spreading throughout the room.

Sealing Off the Work Area

Seal off the work area using plastic sheeting and painter’s tape to contain the dust. Close doors and windows to prevent dust from circulating into other parts of your home. After sanding, use a damp cloth to wipe down surfaces and remove any remaining dust.

Personal Protective Equipment (PPE)

Always wear appropriate PPE, including a dust mask, safety goggles, and gloves. This protective gear will shield you from inhaling dust particles and protect your eyes and hands from irritation.

Conclusion

Mastering the art of drywall sanding is a valuable skill for any DIY enthusiast, home renovator, or interior designer. By following the step-by-step guide and implementing the tips and techniques outlined in this post, you can achieve a smooth and professional finish that enhances the overall look of your space.

If you’re ready to take your sanding skills to the next level, don’t hesitate to reach out to our expert team for personalized advice and assistance. Contact Drywall by AMFA at 317-269-7319 for professional drywall services in Indianapolis, Indiana. Whether you’re tackling a small repair or a large-scale renovation, we’re here to help you achieve the perfect finish.

Related Posts:

Avoid Drywall Dust With Wet Sanding
Tips for Avoiding DIY Drywall Mistakes
How to Cut Drywall With Just Two Simple Tools

5 Steps to Properly Painting Over New Plasterboard

As one of the most widely applied in universal building materials of our day, plasterboard is a common commodity you will come across at some point in time as a homeowner. Also known as gypsum board, sheet rock, or drywall, fresh plasterboard requires a nice finish for optimal aesthetic appeal. In place of a skip trowel or texture design, homeowners can choose to paint over the new plasterboard. However, be sure you know the proper techniques and the right kind materials before getting over your head in a drywall painting project.

Continue reading to learn the 5 steps it takes to properly paint over new plasterboard, as well as, where to turn if you find yourself in need of some professional assistance or advice.

Indianapolis Drywall Contractors 317-269-7319

Let’s Get Started With What You Need

Visit your local department store or home improvement store, and pick up these supplies to properly paint over your freshly-installed and finished drywall:

✒ High Quality Paint and Primer
✒ 2.5 or 3 Inch Tapered Paint Brush
✒ Paint Rollers W/Covers
✒ Roller Extension Handle (Optional)
✒ Painters Tape
✒ Paint Pan
✒ Drop Cloths or Tarps
✒ Damp Sponge
✒ Screwdriver
✒ Ladder (Optional; Depending)

Once you’ve gathered all of your necessary supplies, organize them in a fashion so that your workspace is all set up and ready to go. This includes donning any protective gear, such as safety goggles, gloves, and painters’ apron, as well as, setting up drop cloths and furniture coverings to protect all surrounding areas and structures.

Now You Are Ready To Paint Your Plasterboard

Step 1

Using your damp sponge, give you our new plasterboard a wipe down to ensure all dust and solid matter are eliminated. During this process you might notice some imperfections or problem areas. In this case, make all necessary repairs, and finish by sanding and re-wiping your sheet rock.

Step 2

Apply your painters’ tape and all necessary areas of your workspace, including around electrical outlets, baseboards, window frames, door frames, ceilings, and more. Be sure that all of your drop cloths or plastic tarps, whichever one you’re using, are perfectly in place and covering any areas that might get paint splatter.

Step 3

If you need your ladder, get it ready to go. If you can reach all areas of your plasterboard with your paint roller, forget the latter. Just grab your paint rollers and paint brush. Pour your primer into your paint pan, and began applying your paint primer. Start with corners and edges first, creating a border. Then, starting at the center of the wall, fill in the rest of the space using straight and diagonal movements to ensure a streak free finish.

Step 4

After you have allowed the primer to dry, you may need to apply a second coat. But if not go ahead and move forward step four, which involves applying your finishing paint coats. First, apply your painters’ tape below the edges of the ceiling. Then pour your paint into your paint pan, and begin painting the ceiling first. Generally, ceilings are painted all white. After the ceiling has completely dried, remove your painters’ tape, and begin applying your finishing paint to the walls, which might be a different color than the ceiling.

Step 5

After the ceiling and walls have dried completely, you may need to apply a second coat. In fact, it is usually best practice to do so. Also during this step, go ahead and add in any touchups you need using your smaller tapered paintbrush. Finish by removing the rest of your painters’ tape from your workspace.

Professional Drywall Installation and Painting Services in Indianapolis

Call Drywall by AMFA at 317-269-7319 for drywall installation and interior painting services in Indianapolis, Indiana. We are experienced drywall contractors who offer a wide range of residential and commercial drywall service, including painting, repair, replacement, installation, new home construction, metal stud framing, custom drywall texture, grid ceilings, and much more. Call 317-269-7319 to request a free estimate, today.