Tips for Replacing Damaged Drywall After Plumbing Leaks

When plumbing leaks invade your home, they often leave behind more than just a puddle—the damage can seep into your walls, turning sturdy drywall into a soggy, unsightly mess. Replacing damaged drywall quickly and effectively is key to preserving your home’s structure and aesthetics. Whether you’re facing a minor patch-up or a full-scale repair, understanding how to tackle drywall repair can save you both time and money while ensuring that your walls stay in top shape.

This guide covers everything homeowners, property managers, or DIY enthusiasts need to know—from spotting signs of water damage to achieving a professional-looking finish. Let’s break it down step by step.

Call 317-269-7319 for Professional Drywall Replacement Services in Indianapolis

Signs and Risks of Water Damage to Drywall

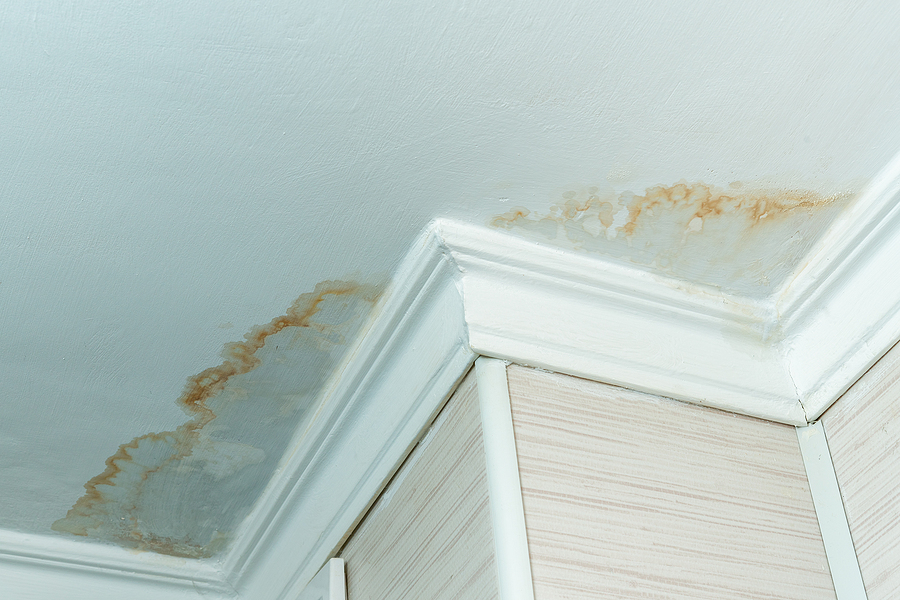
Drywall is especially vulnerable to water damage, and the longer water issues go untreated, the more severe the consequences can become. Here are the key signs to look for when assessing damage to your drywall:

Common Signs of Water Damage:

  • Discoloration: Brown, yellow, or gray stains are clear indicators of water infiltration.
  • Swelling or Warping: Drywall may start to bulge, bubble, or sag if it has absorbed too much water.
  • Peeling Paint or Wallpaper: Water damage can cause paint or wallpaper to lose adhesion and peel away.
  • Soft or Crumbly Material: Touch the wall. Damaged drywall will feel soft or crumble easily.
  • Mold or Mildew Growth: A musty smell often accompanies visible black or green spots on the drywall surface.

Risks of Ignoring Water Damage:

  • Mold Growth and Health Hazards: Untreated drywall can become a breeding ground for mold, leading to allergic reactions and respiratory issues.
  • Structural Weakness: Water-damaged drywall can weaken your home’s walls, compromising the overall structure.
  • Decreased Property Value: Unsightly water stains or warped drywall can lower the market value of your home.

Recognizing and addressing these signs promptly minimizes long-term damage and helps maintain the integrity of your home.

Steps to Assess and Prepare for Repair

Before jumping into drywall replacement, a proper assessment and preparation phase ensures you tackle the root problem and avoid further complications.

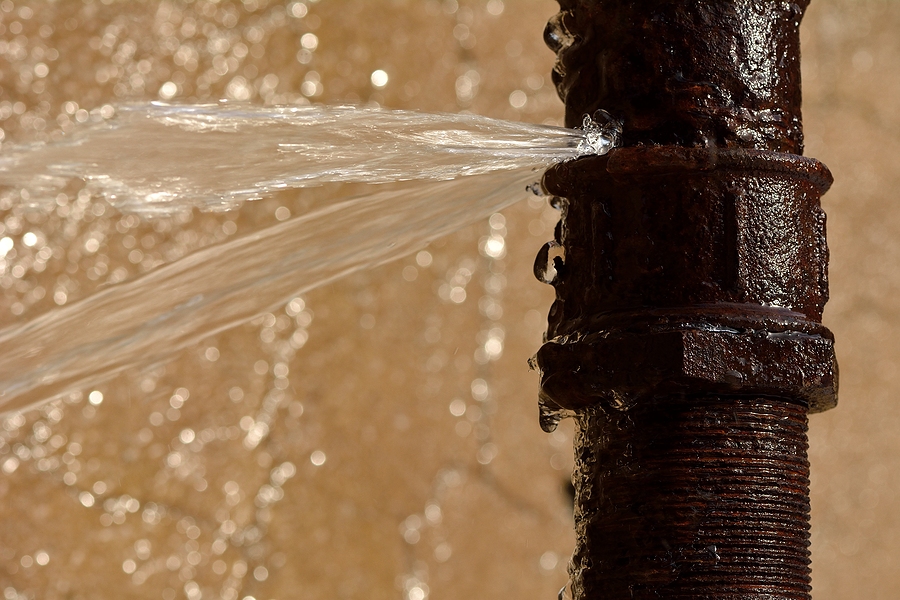
  1. Identify the Source of the Leak: Before repairing drywall, confirm the plumbing issue is fixed. Whether it’s a leaky pipe, roof, or HVAC system, addressing the source is crucial for long-term success.
  2. Inspect the Extent of the Damage: Use a flashlight and moisture meter to assess how far the water damage has spread. Mark damaged areas for removal.
  3. Dry the Area Completely: Ensure the drywall is completely dry to prevent mold growth. Use fans, dehumidifiers, or professional drying equipment to speed up the process.
  4. Remove Furniture or Decorations: Clear the affected area of furniture, wall hangings, or items that might interfere with repair work.
  5. Protect Surrounding Surfaces: Lay down tarps or drop cloths to catch drywall dust and debris. Tape around unaffected areas to minimize mess.

Tools and Materials Needed

To replace damaged drywall, you’ll need the right set of tools and materials. Here’s what to gather before you begin:

Tools:

  • Utility knife
  • Drywall saw
  • Measuring tape
  • Straightedge ruler
  • T-square or level
  • Drywall screws or nails
  • Cordless drill or screwdriver
  • Joint knife

Materials:

  • Replacement drywall panels (match the thickness to your existing walls, typically ½ inch)
  • Joint compound
  • Drywall tape
  • Sandpaper (120–150 grit)
  • Primer and paint (or matching finish)
  • Safety gear (gloves, goggles, dust mask)

Having these essentials on hand will streamline the repair process and help you achieve professional results.

Step-by-Step Guide to Replacing Damaged Drywall

Replacing drywall may seem daunting, but following these steps makes the process manageable—even for first-timers:

Step 1: Cut Out the Damaged Area

Use a utility knife or drywall saw to cut out the damaged section. Always cut slightly larger than the damaged area to ensure clean edges for the replacement panel.

Step 2: Measure and Cut Replacement Drywall

Measure the opening and use those dimensions to cut a new drywall piece. Precision is key—your replacement piece should fit snugly.

Step 3: Secure the Replacement Panel

Place the new drywall into position and secure it with drywall screws or nails spaced every 6–8 inches.

Step 4: Apply Drywall Tape

Cover the seams between the old and new drywall with self-adhesive drywall tape. This step ensures a smooth, seamless transition.

Step 5: Apply Joint Compound

Spread a thin layer of joint compound over the taped area using a joint knife. Feather the edges to create a smooth, blended surface. Allow it to dry completely, then sand until smooth.

Step 6: Prime and Paint

Apply a coat of primer to prepare the surface, then paint to match the rest of the wall. Your repair should now blend seamlessly with its surroundings.

Tips for a Professional Finish

For results that rival those of professional drywall services, follow these tips:

  • Feather Your Edges: Gradually thin out joint compound near the edges for a flawless blend.
  • Sanding Between Coats: Sand lightly after each coat of joint compound to eliminate rough spots.
  • Paint in Natural Light: Check your work in natural daylight to ensure even coverage and color matching.

If achieving a perfect finish feels overwhelming, hiring a professional drywall installation service may be worth considering to handle the job with precision.

Preventing Future Water Damage

Minimizing the likelihood of future water damage saves you from repeating the drywall repair process. Here’s how you can protect your home:

  • Inspect Plumbing Regularly: Schedule routine checks for pipes, faucets, and fixtures to catch leaks early.
  • Install Waterproof Drywall: Known as green or cement board, this type of drywall is ideal for areas prone to moisture, such as bathrooms or basements.
  • Use Water Leak Detectors: Devices that alert you to leaks can stop water damage in its tracks.
  • Ensure Proper Ventilation: Maintain good airflow in high-humidity spaces to prevent condensation buildup.
  • Keep Gutters and Downspouts Clean: Diverting rainwater away from your home’s foundation reduces leaks from exterior walls.

Why It’s Okay to Leave It to the Professionals

Replacing damaged drywall after plumbing leaks is a project that requires precision, time, and patience. While DIY is an option, hiring a professional drywall service comes with its benefits—guaranteed quality, faster completion times, and peace of mind.

Is this drywalling project proving to be more than you can handle on your own? Contact Drywall by AMFA at 317-269-7319 for professional drywall services in Indianapolis, Indiana. We serve residential and commercial clients.

Related Posts:

Replacing Drywall After a Pest Infestation: What You Need to Know
Detecting Water Damage in the Home: Signs, Solutions, and Prevention
Tips for Drywall Water Damage Clean Up

Detecting Water Damage in the Home: Signs, Solutions, and Prevention

Water damage in your home’s walls and ceilings can be a nightmare. However, identifying the signs early can save you from costly repairs and potential health hazards. This blog post will walk you through the most common signs of water damage, its causes, and how to prevent it. By the end, you’ll be equipped to tackle water damage head-on, ensuring your home remains safe and sound.

Call 317-269-7319 for Professional Water Damage Drywall Replacement in Indianapolis

The Importance of Early Water Damage Detection

Water damage doesn’t just ruin your walls and ceilings; it can lead to severe structural and health issues if left untreated. For homeowners and property managers, knowing what to look for is crucial. Early detection allows for prompt repair, preventing minor issues from escalating into major problems.

Common Signs of Water Damage in Walls and Ceilings

Discoloration and Water Stains

One of the first indicators of water damage is discoloration. Look for brownish or yellowish stains on your walls and ceilings. Water stains often indicate that water has seeped through the layers of your drywall or ceiling material. Discoloration can appear in various patterns, from small spots to large patches. Pay attention to areas around windows, doors, and roof lines, as these are common entry points for water.

Peeling or Bubbling Paint

If you notice paint peeling or bubbling on your walls or ceilings, it’s a strong sign of water damage. When water seeps into the walls, it disrupts the adhesion between the paint and the surface, causing it to peel or bubble. This is not just an aesthetic issue. It indicates underlying moisture problems that need addressing. Ignoring peeling or bubbling paint can lead to more extensive damage over time.

Sagging or Bulging Areas

Sagging or bulging in the walls or ceilings is a clear sign of water accumulation. This occurs when water saturates the material, making it heavy and weak. If you see areas that appear to be drooping or bulging out, it’s essential to investigate immediately. These spots are at risk of collapsing, posing a danger to anyone in the vicinity.

Musty Odors

A musty smell is often a hidden sign of water damage. This odor usually indicates mold or mildew growth due to prolonged moisture exposure. Musty odors are commonly found in basements, attics, and other areas with poor ventilation. If you detect a persistent musty smell, it’s time to inspect your home for water damage.

Top Causes of Residential Water Damage

Leaking Pipes

Leaking pipes are one of the most widespread sources of water damage. Pipes can leak due to age, corrosion, or high water pressure. Regularly inspect your plumbing for signs of leaks, such as pooling water, corrosion, or unusual dampness. Promptly fixing leaks can prevent significant water damage.

Roof Leaks

Roof leaks are another major cause of water damage in ceilings. Damaged shingles, cracked flashings, or clogged gutters can allow water to seep into your home. Regular roof inspections, especially after storms, can help identify and fix leaks before they cause extensive damage.

Poor Ventilation

Poor ventilation can trap moisture inside your home, leading to water damage. Bathrooms, kitchens, and basements are particularly susceptible to this issue. Ensure proper ventilation by using exhaust fans, opening windows, and installing dehumidifiers in areas prone to moisture buildup.

Flood Damage

Flooding can cause severe water damage to your home. Whether it’s from a natural disaster or a plumbing issue, floods can saturate walls, ceilings, and floors. It’s crucial to address flood damage immediately to mitigate its effects. Professional water damage restoration services can help dry and repair affected areas.

The Dangers of Ignoring Water Damage

Mold Growth

Mold thrives in damp environments, making water-damaged areas a perfect breeding ground. Mold can cause respiratory issues, allergies, and other health problems. Ignoring water damage can exacerbate mold growth, making it harder and more expensive to remove. Early detection and prompt action are key to preventing mold infestations.

Structural Damage

Prolonged water exposure can weaken the structural integrity of your home. Water can rot wood, corrode metal, and compromise the stability of walls and ceilings. If left unchecked, structural damage can lead to costly repairs and even pose a safety risk to occupants. It’s essential to address water damage promptly to maintain your home’s stability.

Health Risks

Water damage can create an unhealthy living environment. Mold, mildew, and bacteria can thrive in damp conditions, leading to various health issues. Respiratory problems, skin irritation, and allergic reactions are common in homes with untreated water damage. Protect your health by addressing water damage as soon as it’s detected.

How to Detect and Confirm Water Damage

Using Moisture Meters

Moisture meters are handy tools for detecting water damage. These devices measure the moisture content in walls and ceilings, helping you identify hidden water issues. Regularly using a moisture meter can help you catch water damage early, even before it becomes visible. Consider investing in one for routine home maintenance.

Inspecting for Visible Signs

Conduct regular visual inspections of your home, looking for the common signs of water damage mentioned earlier. Pay special attention to areas prone to moisture, such as basements, bathrooms, and attics. Keep an eye out for discoloration, peeling paint, sagging areas, and musty odors. Early detection can save you from more extensive repairs down the line.

Seeking Professional Help

If you’re unsure about the extent of water damage or how to address it, seek professional help. Plumbing experts can assess the situation and recommend the best course of action for repairing the source of the water damage. Drywall contractors can remove and replace damaged drywall and ceilings, plus provide painting and texturing services. Professionals have the tools and expertise to thoroughly inspect and repair water damage, ensuring your home remains safe and dry.

Preventive Measures to Protect Against Water Damage

Regular Maintenance Checks

Regular maintenance checks are crucial in preventing water damage. Inspect your home’s plumbing, roof, and gutters regularly for signs of wear and tear. Promptly addressing minor issues can prevent them from escalating into major problems. Schedule routine inspections to keep your home in top condition.

Prompt Repairs of Leaks

Don’t delay in fixing leaks, no matter how minor they seem. Even small leaks can lead to significant water damage over time. Repairing leaks promptly can prevent water from seeping into walls and ceilings, reducing the risk of mold growth and structural damage.

Improving Home Ventilation

Improving ventilation can help prevent moisture buildup in your home. Use exhaust fans in bathrooms and kitchens, open windows to allow fresh air in, and install dehumidifiers in damp areas. Proper ventilation reduces the risk of water damage and creates a healthier living environment.

Waterproofing Strategies

Consider implementing waterproofing strategies to protect your home from water damage. Apply sealants to vulnerable areas, install sump pumps in basements, and ensure your home’s foundation is well-maintained. Waterproofing your home can provide an extra layer of protection against water damage, keeping your walls and ceilings dry and intact.

Taking Action to Safeguard Your Home

Water damage can be a homeowner’s worst nightmare, but early detection and prompt action can mitigate its effects. By understanding the common signs of water damage, its causes, and preventive measures, you can protect your home from costly repairs and health risks.

Don’t wait until it’s too late. Regular maintenance, prompt repairs, and proper ventilation are key to preventing water damage. If you suspect water damage in your home, seek professional help to assess and address the issue.

Did you find some water-damaged walls or ceilings in your home? Contact Drywall By AMFA at 317-269-7319 for expert drywall replacement services in Indianapolis, Indiana. We serve residential and commercial clients throughout the Greater Indy areas. Protect your home and enjoy peace of mind knowing your walls and ceilings are in good hands. Request an estimate, today.

Related Posts:

Tips for Drywall Water Damage Clean Up
How to Remove Water Damaged Drywall
The Meaning Behind the Color of Mold on Your Walls